
Introduction: The Flavorful Salsa Chicken
Looking for a weeknight dinner that’s bursting with vibrant flavor and incredibly easy to make? Our Creamy Salsa Chicken is precisely that – a wonderfully satisfying meal packed with the tangy sweetness of salsa balanced by the luxurious smoothness of cream cheese. This recipe is a fantastic way to elevate a simple chicken dinner, transforming it into something truly special. The combination of the classic taco seasoning, intensified by the slight heat and complexity of the salsa, creates a delightful explosion of taste in every bite. Adding the cream cheese is the key to unlocking that rich, velvety texture, making it feel undeniably decadent without requiring any complicated techniques. It’s a dish that’s both comforting and exciting, perfect for families or a quick and easy meal for yourself. This isn’t just chicken – it’s a flavor adventure! And because it comes together so quickly, you’ll have more time to enjoy it. Imagine serving it up with warm tortillas, a sprinkle of shredded cheese, and a dollop of sour cream. It’s a meal that will impress your guests or simply provide a moment of pure comfort. Whether you’re a seasoned cook or just starting to explore new recipes, this Creamy Salsa Chicken is sure to become a staple in your repertoire. delicious chicken recipes is where you can find plenty of other fantastic chicken ideas. This is one dish that’s guaranteed to become a favorite. Don’t underestimate the power of a simple, well-executed recipe – it’s truly magical. flavorful meals is a great source of inspiration. This recipe is also adaptable! You can easily swap out the salsa for a different flavor profile, like mango salsa or a spicy jalapeño salsa. salsa variations offer endless possibilities. Get ready to experience the perfect balance of sweet, savory, and creamy! easy weeknight dinners is a great resource for finding more quick and delicious meals.
Ingredients: What You’ll Need for This Delicious Dish
Get ready to create a truly satisfying and flavorful meal with this Creamy Salsa Chicken recipe. Here’s a comprehensive list of the ingredients you’ll need to bring this dish to life. You’ll find everything carefully selected to create a vibrant and tender chicken experience. It’s remarkably simple – the beauty of this recipe lies in its straightforward ingredients.
Here’s what you’ll require:
- Chicken: 2 pounds of boneless, skinless chicken breast (this provides the protein foundation – using breast ensures tender, juicy results).
- Salsa: 24 ounces of your favorite salsa! salsa – a chunky salsa offers the most robust flavor, but feel free to use a smoother one if you prefer. salsa varieties are vast, so choose your favorite!
- Cream Cheese: 8 ounces of low-fat cream cheese. cream cheese brands – low-fat allows the flavor to shine through, maintaining a balanced taste. cream cheese uses are varied, from baking to savory dishes.
- Seasoning:
- 2 tablespoons taco seasoning (the classic kick – taco seasoning recipes provide endless possibilities!).
- 1/2 teaspoon garlic powder – garlic powder benefits enhance the savory notes.
- 1/4 teaspoon onion powder – onion powder substitutes offers a convenient alternative.
- Oil: 1/4 cup of olive oil – olive oil types adds richness and helps with browning.
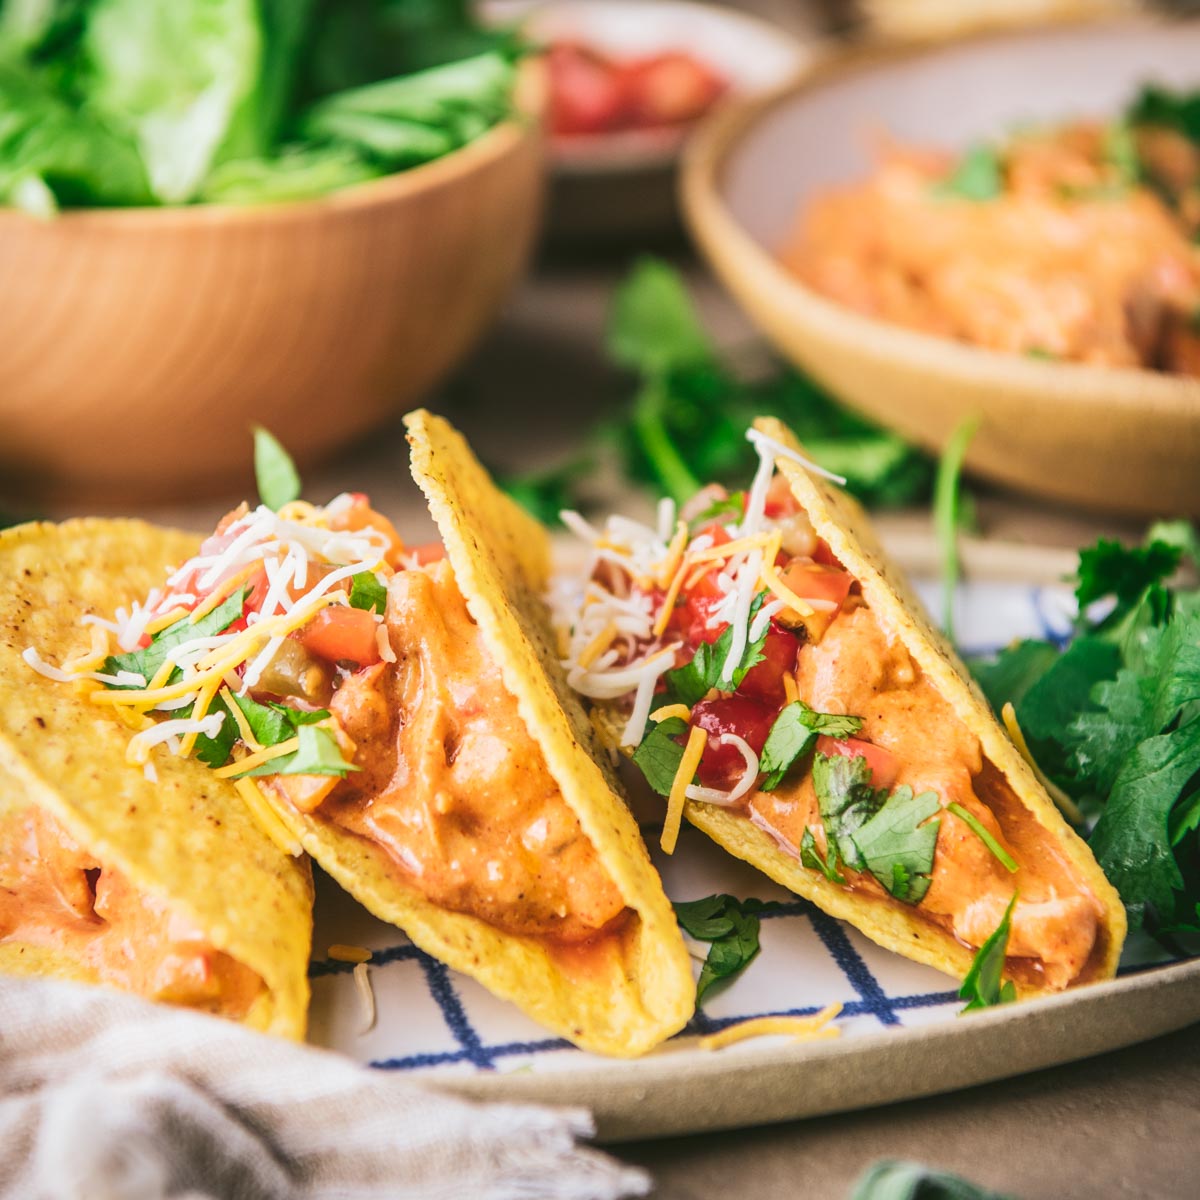
- Toppings (Optional, but Highly Recommended): These are just suggestions for taking your Creamy Salsa Chicken to the next level! topping combinations are nearly limitless. Shredded cheese cheddar cheese recipes is a classic. Fresh cilantro cilantro benefits adds a burst of freshness. Lettuce, sour cream, guacamole – guacamole recipes are easy to make and enhance the meal.
With these ingredients, you’re well on your way to creating a fantastic, easy dinner. Happy cooking!
Instructions: Step-by-Step Cooking Guide
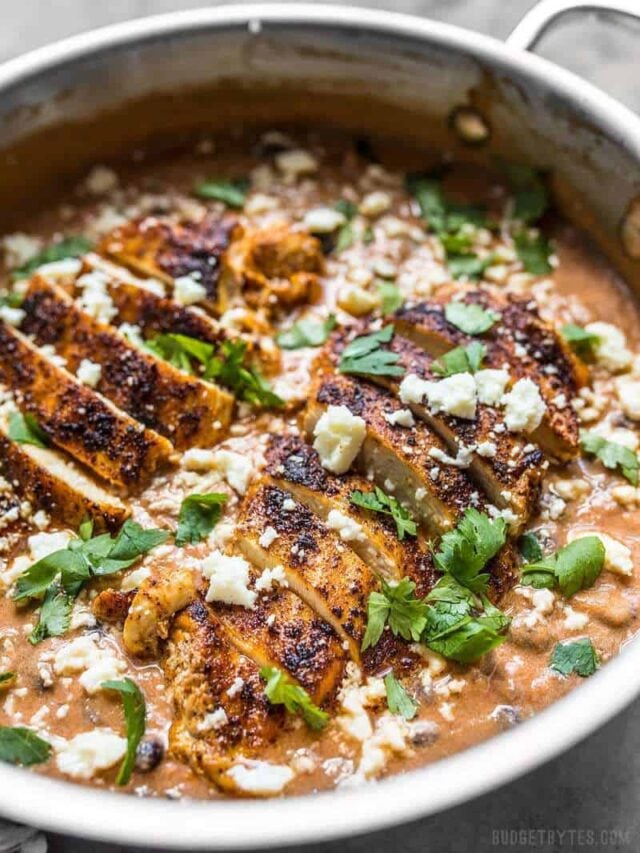
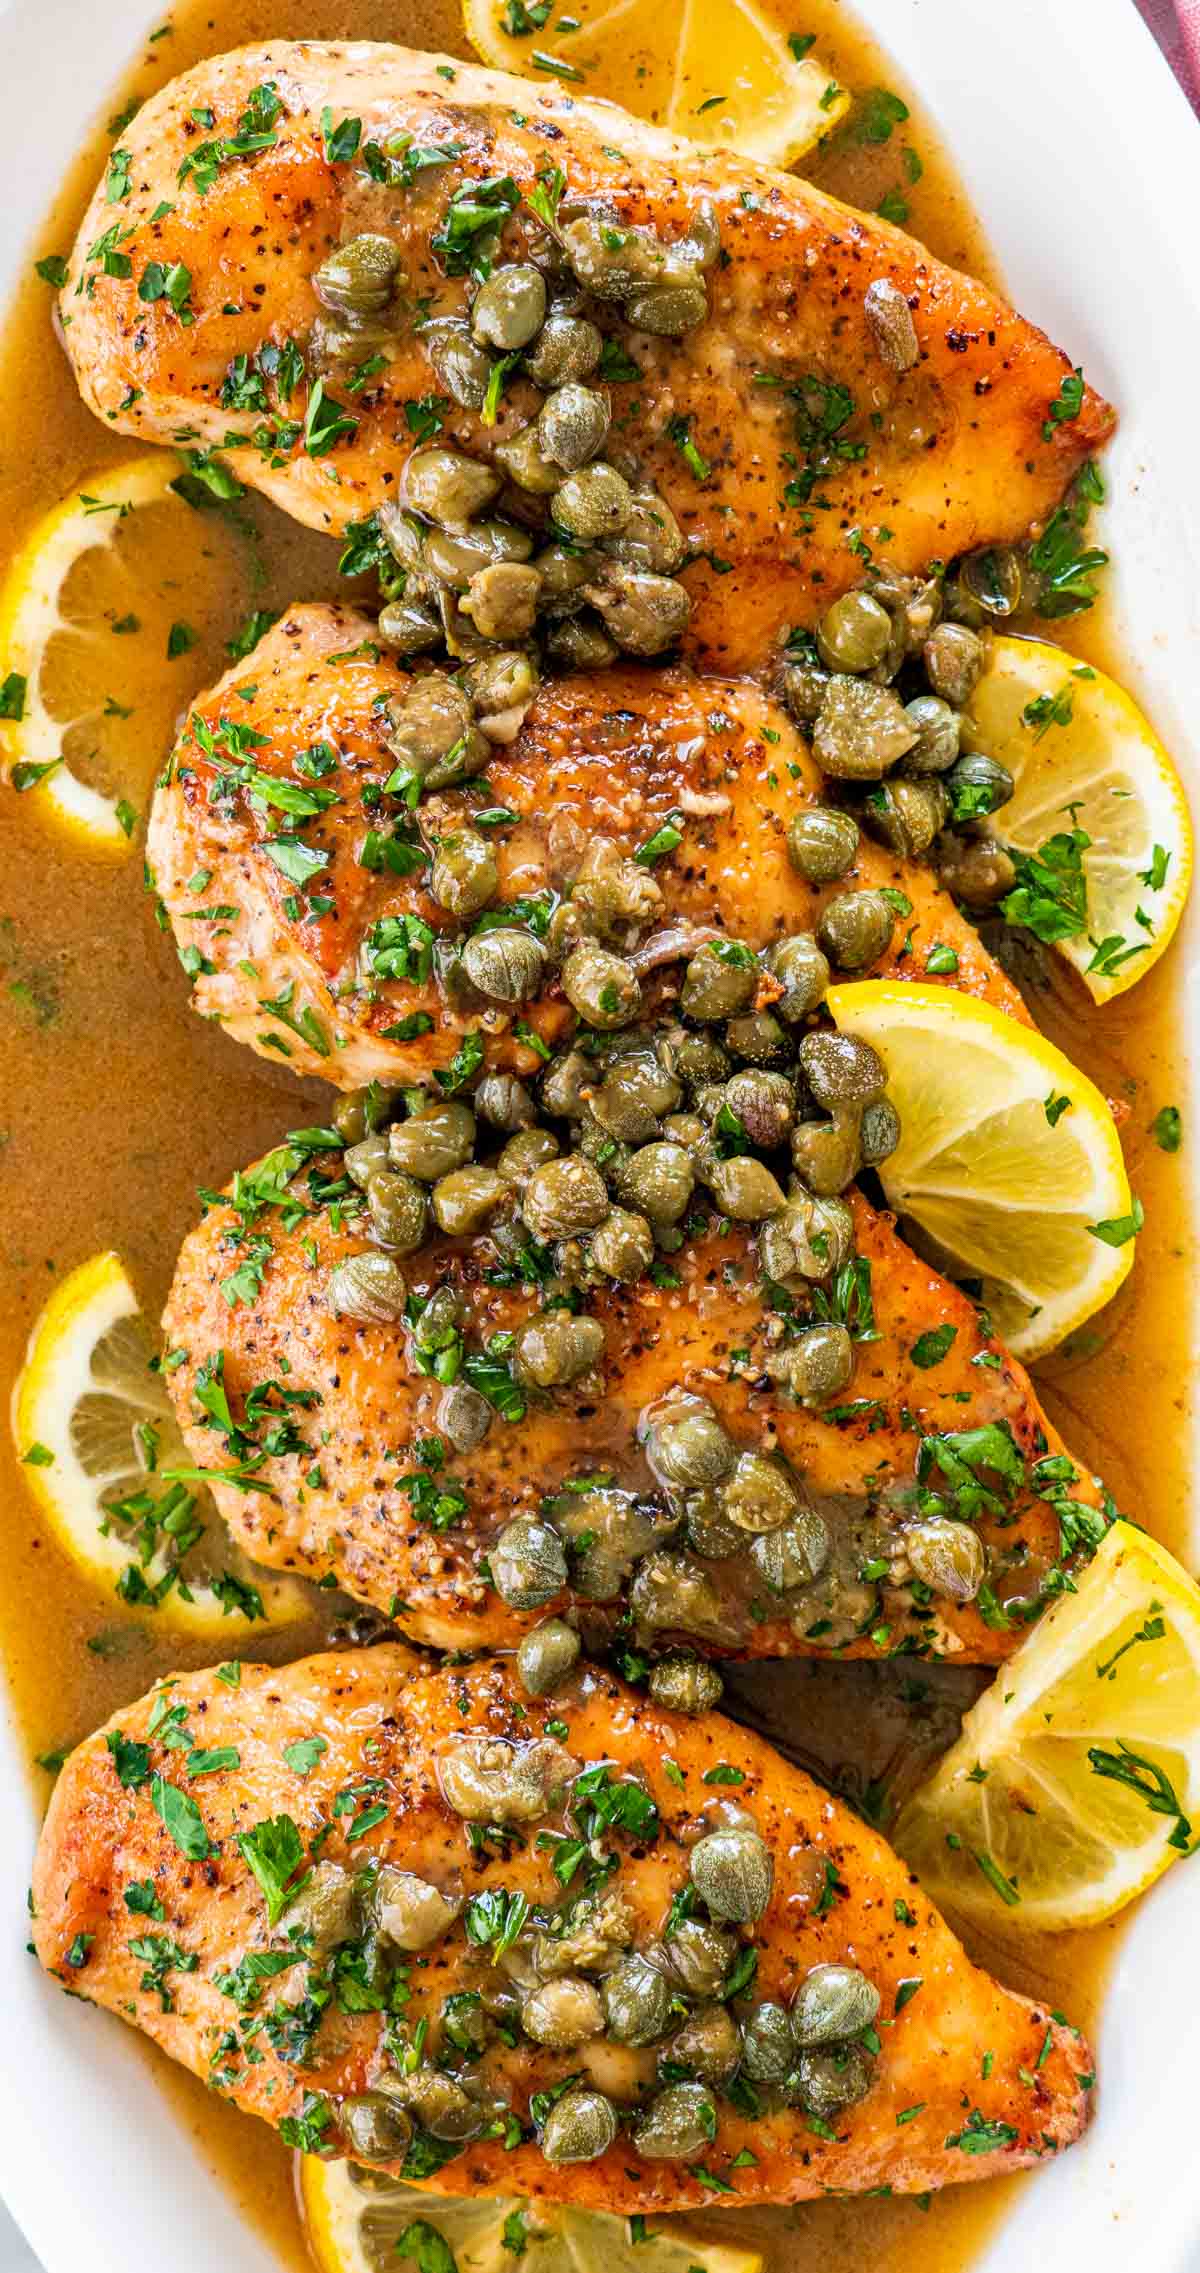
To create this incredibly flavorful and satisfying Creamy Salsa Chicken, follow these simple steps. First, heat 2 tablespoons of olive oil in a large skillet over medium-high heat. Add the 2 pounds of boneless, skinless chicken breasts to the skillet. Sear the chicken for approximately 1-2 minutes per side, until lightly browned. This initial searing step is key – it builds a fantastic base of flavor for the rest of the dish. Next, sprinkle in 2 tablespoons of taco seasoning, 1/2 teaspoon of garlic powder, and 1/4 teaspoon of onion powder. Stir continuously for about 1 minute, ensuring that the seasoning is evenly distributed across all the chicken pieces. This step helps to bloom the spices, intensifying their taste. Once the seasoning is incorporated, reduce the heat to medium and pour in 24 ounces of your favorite salsa. Gently push the chicken down into the salsa, ensuring that all sides are submerged. Bring the salsa to a gentle boil, then reduce the heat to low, cover the skillet, and simmer for approximately 15-20 minutes, or until the chicken is cooked through. The internal temperature of the chicken should reach 165°F (74°C). For an extra creamy texture, stir in 8 ounces of low-fat cream cheese during the last 5 minutes of simmering. Continue to stir until the cream cheese is completely melted and fully incorporated into the salsa and chicken. Don’t overheat the cream cheese, as it can curdle. Once the chicken is cooked through and the cream cheese is melted, remove the skillet from the heat. Let the chicken rest for a few minutes before serving. This allows the juices to redistribute, resulting in a more tender and flavorful chicken. To serve, shred the chicken using two forks. Alternatively, you can slice it if you prefer. Serve the Creamy Salsa Chicken over your favorite toppings, such as shredded cheese, cilantro, lettuce, sour cream, or guacamole. Consider serving it with warm tortillas for a truly authentic Mexican experience. For a quick and easy weeknight meal, this Creamy Salsa Chicken is a guaranteed winner. You can easily scale the recipe up or down depending on the number of servings you need. Experiment with different types of salsa to find your perfect flavor combination. Enjoy this delicious and incredibly versatile dish!
Toppings: Customize Your Creamy Salsa Chicken
Transform your Creamy Salsa Chicken from a fantastic main course into a truly personalized feast with a generous selection of toppings! The beauty of this dish lies in its adaptability, allowing you to tailor it to your exact preferences. Consider the layers of flavor you can build – from fresh, vibrant additions to richer, more indulgent choices.
Fresh & Bright: Start with classic toppings like shredded cheese – Monterey Jack, cheddar, or a blend – offers a gooey, melted richness. Fresh cilantro, chopped finely, adds a burst of herbaceous freshness that perfectly complements the tangy salsa. Sliced lettuce provides a crisp, cool counterpoint to the creamy sauce, offering a delightful textural element. A few slices of ripe avocado, whether diced or sliced, deliver creamy, healthy fats and a subtle buttery flavor, a fantastic addition to elevate the experience.
Flavor Boosts: For a serious flavor punch, consider incorporating some finely chopped red onion, which adds a subtle bite that cuts through the richness. A dollop of sour cream – or Greek yogurt for a tangier, healthier option – introduces a cooling element and a smooth texture. Jalapeños, seeded and minced, bring a welcome heat, allowing you to control the spice level to your liking. A sprinkle of lime zest adds a zesty brightness and aromatic complexity.
Rich & Decadent: If you’re craving a truly indulgent experience, a few tortilla chips, crumbled and added to the dish, offer a satisfying crunch and absorb some of the delicious sauce. A little bit of guacamole, whether homemade or store-bought, adds a creamy, vibrant green element and is a fantastic pairing. Don’t hesitate to experiment with a sprinkle of smoked paprika for a smoky depth of flavour. For a truly decadent addition, a small drizzle of honey can create an amazing sweet and savory combination.
Creative Combinations: Don’t be afraid to get creative! A small handful of toasted pumpkin seeds adds a nutty crunch. A few slices of roasted corn adds sweetness and a different texture. Finally, a squeeze of fresh lime juice just before serving brightens up all the flavors and ensures a truly vibrant and delicious meal. The possibilities are endless – let your taste buds guide you!
To make it even easier to put together your dream topping arrangement, consider preparing a small bowl with all your favorite toppings before you start cooking. This will save you valuable time and ensure a consistently enjoyable meal. Ultimately, Creamy Salsa Chicken is a blank canvas for your culinary creativity!
Video: Watch How It’s Made
Want to see exactly how to create this incredibly flavorful and satisfying Creamy Salsa Chicken? Check out this video! Watch the video This step-by-step guide will take you through the entire process, from searing the chicken to incorporating the creamy salsa and melted cream cheese. It’s surprisingly easy and perfect for a weeknight dinner. You’ll learn tips for getting the chicken perfectly tender and how to build layers of flavor. The video highlights key moments, like how to evenly coat the chicken with the seasoning blend – crucial for maximum taste. Pay close attention to the simmering stage, where the cream cheese melts beautifully and creates a luscious sauce. This video ensures you’ll nail it every time, transforming a simple chicken dish into a restaurant-quality meal. It’s a fantastic resource for beginner cooks and seasoned home chefs alike! We really focused on showing how to avoid overcooking the chicken – a common mistake! You can find similar videos of chicken recipes here or here.
Tips & Variations: Elevate Your Recipe
To truly transform your Creamy Salsa Chicken into a meal that’s both satisfying and impressive, let’s explore some fantastic variations and additions. Beyond the basic recipe, you can easily customize the flavors and textures to suit your preferences.
Spice It Up: If you enjoy a kick, don’t hesitate to add a pinch of cayenne pepper or a few dashes of your favorite hot sauce to the salsa while it’s simmering. For a smokier flavor, consider adding a teaspoon of chipotle powder – a little goes a long way! Alternatively, you could incorporate a finely diced jalapeño pepper for a fresh, vibrant heat. spice levels offers a fantastic guide to heat levels and flavor profiles, helping you tailor your dish perfectly.
Layer in Protein: While the chicken itself is a protein powerhouse, feel free to enhance the dish further. Shredded rotisserie chicken (about 2 cups) can be added in the last few minutes of cooking for a quicker meal. rotisserie chicken provides insights into sourcing and preparing rotisserie chicken effectively.
Creamy Enhancements: Experiment with different cream cheese varieties. A herb-infused cream cheese (like chive and garlic) will infuse a lovely aroma and taste. Alternatively, you could substitute a portion of the cream cheese with sour cream or Greek yogurt for a lighter, tangier version. dairy alternatives provides valuable information on dairy-free options, should you prefer.
Grain or Pasta Additions: To create a heartier meal, consider serving your Creamy Salsa Chicken over cooked rice, quinoa, or even a bed of pasta. A simple tomato pasta with a touch of chili flakes would complement the flavors beautifully. pasta pairings offers a comprehensive overview of pasta types and sauce pairings.
Topping Inspiration: Don’t limit yourself to the basic toppings! A sprinkle of toasted pumpkin seeds or pepitas adds a delightful crunch. Diced avocado provides a creamy counterpoint to the richness of the salsa. topping ideas highlights a range of delicious topping choices to complete your meal.
Slow Cooker Adaptation: For a truly effortless experience, this recipe can easily be adapted for the slow cooker. Simply combine all ingredients – chicken, salsa, cream cheese, and spices – in the slow cooker and cook on low for 6-8 hours or on high for 3-4 hours. slow cooker recipes offers a wealth of information regarding slow cooker usage.
By incorporating these variations, you can transform a simple Creamy Salsa Chicken into a versatile and memorable dish. Remember to adjust the seasonings to your liking – taste as you go and don’t be afraid to experiment!
 ,
, ,
, ,
,

 ,
, ,
, ,
,:max_bytes(150000):strip_icc()/nashville-hot-chicken-recipe-4687161-12-73440fd9683848a8952a4f5853bca67c.jpg)

 ,
, ,
, ,
, ,
, ,
, ,
, ,
,

 ,
, ,
, ,
,


 ,
, ,
, ,
,

 ,
,

 ,
, ,
,

 ,
, ,
,
