Introduction to Spatchcock Chicken: What is it and Why You’ll Love It
Spatchcock chicken, also known as butterflying, is a remarkable cooking technique that transforms a whole chicken into a spectacularly juicy and flavorful masterpiece. It’s far more than just flattening a chicken; it’s a method rooted in traditional Southern cooking, prioritizing even cooking and maximizing tenderness. The term ‘spatchcock’ itself comes from the way the chicken is prepared – you essentially ‘spatchcock’ it, meaning you cut along the backbone to lay the bird flat. This unlocks a whole world of possibilities, allowing you to achieve a perfectly cooked bird with crispy skin and incredibly moist meat.
Traditionally, cooking a whole chicken in a standard roasting pan often results in uneven cooking. The breast tends to dry out while the legs remain stubbornly undercooked. Spatchcocking dramatically changes this. By flattening the bird, you dramatically increase the surface area exposed to the heat, ensuring consistent cooking throughout. This technique is especially well-suited for larger chickens, as it evenly distributes the heat and minimizes the chances of dry breast meat. You’ll notice a considerable difference in the texture of the meat – it’s often described as succulent and almost fall-off-the-bone tender.
Beyond the technical aspects, spatchcocking offers a richer, more profound flavor experience. The extended cooking time, even with relatively high heat, allows the spices and aromatics to deeply penetrate the meat, resulting in a more intense and complex taste. It’s also significantly faster than roasting a whole chicken, often completing in around 60-90 minutes, depending on the size of the bird and your preferred level of doneness. The reduced cooking time means less risk of overcooking and a significantly enhanced flavor profile.
Furthermore, spatchcocking presents a beautiful presentation. The flat, streamlined shape of the bird is visually stunning, making it perfect for entertaining or special occasions. It’s an impressive culinary technique that yields exceptional results, proving that sometimes, the simplest methods produce the most extraordinary outcomes. Many cooks believe it to be one of the most effective ways to cook chicken, and it’s an essential technique to master for any serious home chef looking to elevate their poultry game. Consider exploring recipes for smoked spatchcock chicken – a truly exceptional experience. You’ll find that the results are truly rewarding, and you’ll quickly understand why this technique has been a cornerstone of Southern cuisine for generations. Don’t be intimidated – it’s easier than you think, and the payoff is a chicken that’s undeniably superior.
Understanding the Spatchcocking Technique – A Step-by-Step Guide
Spatchcocking, also known as butterflying, is a brilliant technique for cooking poultry, particularly chicken and turkey, incredibly evenly and quickly. It involves removing the backbone of the bird and laying it flat, exposing the entire surface of the meat to direct heat. This dramatically reduces cooking time and results in a beautifully browned, uniformly cooked bird – a true hallmark of classic American barbecue. It’s a technique that unlocks a whole new level of flavor and texture.
Here’s a detailed breakdown of the process:
Step 1: The Backbone Removal – The Key to Spatchcocking
Removing the backbone is arguably the most critical step. Without it, you’re essentially just roasting a chicken; with it, you’re creating a surface area that allows for rapid and consistent cooking. The goal is to completely remove the entire ridge of bones along the spine. This is typically done with a heavy-duty poultry shears – shears for poultry – which are specifically designed to cut through these tough bones with minimal effort. Alternatively, a sharp, long knife can be used, but shears are far more efficient. Position the chicken breast-side down, and use the shears to cut along both sides of the backbone, working from the tail end toward the neck. You’ll need to exert some pressure to get the shears to penetrate. Once you’ve cut through both sides, you can gently pry the backbone out. Don’t be afraid to use a little force – you’re aiming to separate the vertebrae from the ribs.
Step 2: Laying Flat – Revealing the Cooking Surface
Once the backbone is removed, the chicken will naturally start to lie flat. This is where the magic happens. The exposed breast and thighs are now directly in contact with the heat source, ensuring even cooking. Images of butterflying chicken showcase this transformation.
Step 3: Assessing and Adjusting – Ensuring Proper Flatness
After laying the chicken flat, take a moment to assess the fit. You want the bird to lie as flat as possible. If there’s a significant curve, you can gently press down on the breastbone with your hands – instructions on pressing the breastbone – to flatten it further. Be careful not to break the bone. A slight curve is acceptable, but aim for a smooth, even surface.
Step 4: Skin Preparation – Enhancing Flavor and Appearance
Once the chicken is laid flat, use your fingers to gently loosen the skin from the breast meat. This is particularly important because it allows the heat to penetrate the meat more effectively, creating a beautiful, crispy skin. Tips for crispy skin recommend massaging the skin to encourage fat release, which contributes to crispness.
Important Considerations:
- Sharp Tools: Using sharp shears or a knife is crucial for efficient backbone removal. Dull tools will require significantly more effort.
- Gentle Pressure: Avoid applying excessive force when removing the backbone. Patience and a firm, steady hand are key.
- Heat Management: Spatchcocking works best with direct heat. Grills, broilers, and cast iron skillets are excellent choices.
By following these steps, you’ll be well on your way to creating a truly exceptional spatchcocked chicken – a delicious testament to this classic technique.
Preparing Your Chicken: Essential Steps for Flavor and Texture
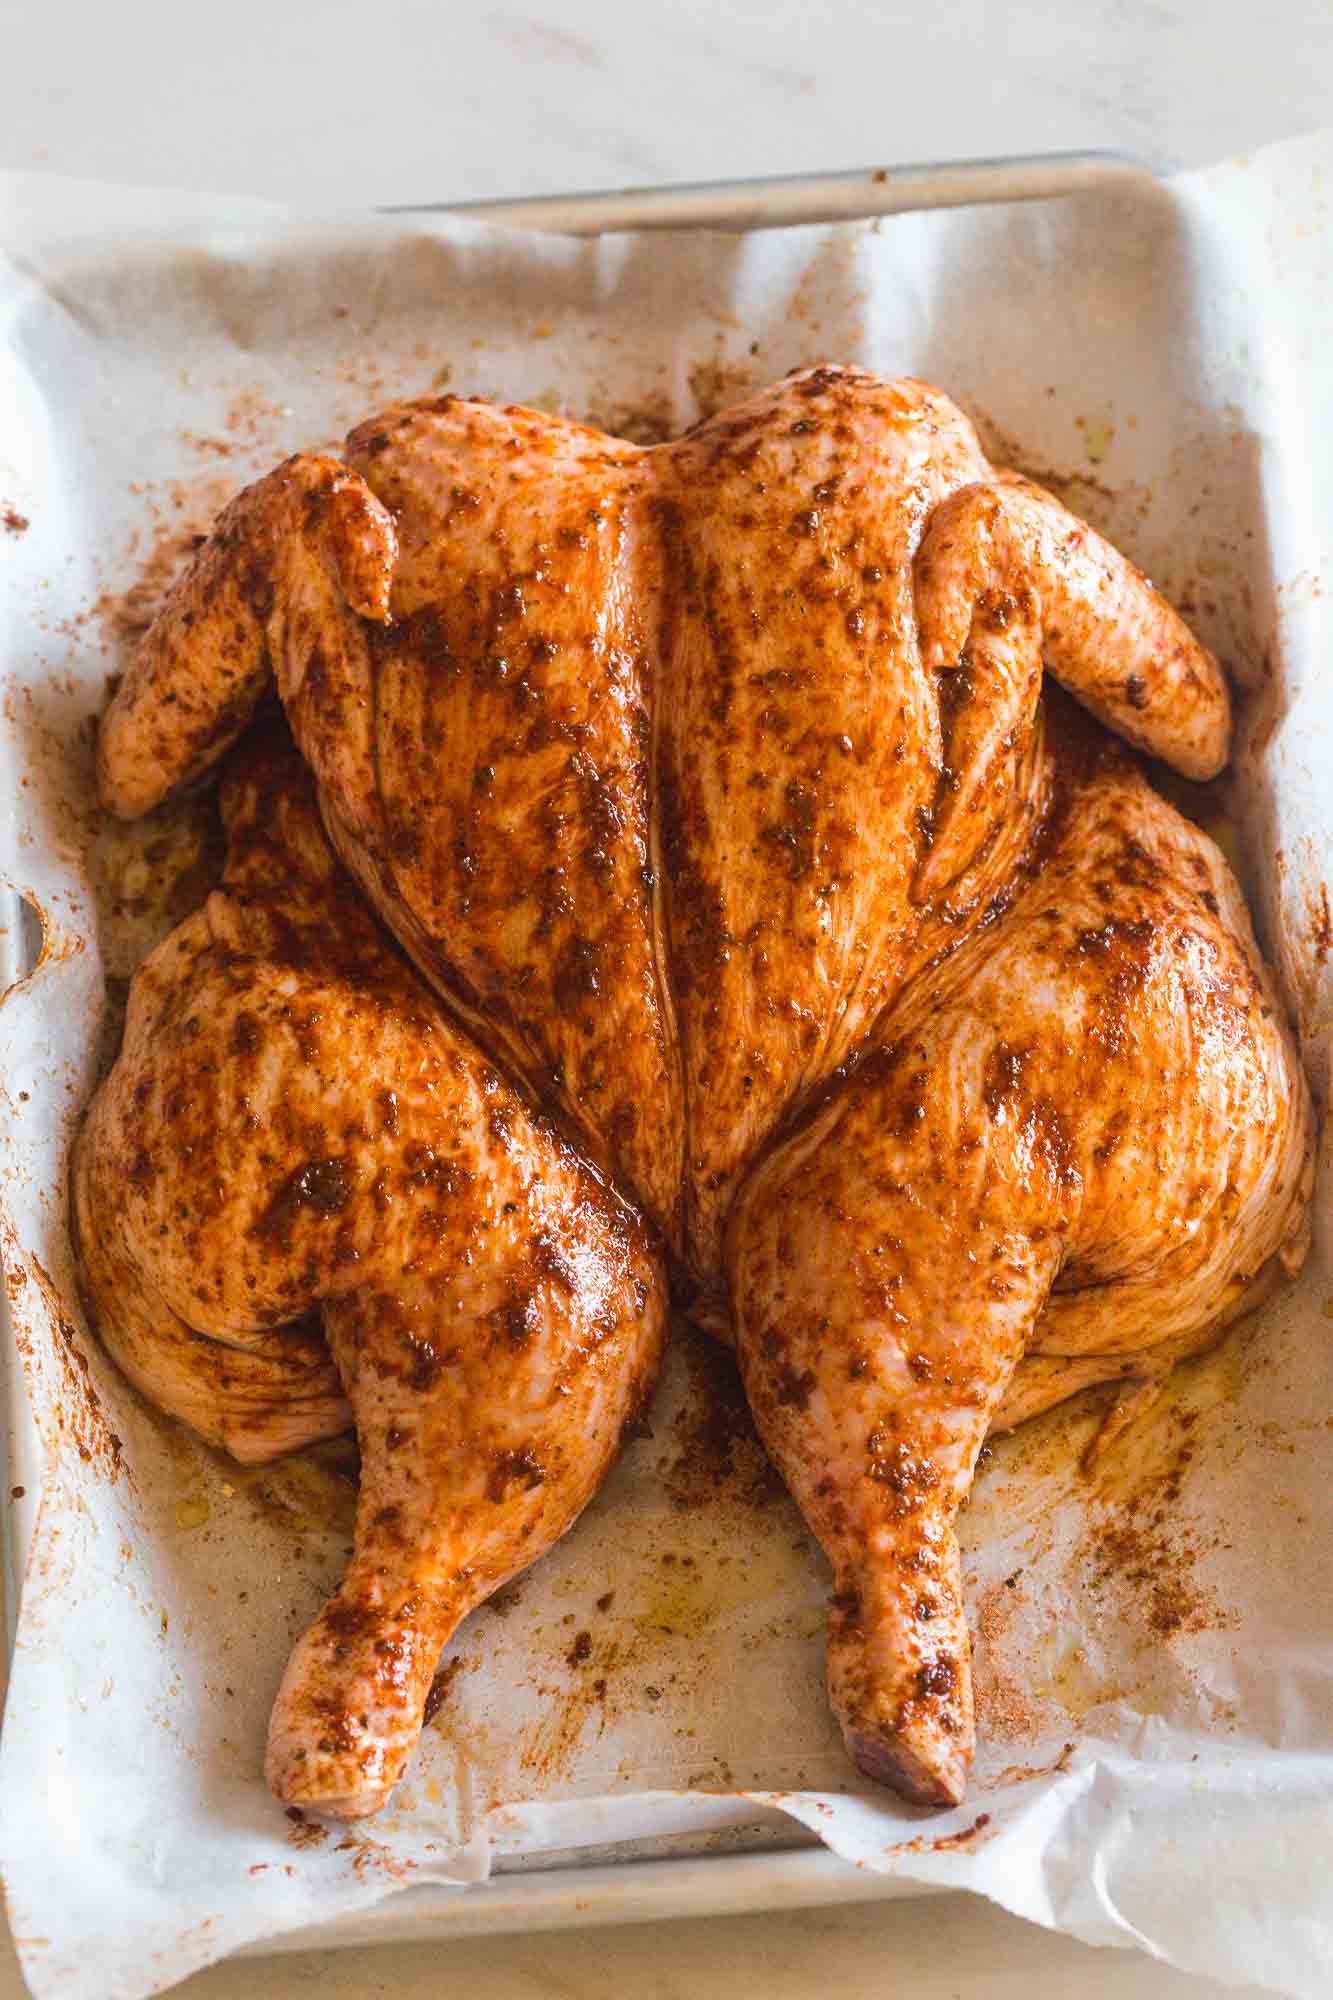
To truly unlock the potential of spatchcocked chicken – transforming it from a simple grilled piece of meat into a culinary masterpiece – begins with meticulous preparation. The goal isn’t just to cook the chicken; it’s to infuse it with maximum flavor and ensure a uniformly tender, juicy result. This section outlines the crucial steps involved, from initial trimming to strategic spice application.
1. Initial Inspection and Trimming: Before even considering the spatchcocking process, take a close look at your whole chicken. Remove any visible giblets, neck, or organs from the cavity. These can impart unwanted flavors if left inside. Also, inspect the skin for any loose or damaged areas. Gently trim away any patches of skin that appear bruised or excessively thick – this will ensure even cooking and a beautiful presentation. You can also remove a small amount of fat around the cavity opening, but avoid excessive trimming, as this fat contributes to flavor and helps keep the chicken moist. The skin should be firm and taut, a good indicator of quality.
2. Strategic Spice Application – The Key to Deep Flavor: This is where the magic truly happens. Simply rubbing the chicken with salt and pepper is insufficient for a truly exceptional spatchcocked bird. Instead, we’ll utilize a layered approach.
-
Dry Rub Base: Begin with a generous application of a flavorful dry rub. A classic blend might include smoked paprika for a smoky depth, coarse black pepper for a robust bite, garlic powder for aromatic complexity, and onion powder to round out the flavors. Adjust the proportions to your liking – some prefer more paprika, while others lean toward garlic. A touch of brown sugar can also add a subtle sweetness and aid in browning.
-
Under-the-Skin Massage: Once the dry rub is applied generously, use your fingers – not a fork – to work the spices deeply into the chicken’s skin. This is critical. Using your fingers, gently lift the skin away from the breast meat, creating a pocket. Then, massage the spices directly into this pocket. This ensures that the seasoning penetrates every layer of the meat, resulting in a consistently flavored bird. Focus particularly on the breast meat, as it tends to dry out more easily. Don’t be afraid to apply pressure; you want to essentially work the spices into the muscle tissue. Aim for at least 30 seconds to a minute of focused massaging.
-
Salt is Crucial: Remember, salt doesn’t just enhance flavor; it also draws moisture to the surface of the meat, which helps to keep the chicken moist during cooking. Make sure to use a kosher salt or sea salt for optimal results.
-
Resting Time: After applying the rub and massaging the spices, allow the chicken to rest at room temperature for at least 30 minutes. This allows the meat to begin absorbing the flavors and helps to even out the temperature. Covering loosely with plastic wrap is sufficient.
By following these detailed steps – paying particular attention to the under-skin spice application – you’ll transform your spatchcocked chicken into a remarkably flavorful and juicy masterpiece, a testament to the power of thoughtful preparation.
Grilling Your Spatchcock Chicken: Temperature, Time, and Wood Choices
Mastering the grilling of your spatchcock chicken is crucial for achieving that iconic American BBQ flavor and perfectly cooked meat. The process begins with a foundational understanding of heat management and wood selection. The initial grilling phase, conducted at a consistent 275 degrees Fahrenheit (135 degrees Celsius), is designed for slow, even cooking. This low-temperature cooking ensures that the chicken’s internal temperature rises gradually, preventing the exterior from burning before the meat is fully cooked. A good rule of thumb for this stage is approximately 80-90 minutes, but always rely on a reliable meat thermometer – aiming for an internal temperature of 165°F (74°C) in the thickest part of the thigh. Checking the temperature frequently is essential to avoid overcooking. The type of wood you choose dramatically impacts the flavor profile of your spatchcock chicken. Different woods contribute distinct smoky notes, and experimentation is key to discovering your preference. For a classic, robust American BBQ flavor, hickory is a consistently excellent choice. Its strong, assertive smoke adds a deep, caramelized sweetness. Another superb option is oak, which imparts a subtle, earthy smoke that complements the chicken beautifully. Mesquite, known for its intense, almost peppery smoke, is a powerful choice, but it can easily overpower the chicken if used excessively. Cherry wood offers a sweeter, fruitier smoke, creating a complex and nuanced flavor. Apple wood provides a gentle, mellow smoke with hints of vanilla, making it a fantastic option for a milder flavor. Alder wood, commonly used for salmon, also works surprisingly well with chicken, offering a clean, delicate smoke. Avoid using woods with strong, spicy flavors like pine or juniper, as they can clash with the chicken’s taste. Once the chicken reaches 165°F (74°C), it’s time to transition to a higher heat stage – approximately 450°F (232°C) – for the final sear. This rapid increase in temperature is what creates the coveted crispy skin. During this searing stage, you’ll reduce the cooking time to around 10-15 minutes, continuously rotating the chicken to ensure even browning. Maintaining the 450°F heat is vital; if the heat is too low, the skin won’t crisp up properly. If you have a pellet grill, maintaining a consistent temperature is even more crucial. For a charcoal grill, managing the amount of hot coals you use is key. Avoid piling all the coals on one side of the grill, as this will lead to uneven cooking. Adjusting the vents on your grill allows you to control the airflow and, consequently, the heat level. Monitoring the internal temperature of the chicken remains your best indicator of doneness. Remember, a well-cooked spatchcock chicken should be juicy and tender, with a beautifully browned, crispy skin. Don’t be afraid to experiment with different wood combinations and searing times to tailor the flavor to your liking. Wood Smoke Flavor Profiles is a helpful resource for understanding the nuances of different wood types. Charcoal Grill Temperature Guide provides further details on temperature control. Pellet Grill Temperature Control offers specific guidance for pellet grill users. Finally, keep in mind that altitude can affect cooking times; higher altitudes typically require longer cooking times. Cooking Chicken at High Altitude offers insights into adjusting your cooking process for different altitudes.
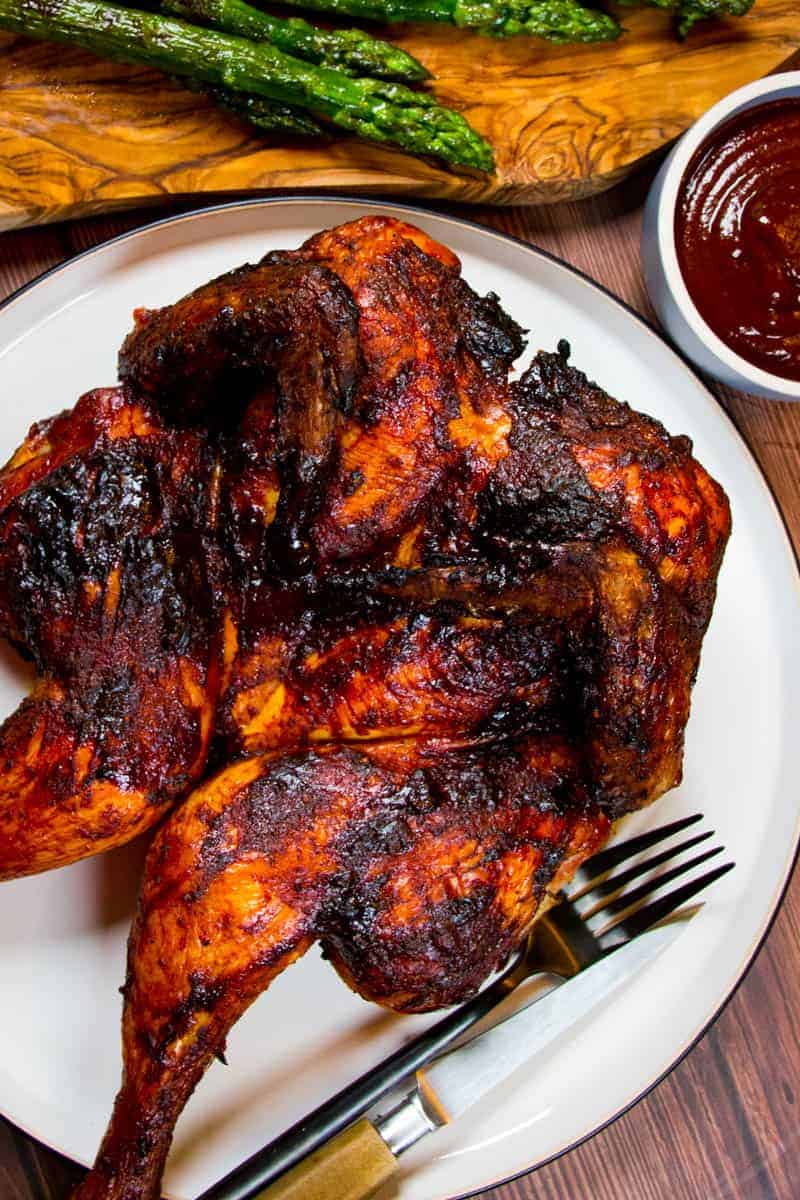
The Sear: Achieving Crispy Skin for the Perfect Finish
The final stage of spatchcocking – achieving that irresistibly crispy skin – is often the most crucial and surprisingly complex. It’s about more than just grilling; it’s about controlled heat, strategic moisture removal, and understanding the science of Maillard reaction, the chemical process responsible for browning and creating those deeply savory flavors. Let’s delve into the techniques for mastering this critical element.
Understanding the Science of Crispy Skin
Before we jump into techniques, it’s helpful to grasp what’s happening. The skin of a chicken is primarily composed of collagen and fat. As the chicken cooks, the heat causes the collagen to convert to gelatin, releasing moisture. If this moisture isn’t managed, the skin won’t dry out sufficiently to brown properly. Conversely, excessive heat will burn the skin before it achieves that beautiful, crackling texture. The Maillard reaction, a non-enzymatic browning process, relies on amino acids and reducing sugars to create complex flavors and aromas. This reaction thrives in a dry environment with moderate heat – the conditions we’re aiming to create.
Techniques for Achieving Maximum Crispness
-
The Move to Higher Heat: Once the chicken has been grilling for approximately 60-75 minutes (depending on size and heat), it’s time to crank up the heat. This requires a shift from indirect grilling – where the heat source is on one side of the grill – to direct grilling. A hotter surface rapidly evaporates the moisture from the skin, promoting browning. Many experienced grillers move the chicken directly over the hottest part of the charcoal or gas burner. Consider using a searing zone on your gas grill to achieve this. High-heat searing is often recommended for maximizing this effect.
-
The Rotate and Monitor Technique: Constant rotation is key. As soon as you’ve positioned the chicken over the direct heat, rotate it 45 to 90 degrees every 2-3 minutes. This ensures that all sides are exposed to the direct heat, preventing localized over-browning and promoting even crisping. A thermometer to monitor the skin temperature is also helpful. The skin should reach approximately 180-190°F for optimal crispness. Searing tips can offer useful guidance on this process.
-
Strategic Moisture Removal (Carefully!): While you want to encourage moisture evaporation, you don’t want to remove all the moisture. A very light spritz of apple cider vinegar or water immediately before the final sear can actually help to create a steam barrier, which further enhances browning. However, this is a delicate balance. Too much moisture, and you’ll end up with steamed skin, not crispy skin. Using vinegar on grilled chicken is worth exploring.
-
Resting is Crucial: After the final sear, transfer the chicken to a cutting board and allow it to rest, loosely tented with foil, for at least 10 minutes. Resting allows the juices to redistribute throughout the meat, resulting in a more tender and flavorful bird. It also allows the skin to firm up slightly, contributing to a crisper texture upon the next serving. Resting meat after cooking provides insight into this essential step.
-
Post-Grill Finish (Optional): For truly exceptional results, consider a brief finish under a broiler. This concentrates the heat and dramatically increases the browning potential. Watch carefully to prevent burning. Broiling techniques for chicken offers valuable tips for achieving a perfect sear.
Resting and Carving: Revealing the Juicy Inside
Once your spatchcocked chicken has reached an internal temperature of 165°F (74°C) – ensuring that the thickest part of the thigh registers this heat – the critical next step is to allow it to rest. This seemingly simple action is absolutely vital for achieving the most succulent and juicy results. During the grilling process, a significant amount of moisture is lost from the meat, primarily through evaporation. The muscle fibers, which have been contracting and working throughout the cooking process, actively push this moisture away. Removing the chicken from the heat source immediately stops this process, allowing the fibers to reabsorb the juices that have been pushed outwards.
Think of it like squeezing a sponge; when you apply pressure, the water is forced out. If you then release the pressure, the sponge will readily draw the water back in. Your chicken’s muscles are essentially the same. The longer the rest, the more effectively the muscle fibers can draw that moisture back towards the center, resulting in a far more tender and flavorful piece of meat.
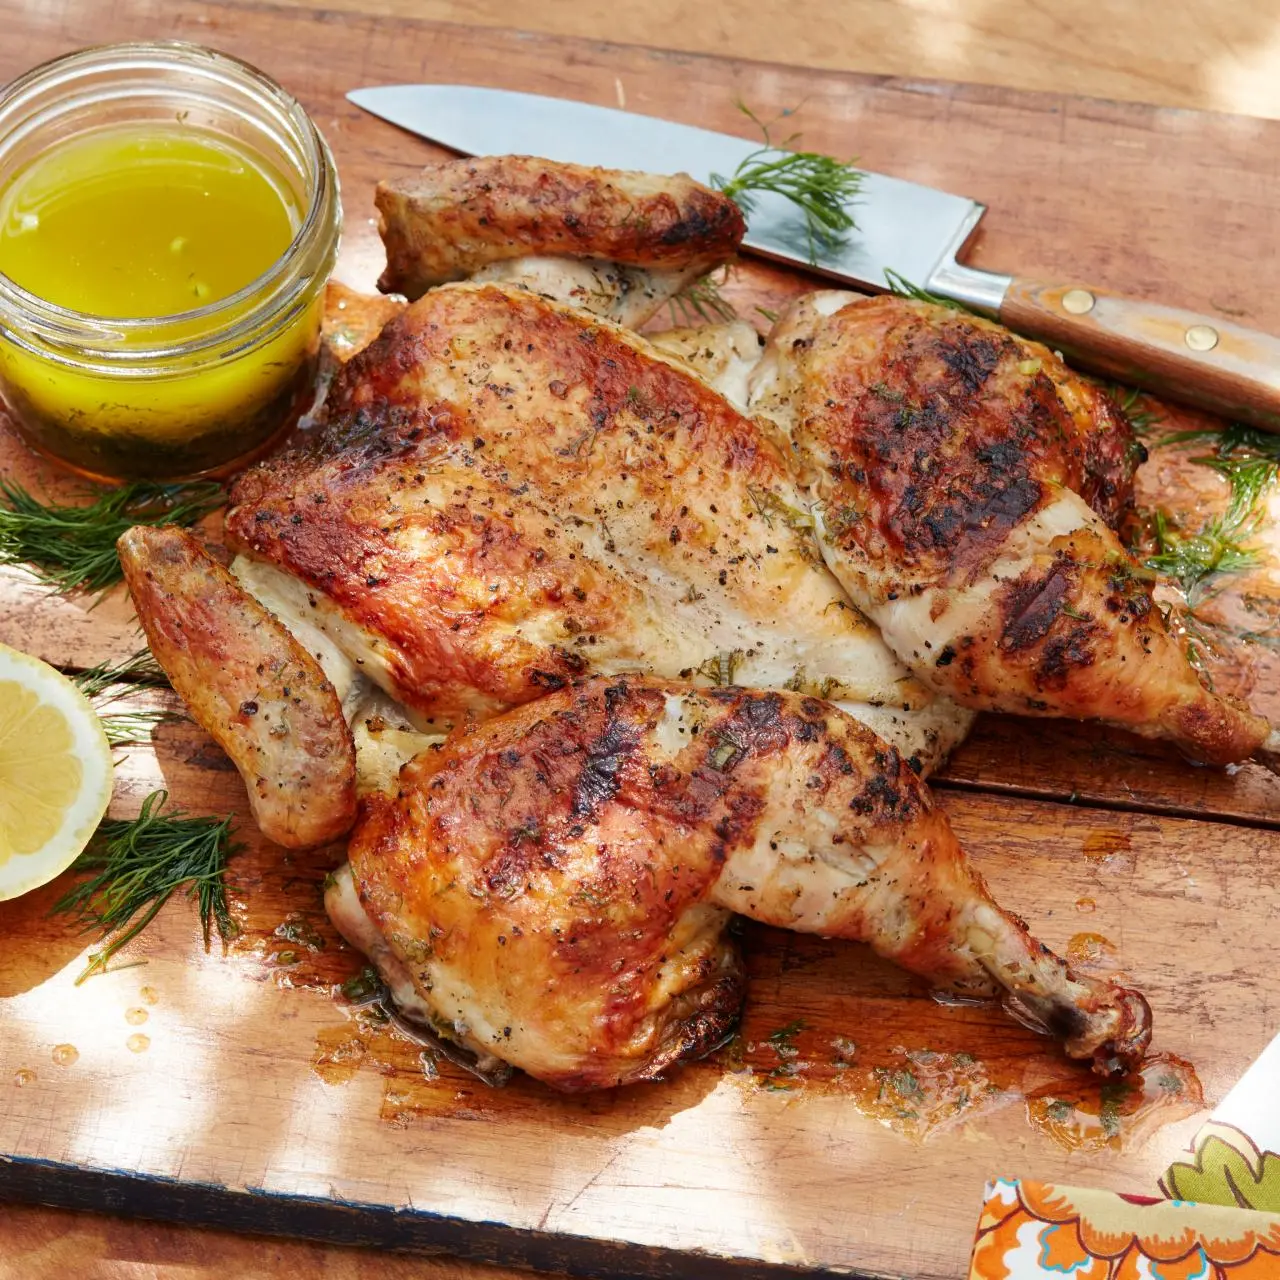
The Carving Process – Unlocking the Juices
After the resting period, you’ll want to carve your spatchcocked chicken. The beauty of this technique is that it breaks apart the meat along the natural seams created by removing the backbone. This doesn’t just make it easier to eat; it also maximizes the distribution of those reabsorbed juices. Use a sharp carving knife – a carving knife with a long, thin blade is ideal – to make clean, precise cuts. Start by slicing through the breast meat, working from the thickest part towards the bone. Then, cut across the thigh meat, again following the natural seams. Don’t saw at the meat; instead, use a rocking motion to slice through the fibers.
Tips for a Perfect Carve:
- Resting Time: Aim for at least 10-15 minutes of resting time after removing the chicken from the grill. For a truly exceptional result, consider allowing it to rest for 20-30 minutes – the longer rest generally equates to a more intensely flavored and tender bird.
- Tent with Foil: During the resting period, loosely tent the chicken with aluminum foil. This helps to retain heat and keeps the meat moist. Don’t wrap it tightly, as this will steam the surface and compromise the crispness if you plan to sear it again.
- Don’t Cut Too Deep: When carving, avoid cutting all the way through the meat. This will cause the juices to escape. You want to slice only as far as necessary to create individual pieces.
By following these steps – allowing ample resting time and executing a careful carving – you’ll fully unlock the juicy, flavorful potential of your perfectly spatchcocked chicken. Understanding Meat Thermometry provides a great guide for accurately checking the temperature of your cooked chicken, and Tips for Perfect Carving offers practical advice on carving techniques. The USDA’s Food Safety and Inspection Service has guidelines on safe internal temperatures for poultry.
Storage and Leftovers: Keeping Your Spatchcock Chicken Fresh
Proper storage is key to preserving the incredible flavor and juicy texture of your perfectly grilled spatchcock chicken. When it comes to leftovers, you have several options, each with its own advantages. Allowing the chicken to cool slightly before storing will help maintain its quality.
Short-Term Storage (1-3 Days):
For the best flavor retention, wrap the leftover spatchcock chicken tightly in plastic wrap, pressing the wrap directly onto the surface to minimize air exposure. Then, place the wrapped chicken in an airtight container or a zip-top bag. Store in the refrigerator at a temperature of 40°F (4°C) or below. This will keep it fresh for up to 3 days. It’s important to note that even with proper storage, the texture of the chicken will naturally begin to change over time – it will become slightly drier. However, it will still be perfectly safe to eat.
Longer-Term Storage (Freezing):
Freezing is an excellent way to extend the shelf life of spatchcock chicken, though it does affect the texture. To freeze your chicken properly, first, allow it to cool completely. Then, divide the chicken into portions that are convenient for you to use later. Wrap each portion individually in plastic wrap, ensuring there are no air pockets. Finally, place the wrapped portions in a freezer-safe container or zip-top bag. Remove as much air as possible before sealing.
For optimal quality, freeze the chicken for up to 6 months. When you’re ready to use it, thaw the chicken completely in the refrigerator for 24-48 hours. To speed up the thawing process, you can submerge the packaged chicken in cold water – changing the water every 30 minutes to maintain a cold temperature. Once thawed, gently reheat the chicken using your preferred method – oven, skillet, or instant pot. Be aware that frozen chicken may develop some ice crystals, which can subtly alter the texture. It’s best to use it for quick meals like sandwiches, salads, or tacos. Don’t refreeze thawed chicken.
Tips for Maintaining Quality:
- Cool Quickly: As mentioned earlier, cooling the chicken quickly prevents bacterial growth and helps preserve flavor. You can place the hot chicken in an ice bath for a faster cooling process.
- Proper Packaging: Airtight packaging is crucial for preventing freezer burn and maintaining moisture.
- Don’t Overheat: Overheating leftover chicken can further dry it out. Reheat it gently to preserve its juiciness.
- Label and Date: Always label and date your leftovers for easy identification.
Reheating Suggestions:
Reheating spatchcock chicken requires a gentle approach. Avoid high heat, which can dry it out. Consider these methods:
- Oven: Cover the chicken with foil and bake at 350°F (175°C) until heated through – typically 20-30 minutes, depending on the size of the pieces.
- Skillet: Sear the chicken in a skillet over medium heat, adding a little broth or liquid to create steam.
- Instant Pot: Cook the chicken in the Instant Pot with a cup of broth for a juicy and tender result.
Regardless of the reheating method, remember that the texture will be slightly different than the freshly grilled chicken. However, with a little care and attention, you can still enjoy delicious leftovers. To learn more about food safety and proper handling of leftovers, you can consult resources from organizations like the USDA https://www.usda.gov/
Nutritional Information: Calories, Macros, and Vitamins
Understanding the nutritional profile of spatchcock chicken is key to enjoying this American BBQ classic responsibly. Let’s break down the approximate nutritional information per serving (assuming a 6-8 ounce serving of cooked spatchcock chicken – approximately 170-220 grams). It’s important to note that these figures are estimates and can vary based on factors such as the size of the chicken, the type of wood used for grilling, and any added marinades or seasonings.
Approximate Nutritional Breakdown (per 6.8 oz / 197g serving):
- Calories: 270 – 340 kcal. This range reflects the significant fat content from the skin, particularly when grilled to a crispy finish. The fat contributes substantially to the overall calorie count, making spatchcock chicken a relatively rich meal. For those monitoring calorie intake, controlling the skin crispness is an important consideration.
- Protein: 28 – 34 grams. Chicken is a lean protein source, and spatchcocking – removing the backbone and air-drying the bird – actually increases the moisture content within the meat, which means it’s more flavorful and easier to cook through, while still providing a substantial protein boost. This makes spatchcock chicken a fantastic choice for muscle repair and satiety. Protein Sources is a valuable resource for more information.
- Fat: 18 – 24 grams. This is where spatchcock chicken truly stands out. The skin, when grilled to a golden-brown, contributes a significant portion of the total fat. While some people enjoy the crispy skin, it’s crucial to be aware of the fat content. Approximately 10-14g is saturated fat. Using leaner cuts of chicken during preparation could help reduce this, although the grilling process itself will inevitably add some fat. Understanding Saturated Fats is a helpful article.
- Carbohydrates: 0 – 3 grams. Chicken is naturally very low in carbohydrates. The grilled skin and any added seasonings contribute negligible amounts. This makes spatchcock chicken a great option for individuals following low-carb diets. Low Carb Diets provides a useful overview.
- Vitamin A: 500 – 800 IU. Chicken is a good source of Vitamin A, which is essential for vision, immune function, and cell growth. The exact amount depends on the chicken’s diet – chickens raised on feed rich in vitamin A will provide a higher concentration.
- Vitamin B6: 0.6 – 1.0 mg. This B vitamin is crucial for brain development and function, and it helps the body metabolize proteins and carbohydrates. Chicken is an excellent source of Vitamin B6.
- Vitamin E: 0.6 – 1.0 mg. Vitamin E is an antioxidant that protects cells from damage. Chicken contains a moderate amount of Vitamin E.
- Iron: 2.5 – 3.5 mg. Chicken is a decent source of heme iron, the type of iron that is most easily absorbed by the body. [Iron Absorption](https://www.nhs.uk/conditions/iron-deficiency- anaemia/introduction/) explains the importance of iron and how to boost absorption.
- Potassium: 130 – 180 mg. This essential mineral helps regulate blood pressure and muscle contractions. Chicken provides a moderate amount of potassium.
Important Note: The grilling process itself can introduce additional nutrients through the Maillard reaction – the chemical reaction between amino acids and sugars that creates complex flavors and melanoidins, which are rich in antioxidants. However, these are secondary benefits to the primary nutritional content of the chicken.
To further enhance the nutritional value, consider using lean cuts of chicken, marinating it in herbs and spices, and grilling over wood that imparts subtle flavors (like hickory or applewood) rather than relying heavily on added fats and seasonings. Always prioritize fresh, whole ingredients for the best flavor and nutritional benefits. Choosing Healthy Grilling Oils is also important to keep in mind.
 ,
, ,
,