Introduction: The Ultimate Easy Grilled Chicken Recipe
Grilled Honey Mustard Chicken Breasts – a revelation for busy weeknights! Forget complicated recipes and hours spent in the kitchen. This recipe delivers unbelievably tender, juicy chicken breasts bursting with sweet and tangy honey mustard flavor, all achieved with minimal effort. It’s a dish that truly exemplifies ‘easy’ without sacrificing taste – a perfect solution for those evenings when you crave a delicious meal but lack the time or inclination for elaborate cooking. This isn’t just about grilling chicken; it’s about crafting a genuinely satisfying and memorable meal with remarkable simplicity. Think perfectly browned chicken, a subtle smoky char from the grill, and that incredible honey mustard glaze that clings to every bite. The beauty of this recipe lies in its ability to transform humble chicken breasts into something extraordinary, making it a staple for weeknight dinners, barbecues, or even impressive gatherings where you want to make a statement without the stress. The core concept revolves around a carefully balanced marinade, a precise grilling technique, and a brief resting period – three simple steps that unlock the full potential of this dish. You’ll find yourself consistently returning to this recipe, not just for its remarkable taste but also for its incredible ease. It’s a dish that speaks to the modern home cook – someone who appreciates quality food but recognizes the importance of efficiency and convenience. This isn’t a complicated recipe; it’s a testament to the power of thoughtful ingredients and precise execution. Furthermore, this recipe lends itself exceptionally well to meal prepping – you can prepare the marinade and marinate the chicken breasts in advance, streamlining your weeknight routine even further. The resulting chicken is exceptionally versatile; you can serve it as a main course, slice it into salads, or utilize it in sandwiches. The tender texture and vibrant flavor profile make it an ideal choice for a wide range of dishes. It’s a recipe that effortlessly elevates simple ingredients to something truly special. Flavorful Chicken is often intimidating but this method demonstrates that you don’t need to be a master chef to create outstanding results. It’s a recipe that embodies the spirit of approachable, delicious cooking – a true testament to the fact that incredible meals can be created with minimal effort. Honey Mustard Marinades have been a staple in kitchens for decades, but this particular iteration is a modern classic, perfected through careful consideration of both taste and texture. Finally, this recipe isn’t just about the food; it’s about creating an experience – a moment of enjoyment and connection around a shared meal. Grilling Techniques are critical to this recipe’s success, ensuring perfectly cooked chicken every time.
Ingredients: Everything You Need for Flavorful Chicken
To create these incredibly delicious grilled honey mustard chicken breasts, you’ll need a collection of high-quality ingredients that will elevate the dish from simple to spectacular. Let’s break down everything you’ll require, ensuring a truly memorable meal.
For the Marinade – The Heart of the Flavor:
- Honey (1/2 cup): We’re using a good quality honey, ideally one with a rich, floral flavor. The sweetness is key to balancing the tang of the mustard, creating a beautiful glaze as it caramelizes on the grill. Honey offers a huge selection of honeys, each with its own distinct character.
- Dijon Mustard (2 tablespoons): Dijon mustard adds a sharp, complex flavor profile that’s essential for the honey mustard combination. A mature, well-aged Dijon will give you the best results. Dijon Mustard’s range of dijon mustards will deliver the perfect flavour for your meal.
- Whole Grain Mustard (1 tablespoon): Adding whole grain mustard intensifies the mustard flavor and provides a delightful texture. Sub with an extra tablespoon of Dijon mustard if preferred. Whole Grain Mustard offers an enormous selection of whole grain mustards.
- Extra Virgin Olive Oil (1 tablespoon): A generous amount of extra virgin olive oil not only contributes to the richness of the marinade but also helps the honey and mustard adhere to the chicken. Look for a fruity olive oil. Extra Virgin Olive Oil has some great organic options.
- Apple Cider Vinegar (1 tablespoon): Apple cider vinegar adds a bright acidity that cuts through the sweetness and balances the flavor beautifully. Apple Cider Vinegar’s selection is perfect.
- Garlic (2 cloves), minced: Freshly minced garlic is crucial – the aroma and flavor are far superior to pre-minced garlic. Garlic provides a helpful guide to using garlic in cooking.
- Morton Kosher Salt (1 teaspoon): Kosher salt enhances the flavors of the ingredients and is ideal for seasoning. Morton Salt’s kosher salt is a staple in many kitchens.
- Black Pepper (1/4 teaspoon): Freshly ground black pepper adds a subtle heat and complexity to the marinade.
For the Chicken:
- Chicken Breasts (4, skinless and boneless): Choose high-quality, free-range chicken breasts for the best flavor and texture. Look for breasts that are a uniform thickness for even cooking. Chicken Breasts offers helpful tips on choosing the perfect chicken breast.
Optional additions to flavour
- Chives (2 teaspoons), finely chopped: These are added as a garnish, but you could add a small amount to the marinade itself for an extra layer of flavour.
Remember, the quality of your ingredients will directly impact the final result. Invest in good honey, fresh garlic, and high-quality chicken for a truly exceptional meal! Don’t be afraid to experiment with small adjustments to the marinade to suit your own taste preferences.
Equipment: Tools for Perfect Chicken Flattening & Grilling
To achieve consistently tender and evenly cooked honey mustard chicken breasts, the right tools are essential. While you can certainly cook delicious chicken without them, these items significantly improve the process and the final result. Let’s explore the equipment you’ll need.
1. Cutting Board: A stable, large cutting board is the foundation. Opt for a sturdy plastic or wood board; a surface that slips while you’re flattening the chicken can lead to uneven results. Ensure it’s clean and sanitized before beginning. A good size (at least 18×24 inches) provides ample space to work comfortably.
2. Kitchen Mallet or Meat Tenderizer: This is your primary tool for flattening. A kitchen mallet, typically made of wood or plastic, is ideal. Look for one with a slightly textured surface to gently break down the muscle fibers of the chicken breast, resulting in a more tender final product. Alternatively, a meat tenderizer (often made of nylon or plastic) can achieve a similar effect, though it may require a bit more force. The key is to apply consistent pressure to create a uniform thickness.
3. Rolling Pin (Optional but Recommended): A rolling pin, particularly a tapered one, provides a more controlled flattening action than a mallet alone. Rolling the chicken over the cutting board with gentle pressure will create a more consistent thickness. This is especially useful if you’re working with thicker chicken breasts. Consider getting a rolling pin with a textured surface for added grip and effectiveness.
4. Plastic Wrap: Plastic wrap is a crucial safety and stability measure. Placing plastic wrap between the chicken breast and the cutting board prevents the chicken from sticking and tearing. Using multiple layers of plastic wrap – one over the cutting board, one over the chicken breast – is highly recommended. This also helps distribute the pressure evenly during flattening.
5. Instant-Read Meat Thermometer: While primarily used for checking the internal temperature of the cooked chicken, an instant-read thermometer is incredibly helpful during the flattening process. It allows you to quickly monitor the thickness of the chicken breasts as you flatten them. Knowing the thickness is crucial for accurate cooking times. Investing in a reliable instant-read thermometer is a small price to pay for perfectly cooked chicken. Thermoworks Instant-Read Thermometers offer precision and durability.
6. Grill-Safe Tongs: Using grill-safe tongs is essential for safely handling hot chicken breasts on the grill. Standard tongs can easily slip, leading to burns. Grill-safe tongs are designed to withstand high temperatures and have textured grips for a secure hold. ThermoWorks Grill-Safe Tongs are a popular choice.
7. Cast Iron Griddle (Optional): For achieving an even sear and crispy skin (if you choose to sear the chicken before grilling), a cast iron griddle is an excellent investment. Its superior heat retention provides consistent cooking temperatures. ThermoWorks Cast Iron Skillets are a highly recommended option.
By utilizing these tools, you’ll not only create perfectly flattened chicken breasts but also ensure a smoother, more successful grilling experience. Remember, consistency is key – the more precise your technique, the more consistently delicious your honey mustard chicken will be! Learn More about Grilling Techniques
Instructions: Step-by-Step Guide to Grilled Honey Mustard Chicken
Let’s get cooking! This recipe for grilled honey mustard chicken breasts is designed to be incredibly easy, even for beginners. Follow these step-by-step instructions for perfectly cooked, tender, and flavorful chicken every time.
1. Prepare the Chicken: Begin by taking your four chicken breasts out of the refrigerator. This allows them to come closer to room temperature, which promotes more even cooking.
2. Flatten the Chicken Breasts: Flattening the chicken breasts is key to achieving a uniform thickness. This ensures they cook evenly and prevents some parts from being overcooked while others are undercooked. Place a large piece of plastic wrap on a cutting board. Place one chicken breast on top of it, and cover with another large piece of plastic wrap. Using the flat side of your kitchen mallet or a rolling pin, gently hit to flatten chicken breasts working from the thickest portion in the middle to the outer edges. Flatten each breast to a uniform thickness of 3/4-inch. Note: if you prefer, you can skip this step and cook the chicken breasts whole, but adjusting your grilling time will be necessary.
3. Make the Honey Mustard Marinade: In a small bowl, combine the honey, Dijon mustard, whole grain mustard (or an extra tablespoon of Dijon if you’re using that), olive oil, apple cider vinegar, minced garlic (about 2 cloves), Morton kosher salt (1 teaspoon), and black pepper (1/4 teaspoon). Whisk until well combined. This marinade is what gives the chicken its signature flavor and helps keep it incredibly moist.
4. Marinate the Chicken: Place the flattened chicken breasts into a resealable plastic bag, and pour the honey mustard marinade on top. Use tongs to work the breast around for even coating. Ensure the entire surface is covered. Seal the bag, and place it in the refrigerator for 4-8 hours, or ideally, overnight. Longer marinating times will result in a more intensely flavored chicken. Tip: For best results, marinate the chicken in the refrigerator.
5. Preheat the Grill: Preheat your grill to medium heat – approximately 350 degrees Fahrenheit (175 degrees Celsius). If you’re using a charcoal grill, allow the coals to burn down to a consistent heat. For a pellet grill, select a mild flavored wood pellet like apple or peach, to enhance the flavor of the chicken. Maintaining a consistent temperature is crucial for perfect grilling.
6. Grill the Chicken: Place the marinated chicken breasts on the grill grates, close the lid, and cook for 4-5 minutes. Important: Use grill-safe tongs to flip the chicken breasts. Flip them over with grill-safe tongs and continue cooking for another 4-5 minutes or until they reach an internal temperature of 165 degrees Fahrenheit (74 degrees Celsius), as measured with an instant-read meat thermometer. This is the most important step – ensuring the chicken is cooked through guarantees safety and a juicy result. Using a thermometer is highly recommended.
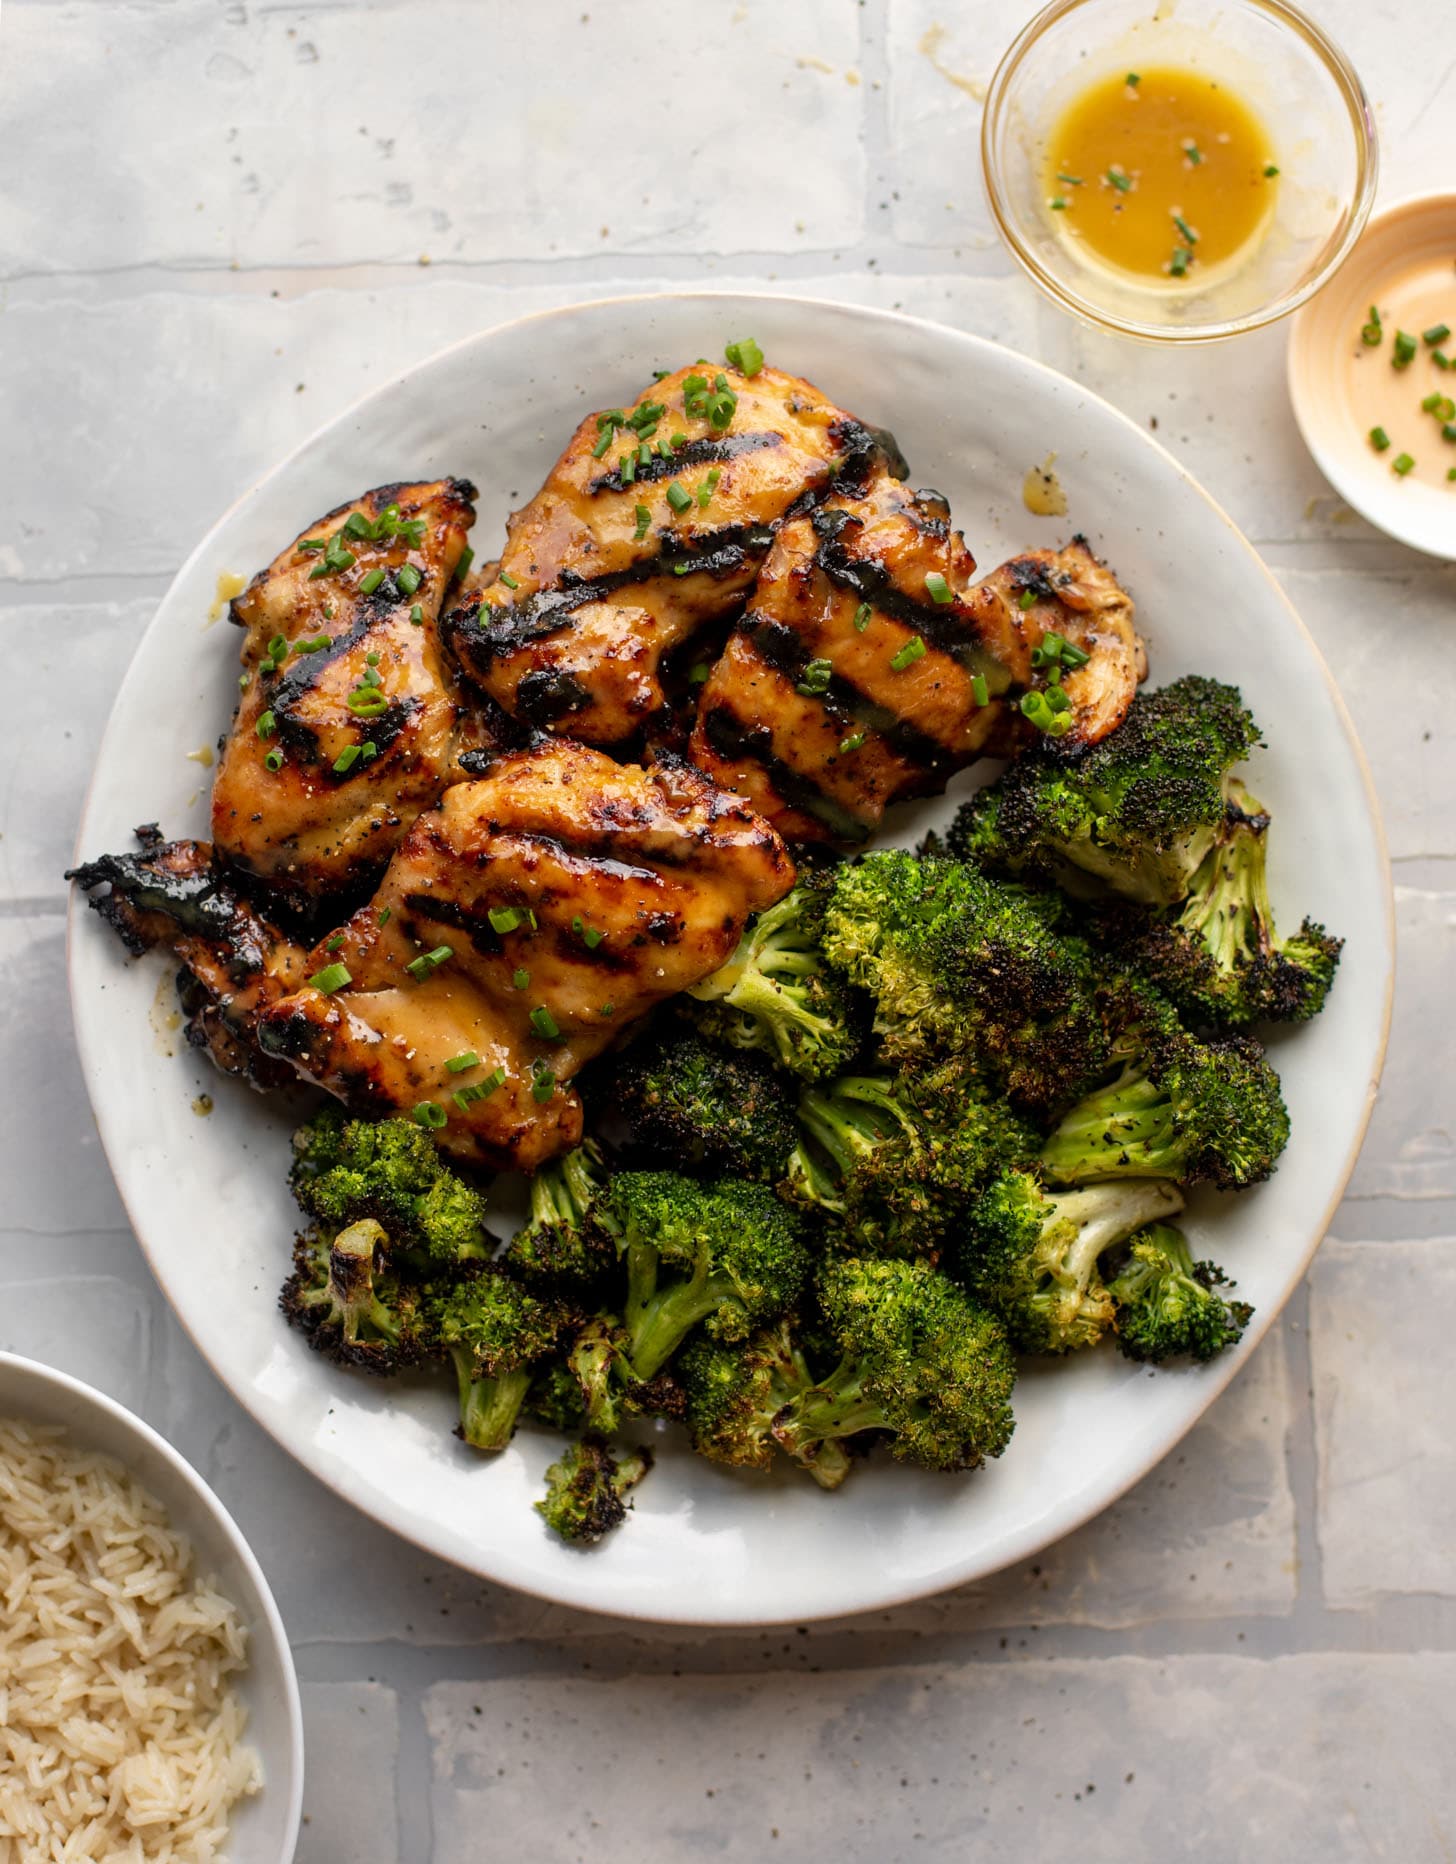
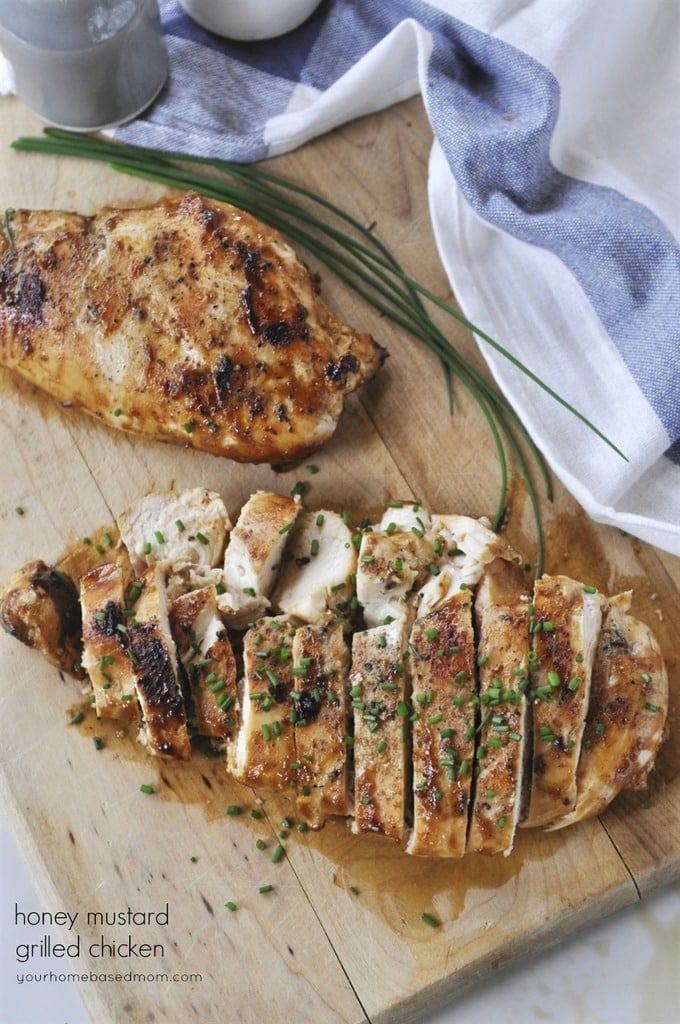
7. Rest and Slice: Once the chicken reaches the target temperature, remove the grill grates with grill-safe tongs, and transfer the chicken breasts to a clean cutting board. Cover loosely with foil and let them rest for 5 minutes. Resting allows the juices to redistribute throughout the meat, resulting in a juicier chicken. After resting, slice the chicken breasts against the grain and garnish with finely chopped chives. Slicing against the grain is important – it shortens the muscle fibers, making the chicken easier to chew.
8. Serving Suggestions: These grilled honey mustard chicken breasts pair perfectly with cauliflower steaks, cowboy potato kebabs, or a creamy corn pudding. For a touch of heat, consider a hot honey rub. “Enjoy your delicious meal!”
Chicken Flattening Techniques: Achieving Optimal Thickness
Flattening chicken breasts is a surprisingly crucial step in achieving consistently tender and perfectly cooked grilled honey mustard chicken. While it might seem like an extra effort, the benefits of a uniform thickness are significant – ensuring even heat distribution and preventing the breast from drying out on the exterior while remaining juicy on the inside. Achieving this optimal thickness isn’t just about presentation; it fundamentally impacts the cooking process.
Consider the physics of heat transfer. A thicker breast will require a longer cooking time at a consistent heat, potentially leading to overcooked edges and an undercooked center. Conversely, a thinner breast cooks much faster, increasing the risk of overcooking and a dry, tough result. The plastic wrap method, as demonstrated, is the most effective and gentle technique. The key is not to smash the chicken with excessive force, which can tear the muscle fibers and release juices, further contributing to dryness. Instead, aim for a firm, even pressure, working from the center outwards.
Using a kitchen mallet or rolling pin – ideally a rubber-headed one to minimize bruising – requires a deliberate, controlled approach. Start by placing the breast on the plastic wrap, then gently work the mallet across the surface, focusing on the thickest portion. It’s important to work in small, controlled strokes, rather than hammering repeatedly. Think of it as ‘encouraging’ the muscle fibers to thin out, rather than forcing them. A good gauge is to aim for a thickness of approximately ¾ inch – this provides a good balance between cooking time and moisture retention. You can even check your progress with a ruler for accuracy.
Don’t be tempted to use a knife to flatten the breasts; this can easily damage the meat and release valuable juices. The plastic wrap provides a protective barrier, preventing the mallet from directly contacting the meat and minimizing bruising. If you find the breast is particularly stubborn, you can apply gentle pressure with your hands as you work the mallet. Remember, patience and a controlled approach are paramount. A uniformly flattened chicken breast will not only cook more evenly but also absorb the honey mustard marinade more effectively, resulting in a richer, more flavorful grilled honey mustard chicken experience. Essentially, it’s about creating a cooking surface that delivers the best possible results – a consistently juicy and flavorful centerpiece for your meal. A quick tip – if you’re using a meat thermometer, check the thickness of the flattened breast to ensure it’s truly at ¾-inch, as this will affect your cooking times.
Marinating: Infusing Flavor for Maximum Tenderness
Marinating is the cornerstone of creating incredibly tender and flavorful grilled honey mustard chicken breasts. The extended period of time spent in the marinade doesn’t just impart the delicious sweet and tangy flavor profile – it’s actually a chemical process that dramatically improves the texture of the chicken. The acids in the marinade, primarily apple cider vinegar and Dijon mustard, begin to break down the muscle fibers in the chicken. This breakdown, called “tenderization,” is what makes the meat incredibly succulent and easy to cut through with a fork.
Beyond the simple acid breakdown, the marinade’s ingredients also penetrate the chicken on a cellular level. Honey, rich in enzymes, further aids in this tenderization process. The combination of honey and mustard creates a synergistic effect; the honey adds sweetness, while the mustard contributes a sharp, complex flavor that complements the honey beautifully. Furthermore, the inclusion of garlic, with its potent sulfur compounds, acts as a natural tenderizer, contributing to a deeper, more savory flavor.
Allowing the chicken to marinate for 4-8 hours – or even up to 24 hours in the refrigerator – is crucial. During this time, the marinade’s components are drawn into the chicken, creating a deeply saturated and unbelievably moist result. A shorter marinating time (e.g., 2 hours) will still offer a noticeable improvement over simply grilling the chicken, but you won’t achieve the same level of tenderness and maximum flavor infusion. Remember, the extended marinade time effectively transforms the chicken from a potentially dry and tough protein into a melt-in-your-mouth culinary delight. It’s also worth noting that using a resealable bag is ideal as it keeps the chicken consistently immersed in the flavorful marinade, maximizing the tenderizing effect. Don’t be tempted to reduce the marinating time – the results speak for themselves. Consider adding a tablespoon of olive oil to the marinade to aid in the penetration of the marinade and enhance the overall texture. Ultimately, marinating the honey mustard chicken breasts is an investment in a truly exceptional grilling experience. Flavor infusion is key!
Grilling: Mastering the Perfect Grill Temperature & Timing
Achieving perfectly grilled honey mustard chicken breasts hinges on understanding and controlling the heat. The goal is to sear the outside for a beautiful char while ensuring the inside remains juicy and cooked through – without overcooking. The ideal grilling temperature for this recipe is medium heat, approximately 350-400°F (175-205°C). Maintaining this consistent temperature is crucial, as fluctuations can lead to uneven cooking. Using a reliable grill thermometer – a digital instant-read thermometer is highly recommended – allows you to monitor the heat accurately.
Initial Sear (High Heat – Approximately 450°F / 232°C): Begin by preheating your grill to a higher temperature, around 450°F (232°C), for roughly 5-7 minutes. This intense heat quickly sears the exterior of the chicken breasts, creating that desirable Maillard reaction – the chemical process responsible for the rich, browned flavor and appealing texture. It’s important to avoid overcrowding the grill; work in batches if necessary to maintain consistent heat. Place the marinated chicken breasts on the hottest part of the grill grates, closing the lid to trap the heat and promote even cooking. You should see immediate signs of searing – a noticeable browning on the surface.
Transitioning to Medium Heat (350-400°F / 175-205°C): After the initial searing stage, reduce the grill temperature to medium heat (350-400°F / 175-205°C). This slower cooking phase allows the chicken to cook through evenly without burning the exterior. Maintaining this temperature is key to achieving that perfect balance. Using a wireless meat thermometer connected to a smartphone or tablet can greatly assist in maintaining consistent temperature during grilling.
Grilling Time: The total grilling time will vary depending on the thickness of the chicken breasts and the temperature of your grill. As a general guideline, expect approximately 4-6 minutes per side for breasts that are roughly ¾-inch thick. However, always rely on a meat thermometer to ensure the internal temperature reaches 165°F (74°C). Inserting the thermometer into the thickest part of the breast, avoiding bone, is the best way to determine doneness. Don’t rely solely on timing; cooking times are highly variable. The USDA recommends a minimum internal temperature of 165°F (74°C) to ensure food safety. Using a grill temperature probe is a great way to accomplish this.
Flipping & Monitoring: Flipping the chicken breasts halfway through the grilling process (around 2-3 minutes) is important for even cooking. Use grill-safe tongs to avoid piercing the chicken and losing valuable juices. Continually monitor the temperature with your digital thermometer to ensure accurate tracking. Remember, a slightly cooler temperature at the end allows for a juicier result. Resting the chicken is critical to allow the juices to redistribute, contributing to a more tender and flavorful final product. Finally, utilizing a grill control system for precise temperature management elevates the grilling experience considerably.
Resting & Slicing: The Secret to Juicy Chicken
Achieving that perfectly cooked, incredibly juicy grilled honey mustard chicken breast isn’t just about hitting 165°F internally – it’s about allowing the muscle fibers to relax and reabsorb their own juices. This final step, often overlooked, is arguably the most crucial for maximizing tenderness and flavor. Once your chicken breasts have reached a safe internal temperature of 165°F, immediately remove them from the grill and place them on a clean cutting board. Tent them loosely with foil – this helps to retain a little bit of heat, ensuring they remain warm while they rest.
Now, the waiting game begins, but it’s a brief one. Allowing the chicken to rest for at least 5-10 minutes is non-negotiable. During this time, the heat continues to gently permeate the meat, further breaking down those tough muscle fibers. Simultaneously, the juices that have been driven towards the center of the breast during cooking redistribute themselves back throughout the meat. This is where the real magic happens, creating a moist and incredibly flavorful chicken breast.
Don’t be tempted to slice the chicken immediately. Resisting this urge will significantly impact the final result. Think of it like squeezing a sponge – if you squeeze it immediately after cooking, you’ll force out all the water. However, if you let it sit for a moment, the water will naturally return, resulting in a much juicier piece of meat.
When you’re finally ready to slice, use a sharp carving knife and make shallow cuts against the grain. Cutting with the grain – which is the direction of the muscle fibers – helps to prevent the meat from tearing and further releasing its juices. A gradual, deliberate slicing approach, combined with that crucial resting period, unlocks the full potential of your grilled honey mustard chicken, transforming it from a simply cooked breast to a truly exceptional culinary experience. The slight temperature difference between the still-warm chicken and your knife will also allow for a cleaner cut. Consider investing in a meat thermometer to ensure consistent results. You’ll find instant-read thermometers that quickly provide accurate readings, giving you confidence in your cooking. Precision meat thermometers can be especially helpful for achieving optimal doneness, and maintaining a safe internal temperature is paramount for food safety. Finally, don’t be afraid to season lightly with a pinch of kosher salt after slicing; this helps to redistribute any remaining moisture and enhance the flavor.
Serving Suggestions: Delicious Sides to Complement Your Chicken
Elevating your grilled honey mustard chicken beyond just the chicken itself is key to a truly satisfying meal. The sweetness and tang of the marinade pair exceptionally well with a variety of dishes, offering textural and flavor contrasts. Let’s explore some fantastic side options that will perfectly complement your chicken.
Vegetable Sensations:
-
Roasted Asparagus with Lemon & Parmesan: The slight bitterness of asparagus cuts through the richness of the chicken, while the lemon and parmesan provide a bright, savory finish. Roasting brings out the vegetables’ natural sweetness, making it an ideal match. Fresh asparagus is readily available in most grocery stores, making this a convenient option.
-
Grilled Corn on the Cob with Chipotle Butter: The smoky sweetness of grilled corn is a classic pairing. A butter infused with chipotle peppers adds a subtle warmth and complexity that complements the honey mustard flavor. Homemade Chipotle Butter recipes abound, offering a customizable level of heat.
-
Sautéed Green Beans with Garlic & Almonds: A simple, yet elegant, combination. The slight crunch of almonds provides a textural counterpoint to the tender chicken and the green beans’ fresh flavor. Green bean recipes are vast and adaptable.
-
Roasted Brussels Sprouts with Balsamic Glaze: Roasting Brussels sprouts caramelizes their edges, creating a delightful sweetness. A drizzle of balsamic glaze adds a tangy finish. Balsamic glaze recipes offer a quick and easy addition.
Starchy Sides:
-
Creamy Garlic Mashed Potatoes: A timeless classic. The buttery, creamy texture of mashed potatoes offers a comforting contrast to the grilled chicken. Easy mashed potato recipes are simple to make. Adding a swirl of chives (as you garnish the chicken) elevates the dish.
-
Quinoa Salad with Herbs & Citrus: For a lighter option, a quinoa salad with fresh herbs like parsley or cilantro, and a bright citrus dressing is a fantastic choice. Quinoa salad recipes provide endless variation.
-
Sweet Potato Casserole: The sweetness of a sweet potato casserole harmonizes exceptionally well with the honey mustard marinade. Sweet potato casserole recipes are a traditional Thanksgiving side dish, but perfect for any occasion.
Other Delicious Options:
-
Coleslaw: A tangy coleslaw provides a refreshing contrast to the savory chicken. Classic coleslaw recipes provide a great base.
-
Corn Pudding: (As you already included!) – A rich, creamy corn pudding is a perfect complement. Corn pudding recipes are delicious and comforting.
Remember to consider the overall balance of flavors and textures when selecting your sides. A combination of sweet, savory, and tangy elements will ensure a truly memorable meal. Don’t be afraid to experiment and find your own favorite pairings! More side dish ideas exist than you can shake a stick at!
Nutritional Information: Calories, Macros & Vitamins
Let’s dive into the nutritional aspects of this incredibly delicious grilled honey mustard chicken. These breasts are a fantastic choice for a healthy weeknight meal, offering a good balance of protein, vitamins, and minerals. Understanding the breakdown can help you tailor your portions and enjoy this recipe guilt-free!
Calories: Each serving (calculated based on 6 servings) contains approximately 285 calories. This is primarily due to the honey and olive oil, but it’s a reasonable amount for a satisfying grilled chicken meal. It’s important to note that calorie counts can vary slightly depending on portion sizes and specific ingredient brands.
Macronutrients:
- Protein: Approximately 32 grams. Chicken is a complete protein, meaning it contains all nine essential amino acids. Protein is crucial for muscle repair, growth, and overall health. Including this amount of protein in your diet supports satiety and helps maintain a healthy weight.
- Carbohydrates: Approximately 24 grams. This comes mainly from the honey, adding a touch of sweetness and energy. It’s relatively low compared to many other dishes, making it a good choice if you’re monitoring your carbohydrate intake.
- Fat: Approximately 6 grams. Primarily from the olive oil and honey, these fats are mostly unsaturated, which are beneficial for heart health. The healthy fats also contribute to the flavor and tenderness of the chicken.
Vitamins & Minerals:
- Vitamin A: Each serving provides around 66 IU (International Units). Vitamin A is essential for vision, immune function, and cell growth. Chicken is a good source of beta-carotene, which the body converts to Vitamin A.
- Vitamin C: Approximately 2 milligrams. Vitamin C is a potent antioxidant that supports the immune system and protects cells from damage. Although the Vitamin C content isn’t exceptionally high in chicken, it contributes to the overall nutritional profile.
- Iron: Roughly 1 milligram. Iron is vital for carrying oxygen in the blood. Chicken provides a modest amount of iron, supporting energy levels and preventing anemia.
- Potassium: Around 591 milligrams. Potassium is an electrolyte that plays a role in maintaining healthy blood pressure and muscle function.
- Other Nutrients: Chicken also contains trace amounts of vitamins B6, niacin, and phosphorus, contributing to a range of bodily functions.
Disclaimer: These nutritional values are approximate and based on standard ingredient measurements. Actual values may vary depending on specific ingredients used and portion sizes. For precise nutritional information, we recommend consulting a nutrition database or using a recipe analyzer. Nutritional Information Database USDA FoodData Central MyFitnessPal Recipe Analyzer
 ,
, ,
, ,
, ,
, ,
, ,
, ,
,