
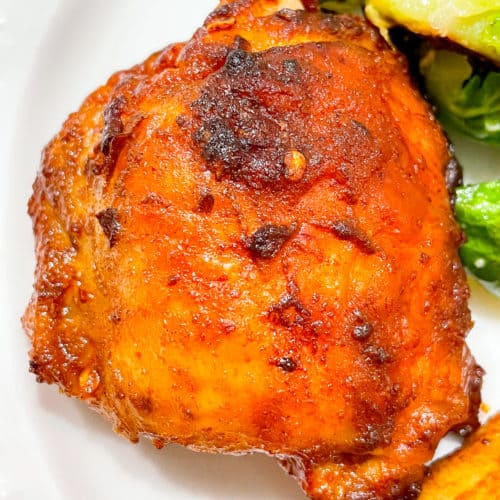
Introduction to Peri-Peri Chicken
Peri-Peri Chicken, a vibrant and intensely flavorful dish originating from the Algarve region of Portugal, has captivated palates around the globe. The name itself, ‘Peri-Peri,’ is derived from the Portuguese word ‘perreiro,’ referring to the bird’s pepper-like appearance – a direct result of the generous application of chili peppers that define this culinary tradition. It’s more than just spicy; it’s a complex symphony of flavors, achieved through a meticulous blend of herbs, spices, and, most importantly, chili peppers, that create a truly unforgettable experience. Traditionally, Peri-Peri was a simple grilled chicken marinated in a mixture of chili, garlic, lemon, and herbs, reflecting the resourcefulness of the local fishermen who initially prepared it. However, modern variations have expanded significantly, incorporating ingredients like paprika, oregano, thyme, rosemary, bay leaves, and even a touch of sweetness from honey or brown sugar, depending on the chef’s preference and regional variations. Understanding the core principles behind Peri-Peri Chicken – a potent combination of heat, acidity, and aromatic herbs – is the key to replicating its signature taste. The dish’s success stems from the careful layering of these elements, ensuring that the spice doesn’t overwhelm the other flavors, and that the chicken remains incredibly moist and tender. Beyond its taste, Peri-Peri Chicken is often associated with a relaxed, coastal lifestyle, reflecting the culinary heritage of Portugal’s southern coast. It’s a dish meant to be enjoyed with friends and family, often accompanied by a refreshing glass of white wine or a crisp lager. The vibrant color and bold flavor profile of Peri-Peri Chicken makes it a perfect choice for summer barbecues or any occasion where you want to add a touch of Mediterranean flair to your meal. The history of Peri-Peri extends beyond just a cooking technique, it represents a significant part of Portuguese culture, and a testament to the power of simple ingredients expertly combined. Mediterranean cuisine frequently relies on similar techniques and flavor combinations, making Peri-Peri a natural fit within this culinary tradition. The preparation itself, while seemingly straightforward, requires attention to detail to fully unlock the chicken’s potential. Chili peppers are used in multiple forms, from whole peppers added to the marinade, to chili flakes, and even chili paste, allowing for adjustments to spice levels. Whether you’re a seasoned chef or a novice cook, embarking on the journey to create authentic Peri-Peri Chicken is an exciting culinary adventure. Grilled chicken recipes offer a variety of variations, but this particular method, using a complex marinade, delivers the most intensely flavorful results. Don’t be intimidated by the variety of spices – experiment with small amounts at first and adjust to your personal preference. Flavor pairings demonstrate the synergy between different tastes, and Peri-Peri Chicken exemplifies this beautifully.
Ingredients: The Key Components of Flavor
To truly unlock the vibrant and complex taste of peri-peri chicken, it’s crucial to understand the roles each ingredient plays. This isn’t just about throwing spices into a mix; it’s about building layers of flavor that will tantalize your palate. At its heart, peri-peri derives its intense taste from the peri-peri sauce itself – a foundational element, often made with the intensely flavorful African Bird’s Eye Chili. Chili pepper intensity can vary dramatically, so starting with a smaller amount and adjusting to your preference is always advised. The base of the marinade is built upon a careful selection of spices, each contributing a unique dimension. Ground cumin, a staple in many cuisines, provides an earthy, warm base note, while coriander offers a bright, citrusy counterpoint. Paprika, whether sweet or smoked, introduces color and depth, contributing both fruity and savory nuances. Garlic, of course, is essential; its pungent aroma and sharp taste cut through the richness of the oil and fat, adding a significant punch. Garlic is not just about flavor; it possesses powerful medicinal properties, adding another layer of complexity to the dish. Beyond the core spices, other ingredients contribute significantly to the overall profile. Onions, whether fresh or powdered, provide a subtle sweetness and help to bind the flavors together. Black pepper offers a sharp, biting heat, while dried thyme and oregano contribute herbaceous notes, adding an aroma and a complex, slightly floral finish. A touch of sugar—often brown sugar—balances the heat and enhances the other flavors. Salt, naturally, is paramount for bringing out all the other tastes and facilitating the chemical reactions in the food. It’s more than just seasoning; it’s the foundation of flavor. Then there’s the olive oil – extra virgin olive oil – which not only carries the flavors but also helps to tenderize the chicken and create a beautiful, glossy finish. Lime juice, frequently added at the end, introduces a vital acidity that brightens the flavors and prevents the dish from becoming overly heavy. Finally, consider the impact of the red bell pepper. Bell peppers – in addition to their sweetness – provide a subtle vegetal note that complements the other ingredients beautifully. The quality of these ingredients matters enormously; fresh spices ground just before use will always yield a more vibrant and aromatic result compared to pre-ground spices that have lost their potency. Using good quality olive oil will also affect the finished dish. The interaction between all these components – the heat of the chili, the earthiness of the cumin, the sweetness of the bell pepper, the acidity of the lime juice – creates a harmonious blend of flavor that defines peri-peri chicken. It’s a journey of taste, and the key lies in understanding and appreciating each ingredient’s unique contribution.
Step-by-Step Instructions: Preparing the Marinade
Let’s embark on creating the vibrant and intensely flavorful marinade that’s the heart of this authentic Peri-Peri chicken recipe. This isn’t just about throwing ingredients together; it’s about layering flavors that build upon each other, resulting in a truly exceptional dish. The key to a fantastic Peri-Peri marinade lies in its complexity, and we’ll achieve this through a careful blend of aromatic spices, fresh citrus, and of course, the signature peri-peri sauce. This stage is crucial – it’s where the chicken absorbs maximum flavor, transforming from a simple ingredient to a culinary masterpiece.
First, Gather Your Ingredients: Before we begin, ensure you have everything readily available. This will streamline the process and prevent any frustrating delays. You’ll need approximately 2.5 to 3 pounds of chicken pieces (bone-in, skin-on thighs or drumsticks work exceptionally well for maximum flavor), and the star ingredient, peri-peri sauce (we’ll discuss sourcing it later – it’s often available in specialty spice shops or online). A high-quality blend of spices is also paramount; consider using a pre-mixed Peri-Peri spice blend to simplify things, but adjusting to your own tastes is always encouraged!
Creating the Paste: Now, let’s get to the heart of the marinade. In a robust food processor – a blender can also work, though may not achieve the same level of fine consistency – add the chicken pieces. Begin by pulsing the chicken a few times to break it down, but avoid over-processing, as this can make the chicken texture mushy. Now, add 1/2 cup of peri-peri sauce. The amount can be adjusted based on your desired level of heat; start with less if you’re sensitive to spice. Next, introduce the aromatic building blocks: 1 tablespoon of olive oil – providing richness and acting as a carrier for the flavors – followed by the finely chopped ingredients. Add 2 cloves of garlic (minced), roughly 1 inch of fresh ginger (peeled and grated – ginger provides a wonderful warmth and complexity), 1/2 medium red onion (roughly chopped), and 1 red bell pepper (cored and diced – this adds sweetness and a gentle spice).
The Spice Symphony: Now, it’s time for the spice symphony! We’ll incorporate approximately 1 tablespoon of mixed spices. A fantastic blend includes paprika (smoked paprika adds an extra layer of depth), cumin, coriander, cayenne pepper (for added heat – adjust to your preference), oregano, thyme, and a pinch of black pepper. For a truly authentic flavor, consider adding a dash of ground cloves (be careful, as they’re potent!). The amount of spices will depend on your personal preference, but don’t be afraid to experiment. Pulse the food processor again until you achieve a homogenous paste. You shouldn’t have large chunks of ingredients; the goal is a smooth, uniformly coated mixture. If the paste is too thick, add a tablespoon of water at a time until you reach a workable consistency.
The Final Coating: Transfer the marinated chicken to a large bowl. Using your hands, thoroughly coat every piece of chicken with the vibrant peri-peri paste. Ensure every surface is covered – this is where the magic happens. Cover the bowl tightly with plastic wrap and refrigerate for at least 2 hours, or preferably longer (up to 24 hours), to allow the flavors to fully meld and penetrate the chicken. The longer it marinates, the more intense the flavor will become. Remember, you can always add more peri-peri sauce during the baking process if you desire a more pronounced taste. Don’t be tempted to handle the chicken excessively while it’s marinating, as this can toughen the meat. Keep the refrigerated chicken covered to prevent it from drying out. Maintaining proper refrigeration is vital for optimal flavor and food safety. Finally, before baking, remove the chicken from the refrigerator to allow it to come to room temperature for about 30 minutes. This helps with even cooking.
Baking Instructions: Achieving Perfect Doneness
Achieving perfectly cooked peri-peri chicken is about more than just timing; it’s about ensuring the internal temperature reaches a safe and delectable level. This section will guide you through the baking process, offering insights to guarantee succulent, juicy meat every single time. The key is to maintain a consistent temperature and monitor the chicken closely during the final stages.
Temperature is Paramount: The USDA recommends an internal temperature of 165°F (74°C) to eliminate any harmful bacteria. However, relying solely on a thermometer isn’t always enough. The carryover cooking process – where the chicken continues to cook even after it’s removed from the oven – can drive the temperature up significantly. That’s why it’s crucial to pull the chicken out of the oven when it’s slightly below this target temperature.
The First 30 Minutes: Initial Sear and Moisture Retention: During the first 30 minutes of baking at 350°F (175°C), the chicken’s exterior develops a beautifully browned crust, thanks to the rendered olive oil and the interaction of the spices. The parchment paper lining the baking sheet helps to trap moisture, preventing the chicken from drying out. The marinade itself begins to penetrate the meat, infusing it with the complex flavors of the peri-peri sauce. You’ll notice the edges of the chicken starting to firm up – this is a good sign! Avoid opening the oven door frequently during this period, as each opening releases heat and can extend the cooking time.
The Final 10-15 Minutes: Achieving Perfection: Starting around the 30-minute mark, begin checking the internal temperature with a meat thermometer. Insert the thermometer into the thickest part of the thigh, avoiding the bone, which can give a false reading. Remove the chicken from the oven when the internal temperature reaches 160°F (71°C). This allows for a 5-degree increase in temperature as it rests, resulting in a perfectly cooked chicken. If you prefer a slightly more well-done chicken, you can bake it for an additional 5-10 minutes, continuing to monitor the internal temperature.
Resting is Crucial: Once the chicken reaches 160°F (71°C), immediately transfer it to a cutting board and cover it loosely with foil. Allowing the chicken to rest for at least 10-15 minutes is absolutely critical. This resting period allows the muscle fibers to relax and reabsorb the juices that have been pushed towards the center of the meat during cooking. Without this resting time, a significant amount of flavorful juices will run out when you carve the chicken, resulting in a drier, less flavorful dish. The extended resting also contributes to a more tender and juicy final product. Consider using a meat thermometer to confirm the internal temperature has reached 165°F (74°C) after resting for a few minutes. A slight temperature increase during resting is perfectly normal and desirable – it demonstrates that the chicken has fully cooked while maintaining its succulence. Ultimately, patience is key to achieving the best possible peri-peri chicken; take the time to allow it to rest, and you’ll be rewarded with a truly exceptional meal. Don’t underestimate the importance of a good rest – it’s arguably the most crucial step in the entire process.
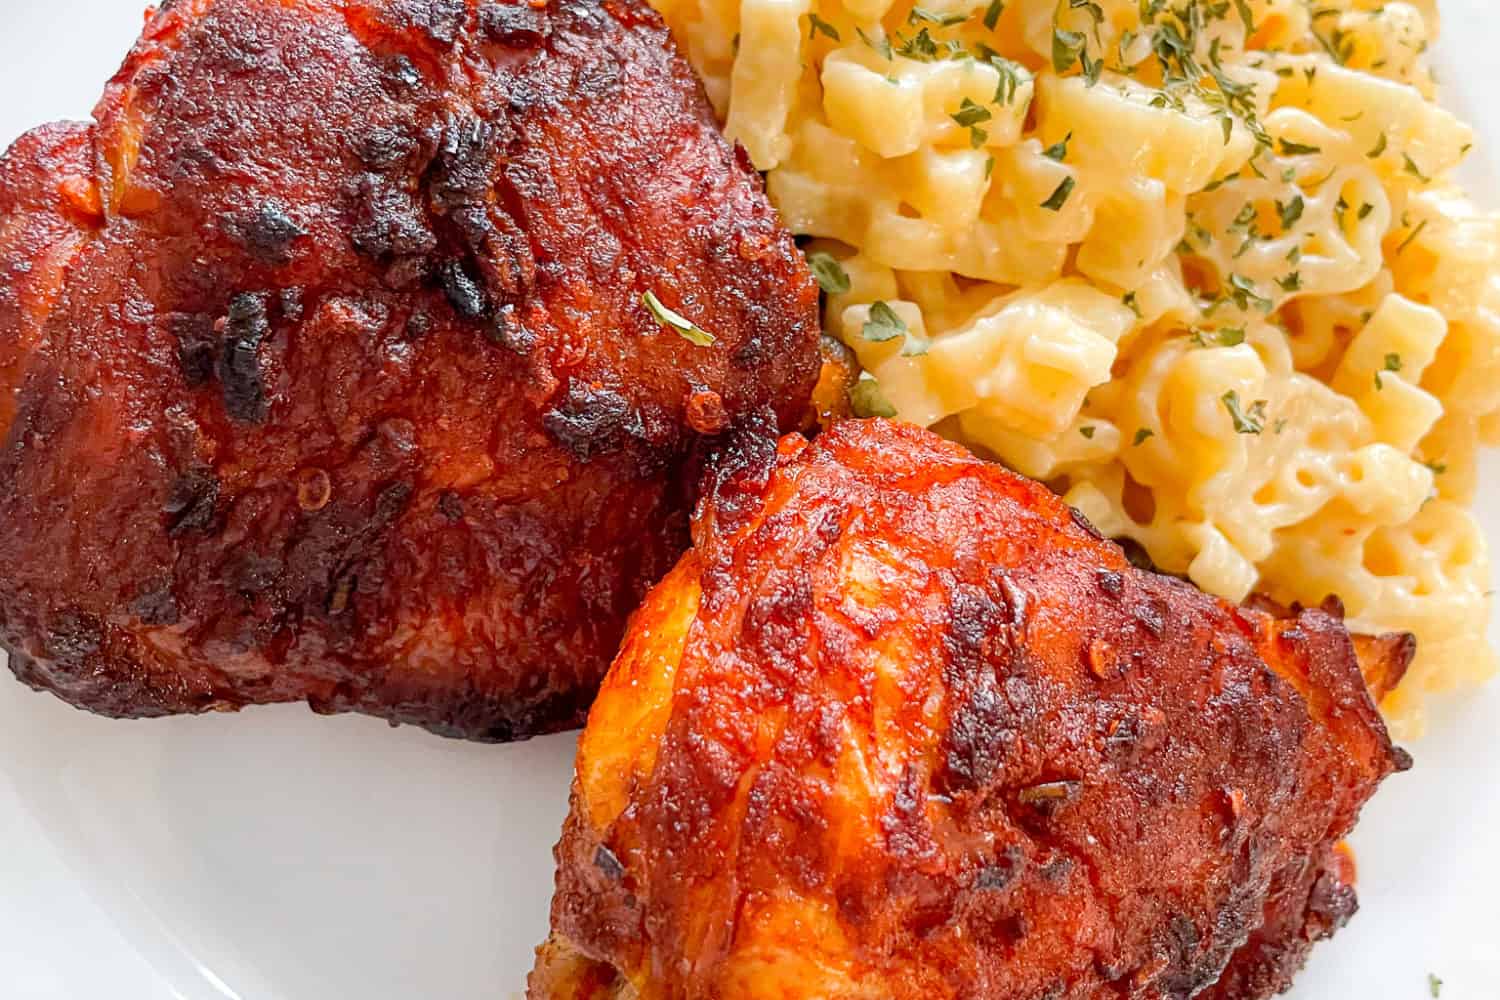
Serving Suggestions and Garnishes
To elevate your authentic peri-peri chicken experience, consider a variety of serving suggestions and garnishes that will not only enhance the presentation but also complement the already robust flavors. Peri-peri chicken, with its spicy and savory profile, deserves accompaniments that offer textural contrasts and further flavor dimensions.
Fresh Herbs – Aromatic and Bright: Fresh herbs are absolutely crucial. A generous scattering of chopped fresh cilantro (fresh herbs) immediately brightens the dish and adds a fragrant layer. Parsley (parsley benefits) is another excellent choice, providing a slightly milder counterpoint to the spice. Dill (dill plant care) – particularly when paired with lemon juice – adds a refreshing element. Don’t underestimate the power of a few sprigs of mint (mint cultivation) for an unexpected burst of coolness.
Starchy Sides – Balancing the Heat: The intense spice of the peri-peri marinade calls for sides that can effectively absorb and balance the flavors. Steamed rice (rice cooking tips) – jasmine or basmati varieties – are classic choices. A fluffy couscous (couscous recipes) provides a light and airy texture, while a hearty potato salad (potato salad variations) offers a comforting and creamy counterpoint. Consider a portion of roasted root vegetables – carrots, parsnips, and sweet potatoes (sweet potato recipes) – for sweetness and earthy notes. Mashed potatoes (mashed potato recipes) are always a great choice for richness.
Fresh Fruits – A Burst of Sweetness & Acidity: A bright, acidic element can work wonders. Slices of lime (lime juice benefits) or lemon (lemon recipes) are essential. Segments of grapefruit (grapefruit recipes) or orange (orange recipes) add a beautiful sweetness and a lovely zest. A few ripe mango chunks (mango recipes) offer a tropical sweetness that complements the spices beautifully.
Pickled Elements – A Tangy Kick: A small amount of pickled onions (pickled onion recipes) or pickled peppers (pickled pepper recipes) inject a welcomed acidity and tang. These elements also provide textural contrast.
Crusty Bread – Sopping Up the Sauce: Warm, crusty bread (crusty bread recipes) is perfect for mopping up the remaining peri-peri sauce – a vital element of the overall experience. Consider a rustic baguette or ciabatta. To enhance presentation, consider a drizzle of olive oil (olive oil benefits) over the dish before serving.
Nutritional Information: A Healthy Option
Peri-Peri chicken, at its core, offers a surprisingly balanced nutritional profile, making it a genuinely healthy choice when prepared as outlined in this recipe. Let’s break down the estimated nutritional information per serving (based on the quantities used and assuming approximately 2-3 servings):
Calories: Approximately 448kcal. This figure reflects the use of olive oil, a heart-healthy fat source, and the protein-rich chicken itself. Managing portion sizes is key to maintaining this calorie level. calorie control
Carbohydrates: Around 8g. Primarily sourced from the bell pepper and mixed spices, which contribute minimal impact on blood sugar levels. low-carb recipes
Protein: A substantial 26g. Chicken is a complete protein, meaning it contains all nine essential amino acids, crucial for muscle repair and overall body function. protein intake
Fat: Roughly 35g. This is where the majority of the fat comes from, predominantly the olive oil used in the marinade. Olive oil, particularly extra virgin olive oil, is rich in monounsaturated fats, which are known for their heart-protective benefits. It’s important to note that this recipe uses a relatively generous amount of olive oil, but its health benefits outweigh the fat content when consumed in moderation as part of a balanced diet. healthy fats
Saturated Fat: Approximately 8g. While present, the quantity is relatively moderate, especially considering the oil’s source – olive oil – which generally has a lower saturated fat content compared to other cooking oils. reducing saturated fat
Polyunsaturated Fat: Around 6g. This represents a beneficial component of the fat content, including essential fatty acids like omega-3 and omega-6, vital for brain health and reducing inflammation. omega-3 fatty acids
Monounsaturated Fat: Roughly 18g. This is a significant proportion, contributing to the heart-healthy profile of the dish. monounsaturated fats
Trans Fat: 0.1g. The recipe intentionally avoids trans fats, which are generally detrimental to health. reducing trans fats
Cholesterol: 102mg. The dish contains a modest amount of cholesterol, primarily from the chicken. While dietary cholesterol has become less of a concern for many, individuals with specific health conditions may need to monitor their intake. dietary cholesterol
Sodium: 768mg. This level is largely influenced by the mixed spices used in the marinade. Consider using reduced-sodium spice blends or adjusting the salt level to further minimize sodium intake. reducing sodium intake
Potassium: 375mg. Chicken is a good source of potassium, an essential mineral that plays a vital role in regulating blood pressure and nerve function. potassium-rich foods
Fiber: 2g. The bell pepper and spices contribute a small amount of dietary fiber, aiding digestion and promoting satiety. dietary fiber
Sugar: 2g. This comes primarily from the natural sugars present in the bell pepper and spices. It’s a minimal amount, and the overall dish doesn’t rely on added sugars. reducing sugar intake
Important Note: These are estimated nutritional values and may vary slightly depending on the specific ingredients used and portion sizes. For precise calculations, it’s recommended to use a nutrition tracking app or consult a registered dietitian. To make this recipe even healthier, consider using lean cuts of chicken and reducing the amount of olive oil used. healthy recipes
Tips and Notes: Ensuring a Delicious Result
To consistently achieve a truly exceptional peri-peri chicken, several crucial factors deserve careful attention. Firstly, don’t rush the marinating process – a minimum of two hours, and ideally up to four, allows the vibrant flavors of the peri-peri spice blend to fully penetrate the chicken, tenderizing the meat from the inside out. Consider covering the chicken tightly with plastic wrap or placing it in a resealable bag to maximize flavor absorption. Furthermore, ensure the chicken pieces are roughly uniform in size; this guarantees even cooking and consistent tenderness. After marinating, pat the chicken thoroughly dry with paper towels – excess moisture inhibits browning and can lead to a steamed, rather than roasted, result. For best results, arrange the chicken pieces in a single layer on a baking sheet, leaving adequate space between them to prevent overcrowding. Overcrowding creates steam, impeding the Maillard reaction – the chemical process responsible for creating that desirable crispy skin. Temperature control is paramount; avoid opening the oven frequently, as each time the temperature drops, it prolongs the cooking time. Instead of relying solely on visual cues, use a reliable meat thermometer to accurately monitor the internal temperature. The safe internal temperature for chicken is 165°F (74°C), ensuring that both the meat and any potential bacteria are eliminated. Allowing the chicken to rest for at least 10-15 minutes after removing it from the oven is another essential step. This ‘carryover cooking’ accounts for the residual heat remaining within the meat, allowing the juices to redistribute, resulting in a more tender and flavorful finished product. During this resting period, the muscle fibers relax, and the juices are reabsorbed, intensifying the overall taste. Finally, experiment with the type of spice blend you use – different peri-peri variations exist, each offering a unique level of heat and complexity. Don’t be afraid to adjust the quantities to suit your personal preference. Adding a small amount of honey or maple syrup to the marinade can enhance the sweetness and caramelization, while a squeeze of fresh lime juice at the end adds a bright, zesty finish. A sprinkle of smoked paprika can add a subtle smoky depth, transforming the flavour profile. Don’t discard the pan drippings – they’re packed with flavour! Use them to create a delicious peri-peri sauce or to moisten your rice. Remember, cooking is a process of observation and adjustment. Trust your instincts, and most importantly, enjoy the delicious results of your efforts. And for a fantastic visual guide on different roasting techniques, explore various roasting methods.
Video Demonstration: Visualizing the Process
To truly master the art of peri-peri chicken, a visual guide is invaluable. This section breaks down the entire preparation process, allowing you to understand the nuances of flavor development and technique.
(Video opens with a close-up shot of a food processor) The first step is creating a vibrant, intensely flavored marinade. You’ll need a food processor – a powerful one will speed things up, but any decent model will do. Add the following ingredients to the bowl:
-
Garlic, Onion, and Bell Pepper: (Video shows chopping fresh garlic, onion, and red bell pepper into small pieces and adding them to the processor) – Roughly 4 cloves of garlic, 1 medium onion, and 1 red bell pepper. These form the aromatic foundation, releasing their sweetness and sharpness as they are pulsed.
-
Mixed Spices: (Video shows adding a blend of spices – paprika, cumin, coriander, cayenne pepper, black pepper) – Approximately 1/4 cup of a mixed spice blend, traditionally including smoked paprika for a depth of flavor, cumin for warmth, coriander for citrus notes, and a pinch of cayenne pepper for a subtle kick. Don’t be afraid to experiment – a little extra smoked paprika can really elevate the experience.
-
Peri-Peri Sauce: (Video shows adding 1 tablespoon of peri-peri sauce) – 1 tablespoon of peri-peri sauce, which is the heart of the dish. This is where the authentic peri-peri flavor comes from – known for its fiery, citrusy taste. If you can’t find pre-made peri-peri sauce, you can substitute with a blend of chili peppers, lime juice, and herbs.
-
Other Ingredients: (Video shows adding olive oil, lime juice, and the chicken pieces) – 1 tablespoon of olive oil – for richness and to help the marinade cling to the chicken, the juice of 1 lime – bringing a bright, acidic counterpoint, and 2.5-3 pounds of chicken pieces (bone-in, skin-on is recommended for maximum flavor, but boneless, skinless works too).
(Video demonstrates pulsing the food processor) Pulse the mixture in the food processor until you achieve a coarse paste. You don’t want it completely smooth – a little texture is desirable. (Approximately 30-60 seconds of pulsing). The goal here is to break down the ingredients while retaining a bit of grit.
(Video shows transferring the marinade to a bowl and coating the chicken) Transfer the marinade to a large bowl. Add the chicken pieces and coat them thoroughly, ensuring every surface is covered. (Video demonstrates rubbing the marinade onto the chicken). Massage the marinade into the chicken, really working it in. This is crucial – the longer the chicken marinates, the more intense the flavor will be. Cover the bowl with plastic wrap and refrigerate for at least 2 hours, or ideally, overnight. The longer it marinates, the more tender and flavorful the chicken will become. (Video shows the chicken covered in the marinade, refrigerated).
(Video concludes with a final shot of the marinated chicken, ready for baking) Throughout the process, remember the key is layering flavors and patience. Don’t rush the marinating time – it’s where the magic happens. This video offers a visual walkthrough of a recipe that will surely transport you to the heart of peri-peri country!
Troubleshooting and FAQs
Let’s address some common questions and potential issues you might encounter while preparing and enjoying your authentic Peri-Peri chicken. It’s fantastic that you’re taking the time to ensure a delicious and perfectly cooked result.
Q: My Peri-Peri chicken is dry.
A: This is a frequent concern, and it’s usually due to overcooking. Peri-Peri chicken benefits from remaining juicy, not being rendered completely dry. The key is to remove it from the oven just before it reaches 165°F (74°C). A meat thermometer is your best friend here! Also, ensure your marinade isn’t too thick, as a thinner consistency helps retain moisture. Overmixing the marinade can also break down the proteins, leading to a drier texture. Consider adding a touch more olive oil to the marinade to combat this. Olive oil is a fantastic ingredient, packed with healthy fats that contribute to flavor and moisture.
Q: My Peri-Peri chicken isn’t flavorful enough.
A: This likely means your marinade wasn’t strong enough, or you didn’t allow sufficient time for the flavors to penetrate. The marinating process is crucial. Increase the marinating time to at least 4-6 hours, or even overnight for maximum flavor infusion. You can also amplify the flavor by adding extra Peri-Peri sauce, which is the heart of the recipe, or a pinch of smoked paprika for a deeper, smoky taste. Don’t be afraid to experiment with other spices like garlic powder or onion powder – just ensure they complement the Peri-Peri flavor. Spices are essential for building complex flavors.
Q: The chicken is unevenly cooked.
A: This often happens when the chicken pieces aren’t uniform in size. Larger pieces take longer to cook. To mitigate this, try to cut the chicken into relatively equal sizes before marinating. Also, ensure you’re rotating the baking sheet halfway through cooking to promote even heat distribution. For consistent results, you can also arrange the chicken pieces in a single layer on the baking sheet, rather than stacking them. Baking tips can also be very helpful!
Q: What if my Peri-Peri chicken is too salty.
A: This can easily occur if you add too much salt to the marinade or if the Peri-Peri sauce itself is high in sodium. Be mindful when measuring spices and sauces. Taste the marinade before adding it to the chicken, and reduce the amount of salt if needed. Lemon juice, as in the recipe, can also help balance the flavors. Lemon juice recipes are a great tool to maintain a balanced flavour profile.
Q: Can I grill or pan-fry Peri-Peri Chicken?
A: Absolutely! Peri-Peri chicken works wonderfully on the grill or in a skillet. Grilling imparts a beautiful smoky flavor, while pan-frying offers a quick and convenient option. When grilling, ensure the heat is medium-high and avoid overcrowding the grill. For pan-frying, use a non-stick skillet and a little bit of olive oil. Maintain the same cooking time as baking – approximately 40 minutes, but always use a meat thermometer to ensure doneness. Grilling is a great option too!
Q: What’s the best way to rest the Peri-Peri Chicken after cooking?
A: Resting is a vital step! Allowing the chicken to rest for at least 10-15 minutes after removing it from the oven allows the juices to redistribute throughout the meat, resulting in a more tender and flavorful dish. Tent it loosely with foil to keep it warm while it rests. You can also carve the chicken and place it on a cutting board while it rests – this promotes even resting. Resting meat provides a great final touch.
Q: Is it safe to freeze Peri-Peri Chicken?
A: Yes, but it’s best to freeze it in an airtight container or freezer bag, properly labeled with the date. Freezing can slightly alter the texture of the chicken, so it’s best enjoyed within 2-3 months for optimal flavor and texture. Freezing food is essential for longevity!
 ,
, ,
, ,
, ,
,:max_bytes(150000):strip_icc()/399717-peri-peri-african-chicken-anhnguyen81-4x3-1-a2f85fbda37f4047ba8c11fe2f2c7802.jpg)