
The Inspiration: Recreating a Wing Dream
Let’s be honest, the whole thing started with a serious craving—a craving for those utterly magnificent chipotle ranch chicken wings that Justine and Zach had been obsessing over. You know the ones, the wings that seemingly existed in a parallel universe of crispy skin and explosive smoky-spicy flavor? Wings and spice are definitely a popular craving, and these wings were something special. I’d read about them on CookingandBeer, and the descriptions—the perfect balance of heat, the incredible crunch, the juicy meat underneath—it completely captivated me. I spent a good fifteen minutes scrolling through the comments, reading the raves, and honestly, I started to feel a little bit of wing envy! Chicken wing recipes are a staple for a reason, and I was determined to capture that magic, but on a different, arguably more substantial, canvas: chicken thighs. The thought of replicating that complex flavor profile, that addictive combination of heat and richness, with a heartier cut of meat was incredibly exciting. It wasn’t just about recreating a dish; it was about chasing a memory, a perfect bite, and honoring the genius of Justine and Zach’s taste buds. Flavor profiles are incredibly important when building these kinds of flavor combinations, and I was eager to experiment. Honestly, the goal wasn’t just to make chicken thighs; it was to bring back a feeling—that feeling of pure wing bliss. I found myself constantly visualizing those wings, dissecting their components in my mind, trying to translate that sensory experience into a tangible recipe. It’s a somewhat silly thought, I know, but that’s cooking for me – it’s about more than just ingredients; it’s about the emotion behind the dish. Chicken thigh recipes are often overlooked, but these were destined for greatness. The whole thing felt a bit like a culinary quest, a mission to conquer a wing-shaped challenge. And let’s be clear: those wings were good. Really good. The memory of the perfect crisp and the flavorful spice blend is what motivated the whole experiment. Crispy skin is a difficult skill to master, and this seemed like the perfect starting point.
Why Chicken Thighs Over Chicken Breasts
Let’s be honest, the original chipotle ranch wings were legendary – and frankly, a little overwhelming for a weeknight. While chicken breasts are a staple for a reason (they’re lean and versatile), when it comes to maximizing flavor and delivering a truly decadent experience, chicken thighs consistently win out. There’s a whole world of juicy richness waiting to be unlocked with a bone-in, skin-on chicken thigh, a world that simply isn’t fully realized with a breast. Flavor depth is paramount, and thighs deliver a significantly more robust and complex flavor profile than breasts, thanks to their higher fat content. This fat isn’t just about taste; it also acts as a natural shield, retaining moisture and preventing the chicken from drying out during cooking – a common complaint with chicken breasts. Plus, let’s talk about the skin! Achieving truly crispy, rendered chicken skin is a culinary challenge, and it’s much easier to accomplish with the larger surface area and bone-in structure of a thigh. Crispy skin techniques are significantly more effective when applied to a chicken thigh. The bone itself also contributes to the overall flavor – a subtle, savory element that’s entirely absent from a chicken breast. Many cooks believe that the bone imparts a richer, more nuanced flavor to the meat, though this is hotly debated. Regardless, it adds another layer of complexity to the dish. Furthermore, thighs are far more forgiving when it comes to cooking times. Because they contain more fat, they’re less prone to overcooking, a notorious issue with chicken breasts. Proper cooking temperatures are critical, and thighs offer a much wider window for achieving perfectly cooked, tender meat without ending up dry and stringy. Consider the textural element too – a thigh offers both the tenderness of cooked meat and that satisfying crackle of crispy skin. You simply don’t get that same cohesive textural experience with a breast. It’s a difference worth making, especially when you’re creating a dish as celebratory as this chipotle chicken thigh creation. Ultimately, choosing thighs isn’t just about flavor; it’s about elevating the entire dining experience. They’re fundamentally better suited for building a truly indulgent and memorable meal. Recipe development advice highlights the importance of selecting ingredients that maximize flavor potential, and for this dish, the chicken thigh is the undeniable champion.
Achieving Crispy Skin – The Key to Success
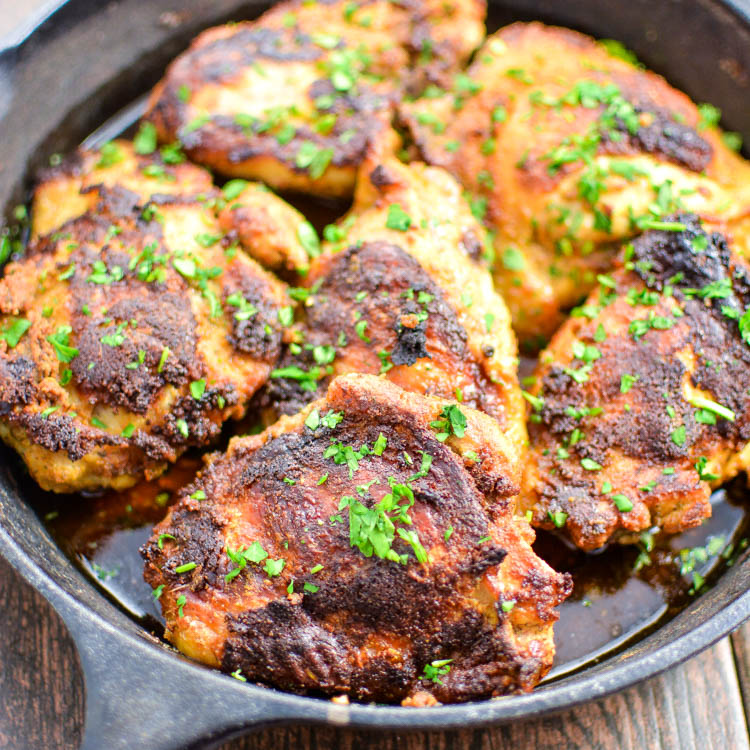
Let’s be honest, the biggest hurdle when it comes to chicken, especially bone-in, skin-on pieces like these thighs, is achieving that coveted crispy skin. It’s not just about aesthetics; perfectly rendered fat creates a depth of flavor and textural contrast that elevates the entire dish. Achieving truly exceptional crispy skin demands a bit of technique, and understanding the science behind it is crucial. The goal isn’t just to brown the skin; it’s about transforming the fat into a delicate, crackling mosaic. Fat rendering begins with heat – a very hot heat. We’re talking about a pan hot enough to immediately sizzle when you add the chicken. Don’t be tempted to lower the heat; that’s a recipe for soggy skin.
Initially, we sear the chicken skin-side down. This is where the magic happens. As the skin hits the hot pan, the fat immediately begins to render out – that’s the key! This rendered fat is what will crisp up and create that textural delight. The amount of heat needs to be high enough that the fat continuously drips away, but not so high that it burns. It’s a delicate balance, and you’ll quickly develop a feel for it. Think of it like a controlled frying – you’re not deep-frying, but you’re harnessing the power of hot fat to create incredible crispness. Understanding the Maillard reaction is also helpful. The Maillard reaction is a chemical reaction between amino acids and reducing sugars that occurs when food is heated, and it’s responsible for the beautiful browned color and complex flavors we associate with perfectly seared meat. Don’t move the chicken around while searing; let it sit undisturbed, allowing the heat to evenly distribute and maximize skin rendering. Flip the chicken when the skin is deeply golden brown and starting to release easily from the pan. A good, heavy-bottomed skillet – cast iron is ideal cast iron skillet benefits – will distribute heat evenly and retain it, contributing significantly to achieving consistent crispy skin. Also, a little bit of oil – vegetable oil or canola oil works wonderfully – helps to prevent the skin from sticking to the pan and encourages even browning. Don’t overcrowd the pan, either. Giving the chicken enough space allows for proper air circulation, which is vital for rendering fat and crisping the skin. Finally, resting the chicken briefly after searing helps the juices redistribute, resulting in a more tender and flavorful result. This isn’t just about the searing step; it’s about mastering the art of rendering fat and achieving that unparalleled crispy skin – a testament to a beautifully cooked chicken thigh. A useful guide to pan searing will help you to improve your technique.
A Simple Yet Flavorful Spice Blend
Let’s be honest, a truly exceptional dish starts with a thoughtfully crafted spice blend – it’s the foundation upon which all that deliciousness is built. And these Buttermilk Chipotle Crispy Chicken Thighs are no exception. We’re aiming for a vibrant, complex flavor profile that’s both subtly spicy and wonderfully aromatic. Forget bland; we want a blend that sings with warmth and a touch of smoky heat. Spice blends are really key to unlocking great flavor in dishes like this.
So, what exactly goes into this magic mix? The starting point is garlic powder – a generous tablespoon. This isn’t just about adding a bit of savory flavor; garlic powder, when cooked properly, mellows out and contributes a deeper, almost caramelized note. Garlic powder is a crucial component for building a good flavor base. Following that, we add two tablespoons of onion powder, which complements the garlic and provides another layer of savory depth. Onion powder, in combination with garlic, offers a wonderful umami dimension Umami that really elevates the dish.
Then comes the chipotle chili powder – and this is where the real character of these thighs comes from. We’re using a full tablespoon, but feel free to adjust to your spice preference. Chipotle chili powder offers a distinctive smoky heat that’s far more nuanced than just straight chili powder. Chipotle Chili Powder is a key element in getting that signature flavor. We also incorporate two teaspoons of dried dill – this isn’t just a garnish; it’s a flavor powerhouse. Dried dill adds a bright, herbaceous note that cuts through the richness of the chicken and balances the spice. Dill is an excellent source of Vitamin K, too! Vitamin K!
To round out the blend, we add ¾ teaspoon of salt and ½ teaspoon of black pepper. Salt isn’t just for taste; it actually enhances the other flavors. Similarly, black pepper provides a necessary sharpness and complexity. It’s important to use freshly ground black pepper for the best results. Salt and pepper are fundamental in every great savory recipe Salt and Pepper!
This spice blend isn’t just about the individual ingredients; it’s about their interaction. The warmth of the garlic and onion powder, the smoky heat of the chipotle chili powder, and the herbaceousness of the dill combine to create a truly unforgettable flavor. Don’t be afraid to experiment and adjust the ratios to your liking. These Buttermilk Chipotle Crispy Chicken Thighs are all about creating a flavor experience you’ll cherish! It’s a spice blend that truly unlocks the potential of the chicken, transforming a simple weeknight dinner into something truly special. Chicken Spice Recipes – explore different flavor combinations for your own culinary adventures.
Marinating for Maximum Flavor
Let’s be honest, the secret to truly phenomenal chicken—whether it’s wings or thighs—lies in the patience of a good marinade. It’s not just about adding flavor; it’s about transforming the protein itself, breaking down tough fibers, and coaxing out every ounce of savory goodness. When you simply toss chicken in a spice blend and bake it, you’re relying solely on heat to develop that depth of taste. But a prolonged marinade? That’s a completely different game. The science behind meat tenderization explains how acids like those found in buttermilk—combined with enzymes—work to break down muscle tissue, resulting in unbelievably tender and juicy chicken. Buttermilk, in particular, isn’t just a tangy liquid; it’s a powerhouse of tenderizing agents. Think of it as a gentle, yet effective, massage for your chicken.
During the marinating process, the longer the chicken sits in the buttermilk and spice mixture, the more effectively the buttermilk’s enzymes do their work. The initial flavors of the spice blend, which include garlic powder, onion powder, chipotle chili powder, dill, and salt, begin to deeply penetrate the meat. The chipotle chili powder, in particular, contributes a smoky and slightly spicy complexity that intensifies with time. The dill adds a bright, herbaceous note that elevates the entire dish. And don’t underestimate the role of salt – it doesn’t just season; it actually helps the other flavors meld together, creating a harmonious blend. Understanding salt’s impact on flavor further illustrates this point.
We’re talking about a minimum of four hours, ideally overnight, but even a few hours makes a noticeable difference. Don’t be tempted to rush this step. A 12-hour marination is a great option if you have the time – the extended exposure allows the flavors to truly marry with the chicken, creating a result that is far superior to a quick toss. This isn’t just about taste; it’s about texture. You’ll notice that the chicken becomes noticeably more yielding to the touch, and when cooked, it’s incredibly moist and succulent. It’s a critical step to achieve that sought-after tenderness. Furthermore, marinating allows the spice blend to form a flavorful crust on the outside of the chicken, creating a delicious barrier that enhances the overall cooking process. Exploring the benefits of spice crusts offers some insight into similar techniques. So, take your time, let the magic happen, and prepare to be amazed by the incredibly tender and flavorful results.
Searing for Crispy Skin and Richness
Okay, let’s talk about the magic that happens when you sear your chicken thighs. It’s not just about color; it’s about developing deep, complex flavor and, crucially, achieving that shatteringly crisp skin you’ve been dreaming about. The key here is heat – a lot of heat – and a little patience. High-heat searing is what creates the Maillard reaction, the chemical process that gives browned foods their incredible flavor. Without it, your chicken will just be… browned.
Don’t overcrowd the pan. Seriously, this is crucial. If you throw too many thighs into your skillet at once, the temperature of the pan will drop dramatically, and you’ll end up with steamed skin, not crispy skin. Work in batches, like a professional chef would! I’m talking about 2-3 thighs at a time, depending on the size of your pan and your stove. A cast iron skillet is ideal; it retains heat incredibly well, which is exactly what we need for a fantastic sear. A stainless steel pan will also work well, just ensure it’s heavy-bottomed for even heat distribution.
Start with a high smoke point oil, such as avocado oil or grapeseed oil. These oils can handle the intense heat without burning or imparting a bad flavor. Add about 3 tablespoons to your hot skillet. Once the oil shimmers – it should just begin to smoke slightly – carefully place the chicken thighs, skin-side down, into the pan. Press down gently on the thighs with a spatula to ensure that the entire surface is making contact with the hot oil. This is key for getting maximum crispness. The Science of Searing explains this quite well – the initial contact creates a dry surface, which is absolutely necessary for achieving that crispy crust.
Let the chicken sear undisturbed for 8-10 minutes. You’ll see the skin transforming from pale pink to a beautiful, rich mahogany color. Resist the urge to move the thighs around – you want to let the heat do its work. You’ll notice a sizzling sound; that’s the happy sound of deliciousness forming. As the skin crisps, it will release its fat, which is fantastic! Don’t wipe off this rendered fat; it’s adding incredible flavor to the chicken and will continue to contribute to the crisping process.
When the skin is beautifully browned and crispy, carefully flip the chicken thighs and sear for another 3-4 minutes. This quick sear on the other side ensures even cooking and adds another layer of flavor. Here’s a helpful guide to cooking chicken thighs that discusses the timing for optimal results. You’re looking for the internal temperature to reach 165°F (74°C) using a meat thermometer. The searing process not only adds color and flavor but also helps to seal in the juices, keeping your chicken incredibly moist. Once the skin is perfectly crisp and the internal temperature is reached, remove the thighs from the pan and place them on a wire rack to drain any excess fat. This will ensure that the skin stays perfectly crisp as it rests. The result? Chicken thighs with skin so crisp you could shatter it with your fork – and packed with so much flavor you’ll want to eat them every single day!
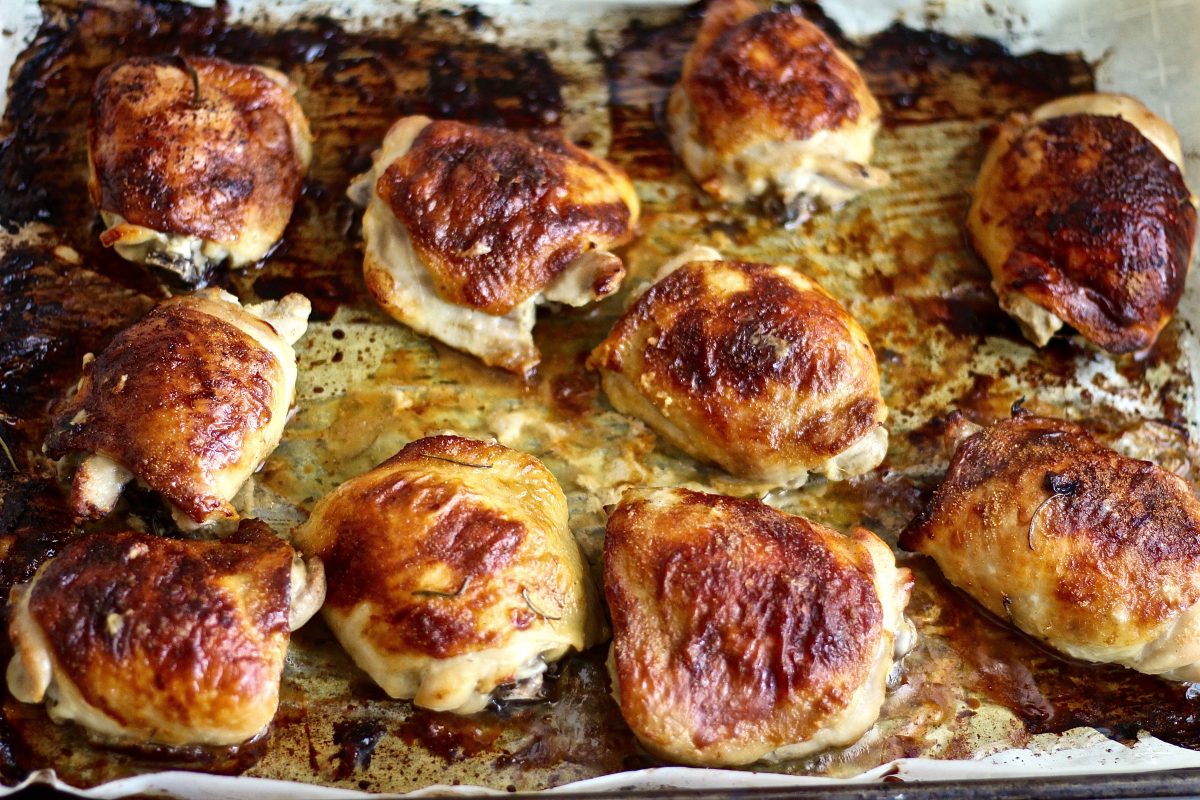
Baking to Perfection – Ensuring Even Cooking
Now that you’ve achieved that beautiful, deeply browned skin – a crucial step for maximizing flavor and visual appeal – it’s time to transition the chicken thighs to the oven. Baking is the key to ensuring that the entire bird, from the crispy skin to the juicy meat beneath, cooks evenly. This is where the magic truly happens, transforming the intensely flavored sear into a succulent, perfectly cooked meal.
The high heat created during searing has resulted in a lovely amount of surface area, making it incredibly receptive to heat transfer. However, relying solely on searing can lead to uneven cooking – some parts of the thigh might be overcooked and dry while others remain underdone. Baking mitigates this risk significantly. The consistent, moderate heat of 400 degrees Fahrenheit (204 degrees Celsius) provides a gentle, uniform warmth that permeates the entire thigh.
One of the most important techniques when baking chicken thighs is to position them correctly in the oven. Avoid overcrowding the skillet, as this restricts airflow and impedes even heat distribution. Space them out so that each thigh has ample room to circulate heat. Ideally, you’ll want to place them on a raised rack within the skillet, elevating them slightly above the bottom, allowing heat to reach all sides equally. This is where a cast-iron skillet truly shines, as it retains heat exceptionally well, contributing to a consistent cooking environment. Alternatively, if your oven-safe skillet doesn’t have a rack, you can arrange the thighs in a single layer.
During the baking process, it’s wise to check the internal temperature of the chicken with an instant-read thermometer. The USDA recommends cooking chicken thighs to an internal temperature of 165°F (74°C) in the thickest part of the thigh. This isn’t just about safety; it’s about ensuring that the meat is cooked through to perfection, avoiding any lingering pinkness and preventing the risk of foodborne illness. Don’t rely solely on visual cues, as this can be misleading. Remember, the skin may continue to brown even after the meat is cooked, so periodically blot the skin with a paper towel to manage the browning process and prevent excessive crisping.
Baking times will vary depending on the size of your chicken thighs. Generally, a 30-40 minute baking period is sufficient for most thighs. However, always use a thermometer to confirm that the internal temperature has reached 165°F (74°C) before removing the skillet from the oven. It’s far better to slightly overcook a chicken thigh than to undercook it, as overcooked chicken is easier to fix than undercooked.
Finally, once the internal temperature is reached, remove the skillet from the heat and let the chicken rest for at least 5-10 minutes before serving. This allows the juices to redistribute throughout the meat, resulting in a more tender and succulent result. Resting also prevents the meat from drying out during the carving process. With a little attention to detail, you’ll have a batch of perfectly cooked, unbelievably flavorful chicken thighs – a testament to the power of searing and baking combined. The key is patience, paying close attention to the internal temperature, and letting the bird rest after baking. You’ll be amazed by the difference! Achieving Perfect Chicken Thighs
Serving Suggestions and Final Thoughts
Okay, let’s be honest – these Buttermilk Chipotle Crispy Chicken Thighs are an absolute revelation, and they’re so much more than just a quick weeknight dinner. They’re a celebration of flavour, a testament to the brilliance of a good spice blend, and frankly, a guilty pleasure that’s entirely justifiable. After all, who doesn’t love a truly crispy piece of skin, especially when it’s packing a serious punch of chipotle heat?
Traditionally, I’d serve these with a simple green salad – something crisp and refreshing to cut through the richness. A little lemon vinaigrette would work beautifully – lemon vinaigrette would be fantastic. Or, if you’re feeling particularly indulgent, consider a dollop of crème fraîche or sour cream crème fraîche for an extra layer of decadent texture. A small portion of roasted root vegetables – carrots and parsnips, for example roasted root vegetables – would also complement the spice profile perfectly. Think about incorporating some charred corn on the cob, adding a touch of sweetness that pairs incredibly well with the chipotle heat.
But seriously, don’t underestimate the beauty of simplicity. These thighs are fantastic as they are, served with just a sprinkle of fresh chopped parsley – the vibrant green adds a welcome visual pop fresh parsley. And of course, they deserve a drink! A robust brown ale, like a Newcastle Brown Ale, is an ideal pairing – the malty notes enhance the spices, while the carbonation cleanses the palate brown ale. If you prefer wine, a medium-bodied Pinot Noir would also work well, especially one with earthy undertones.
Beyond the immediate meal, these thighs are surprisingly versatile. Shredded, they’re a fantastic addition to tacos, burritos, or quesadillas – creating a seriously flavourful and satisfying Southwestern-inspired meal. You could even use them in a hearty chili, adding depth and complexity to your favourite recipe. Don’t limit yourself; these are the kind of dish that begs to be experimented with! Seriously, I make these almost weekly, and I’m constantly finding new ways to enjoy them. I even think they’d be amazing in a shepherd’s pie, swapping out the traditional lamb for a smoky, spiced chicken version. It’s that good.
Ultimately, this recipe isn’t just about following instructions; it’s about creating a meal you genuinely love. So, go ahead, indulge, and don’t be afraid to get a little messy. After all, life’s too short for boring dinners! And if you decide to make these at home, I truly hope you find as much joy in the process as I do. I’d love to see your creations – tag me on Instagram Instagram or Facebook Facebook – I’ll be following your culinary adventures!
 ,
, ,
, ,
, ,
,