
Essential Equipment & Ingredients
To create a truly exceptional Air Fryer Chicken Katsu, you’ll need a few key components – both in terms of equipment and ingredients. Let’s break down everything you’ll require, ensuring you have all the tools and quality ingredients for a fantastic result.
Equipment:
- Air Fryer: A good quality air fryer is absolutely crucial. Different models vary in wattage and basket size, which will affect cooking times. For best results, ensure your air fryer reaches a consistent temperature. Consider investing in a larger capacity air fryer if you frequently cook for several people. Air Fryer Size Guide provides some helpful guidelines.
- Shallow Dishes: You’ll need at least three shallow dishes – one for the flour mixture, one for the beaten eggs, and one for the panko breadcrumbs. Dishware Recommendations suggests using ceramic or glass for even heat distribution.
- Tongs: Long tongs are essential for handling the breaded chicken without tearing the panko. Best Tongs for Cooking highlights ergonomic options.
- Meat Thermometer: Accuracy is key when cooking chicken. A reliable meat thermometer guarantees perfectly cooked chicken every time. Digital Meat Thermometer Reviews offers detailed comparisons.
- Wire Rack: A wire rack placed inside the air fryer basket allows air to circulate freely, promoting even cooking and crisping. Air Fryer Rack Options explores different materials and designs.
Ingredients:
- Chicken Breasts: Opt for boneless, skinless chicken breasts – approximately 6-8 ounces each. The thickness of the chicken breasts will affect cooking time. Choosing the Right Chicken Breasts provides a handy guide.
- Panko Breadcrumbs: Panko breadcrumbs are essential for achieving that signature crispy texture. They’re larger and lighter than regular breadcrumbs, contributing to the optimal crunch. Understanding Panko Breadcrumbs explains their unique qualities.
- Eggs: Two large eggs provide the binding agent for the breading. Egg Quality for Breading discusses the impact of egg quality.
- Flour: All-purpose flour helps create a light and airy coating. Flour Types for Breading details the nuances of different flour varieties.
- Salt & Pepper: Freshly ground black pepper and sea salt enhance the flavor of the chicken. Salt & Pepper Guide provides a full assessment of the best options.
- Optional Seasonings: While salt and pepper are the basics, feel free to experiment with other seasonings like garlic powder, onion powder, paprika, or cayenne pepper to customize the flavor to your liking. Spice Guide gives you the best spice selection.
Preparing the Chicken: A Breaded Masterpiece
Creating a truly exceptional Air Fryer Chicken Katsu begins with a flawlessly prepared chicken, and that starts with a perfectly breaded masterpiece. Don’t underestimate this seemingly simple step; it’s the foundation for crispy skin and juicy meat. Chicken breast preparation is key – aim for even thickness to ensure uniform cooking.
First, pat the chicken breasts completely dry with paper towels. Moisture is the enemy of crisping! A dry surface allows the breading to adhere properly and, more importantly, browns beautifully in the air fryer. For a total of two 6-ounce chicken breasts, you’ll need approximately 300g of panko breadcrumbs – the Japanese breadcrumbs that deliver the signature crunch. Don’t skimp on the panko; a generous coating is essential. You’ll also need about 1/2 cup of all-purpose flour, acting as a light adhesive for the panko and preventing the breading from falling off during the cooking process. Flour dredge is important to have as a layer of protection.
Next, prepare your wet ingredients. In a shallow dish, whisk together about 1 large egg – preferably lightly beaten – with about 1 tablespoon of water. This creates a luscious coating that helps the panko stick and adds flavor. A little splash of soy sauce (about 1 teaspoon) can also be incorporated for enhanced savory notes. You can also add a pinch of salt and a dash of black pepper. Egg wash recipes are easily customizable.
Now, let’s build your breading station. You’ll need three separate shallow dishes. In the first, place the flour. In the second, pour the beaten egg mixture. In the third, place the panko breadcrumbs. A good rule of thumb is to use a dish size of approximately 8-10 inches. The size of the dishes will affect the amount of breading you can comfortably work with.
To bread the chicken, begin by dredging each chicken breast in the flour, ensuring it’s fully coated and shaking off any excess. Then, dip it into the beaten egg, allowing it to soak for a few seconds. Finally, coat it generously with panko breadcrumbs, pressing firmly to make sure every surface is covered. It’s crucial to press firmly; this is what creates that incredible crispiness. If you’re struggling to get the breading to stick, try chilling the breaded chicken in the refrigerator for 15-20 minutes before cooking. This helps the breading adhere better. Chicken breading techniques can vary based on preference.
Don’t overcrowd the air fryer basket. To ensure even cooking, work in batches if necessary. Consider using a wire rack inside the air fryer basket to elevate the chicken breasts slightly, allowing hot air to circulate around them more effectively. Air fryer basket organization is key to getting the best results. Finally, remember that a well-prepared breaded chicken breast is the cornerstone of a truly spectacular Air Fryer Chicken Katsu. A little extra time and effort here will pay off handsomely in the form of incredibly crispy, juicy, and flavorful results.
Cooking Perfection: Air Fryer Settings & Times
Achieving the perfect crispy Chicken Katsu in your air fryer requires a little finesse, primarily centered around temperature and timing. The air fryer’s rapid air circulation is key to that coveted crunch, so understanding how it works is crucial. Let’s break down the optimal settings and times – but remember, air fryers can vary, so a little experimentation is always recommended.
Temperature: The ideal temperature for cooking Chicken Katsu in an air fryer typically falls between 380°F (193°C) and 400°F (204°C). Starting at 400°F (204°C) gives you the most immediate searing and crisping effect, which is essential for developing a truly robust crust. Lowering the temperature slightly – to 380°F (193°C) – after the initial searing can prevent the outside from burning before the inside is fully cooked. Maintaining a consistent temperature throughout the cooking process is also critical. Fluctuations can lead to uneven cooking, with some parts becoming overly crispy while others remain soggy.
Timing: The cooking time will depend on the size and thickness of your chicken pieces, as well as the air fryer model itself. Generally, you can expect the first side to cook for approximately 8-10 minutes at 400°F (204°C). After flipping the chicken pieces – a crucial step to ensure even cooking – cook the other side for another 6-8 minutes at the same temperature. Watch the chicken carefully during this stage. You’re looking for an internal temperature of 165°F (74°C), which is the safe minimum for poultry. Use an instant-read thermometer inserted into the thickest part of the meat to check. Don’t rely solely on time; the thermometer is your best friend here.
Flipping: Flipping the chicken pieces halfway through cooking is absolutely vital. This ensures that both sides are exposed to the hot air, leading to even browning and crisping. For larger pieces, you might need to gently shake the air fryer basket to ensure the pieces aren’t sticking together.
Air Fryer Basket Spray: Don’t underestimate the power of a quick spray with cooking oil. Before adding the chicken to the basket, lightly coat the sides and top with a spray of high-smoke-point oil, such as avocado or grapeseed oil. This creates a barrier that prevents the chicken from sticking and contributes significantly to the crisping process. Spray Cooking Oil is a great option.
Considerations for Different Air Fryers: Some air fryers have settings specifically designed for ‘roasting’ or ‘crisping.’ These can be helpful, but always monitor the temperature and cooking time closely. If your air fryer tends to run hot, you may need to reduce the temperature slightly or shorten the cooking time. Air Fryer Models offer a wide variety of settings and features – explore yours to find the optimal settings for Chicken Katsu.
Ultimately, mastering the art of air frying Chicken Katsu is about observation and adjustment. Pay attention to how your chicken is browning, and don’t be afraid to tweak the temperature and timing until you achieve the perfect balance of crispy exterior and juicy interior. Understanding Air Fryer Heat can offer helpful insights.
Resting & Serving: Achieving Maximum Flavor
Once the air fryer has finished cooking the chicken katsu to golden perfection, it’s absolutely crucial to allow it to rest for at least 5-10 minutes before serving. This seemingly simple step is the key to unlocking the truly exceptional flavor and texture that makes this dish so irresistible. During the cooking process, the internal heat of the chicken continues to circulate, which can actually cause some of the moisture to be reabsorbed back into the protein, resulting in a slightly softer, less crispy final product. Resting the chicken allows this residual heat to dissipate, and, more importantly, allows the surface proteins to re-establish a tight, crisp structure. This essentially ‘seals’ in the delicious fried flavor and helps maintain that coveted crunchy exterior.
Furthermore, resting also gives the juices within the chicken a chance to redistribute throughout the meat. As the meat cools, the moisture molecules shift, concentrating flavor compounds and creating a more succulent and flavorful bite. Think of it like allowing a good wine to decant—it releases its full potential. Don’t rush this part; it’s not just about waiting; it’s about enhancing the overall eating experience.
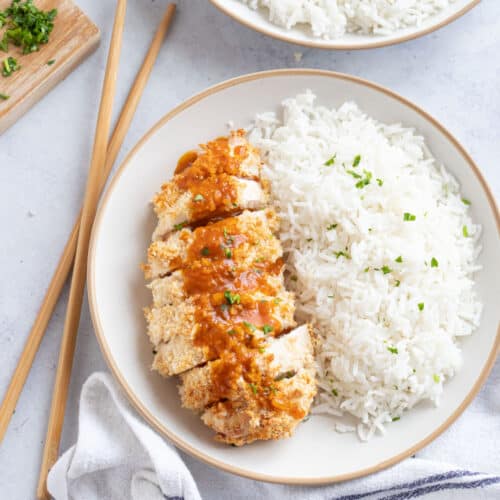
When serving, consider a light drizzle of the remaining pan juices (carefully strained, of course!) – these are packed with concentrated savory goodness. A sprinkle of freshly chopped scallions or finely sliced chives adds a vibrant pop of color and a subtle oniony flavor, complementing the richness of the chicken. Traditionally, chicken katsu is served with a mound of steamed Japanese rice, providing a neutral base to soak up all that fantastic sauce. A simple side of pickled ginger is also a classic accompaniment, offering a palate-cleansing counterpoint to the richness of the dish. Don’t discard the breading—it’s worth saving and incorporating into a flavorful coating for your rice or a crusty roll – this is a great way to maximize the incredible flavor you’ve created. To truly elevate your chicken katsu experience, consider serving it with a Japanese mayonnaise—a mixture of Japanese mayonnaise and sriracha provides a delightful sweet and spicy kick Japanese mayonnaise, and a sprinkle of toasted sesame seeds for an aromatic finish sesame seeds. Ultimately, resting and serving properly isn’t just about presentation; it’s a fundamental step in transforming a well-cooked chicken katsu into a truly memorable culinary masterpiece. Don’t underestimate the power of patience – it’s worth every minute. Consider this as your ‘moment of zen’ while preparing a fantastic dish, and remember that the best dishes are often the result of thoughtful preparation and a little bit of waiting waiting for a dish to rest. Adding a touch of mirin after resting the chicken will further enhance the savory flavor.
Storage & Reheating: Keeping the Crispness
Once you’ve achieved that perfectly golden, crispy Air Fryer Chicken Katsu, it’s crucial to store and reheat it correctly to maintain that textural delight. Let’s face it, a soggy Katsu is a tragedy! Here’s how to preserve its magnificent state.
Storage:
Allowing the Katsu to cool completely before storing is paramount. Covering it tightly with a food-grade container or tightly wrapping in plastic wrap will help prevent it from drying out. For best results, store it in the refrigerator for up to 5 days. However, it’s often at its best consumed within 3 days, as the crispness will gradually diminish over time. To maintain optimal crispness during storage, you can place a piece of parchment paper or paper towel between the Katsu pieces – this helps absorb any excess moisture. Consider a vacuum-sealed container for longer storage, which significantly reduces moisture exposure. Freezing the Katsu is also an option, but be aware that the texture may change slightly upon thawing; it’s best enjoyed within 2-3 months.
Reheating – The Key to Revival:
Reheating Air Fryer Chicken Katsu is a delicate operation – you want to re-establish the crispness without turning it into a rubbery mess. Here’s our recommended method – and it’s significantly better than simply microwaving!
- Low and Slow: Set your Air Fryer to 375°F (190°C) for 5-7 minutes. This lower temperature is crucial. Higher temperatures will simply dry the Katsu out and compromise the crispness. The parchment paper trick again comes into play – placing it in the basket with the Katsu helps absorb excess moisture from the air, which is key for maintaining the crispness.
- Flip & Repeat: After 5 minutes, carefully flip the Katsu pieces over with tongs. Continue cooking for another 3-5 minutes, or until they’re heated through and the exterior is noticeably crisp again. Watch carefully – every air fryer is different, so cooking times can vary slightly.
- Spray with Oil (Optional): For an extra crispy finish, lightly spray the Katsu with a touch of cooking oil (about 1 teaspoon) before reheating. This creates a thin coating that helps it re-crisp beautifully. A high-smoke point oil like avocado oil is ideal.
- Don’t Overcook: Overheating will immediately turn the Katsu into a dense, unappealing texture. Err on the side of slightly undercooking, as it will continue to crisp up as it cools.
Key Takeaway: Reheating Air Fryer Chicken Katsu is all about gentle heat and careful monitoring. By following these guidelines, you can enjoy that incredible crispy texture – time and time again. To ensure even crispness, consider batch reheating – small batches at a time to avoid overcrowding the air fryer basket. Proper storage and reheating is the difference between a truly amazing meal, and a disappointing one! Also, keep in mind to add ingredients such as lemon juice or sriracha for an additional flavor boost. Experimenting with sauces is encouraged to enhance the final result. Consider placing the reheated Katsu under a preheated broiler for a brief minute to boost the crispness and add an appealing sheen.
:max_bytes(150000):strip_icc()/7724372-9432d0c0565e48b9b718be11147bf779.jpg) ,
, ,
,