
Introduction: The Magic of Air Frying
Air frying has revolutionized the way we cook, offering a remarkably quick and convenient method to achieve restaurant-quality results without the need for deep frying. Traditionally, achieving that satisfyingly crisp exterior and juicy interior required submerging food in hot oil, a process that’s often messy, time-consuming, and loaded with unhealthy fats. However, air fryers operate on a brilliant principle: they use circulating hot air to mimic the effect of deep frying, but with significantly less oil and substantially fewer calories. It’s like having a miniature convection oven designed specifically for smaller portions. The technology behind air frying is quite sophisticated, employing a heating element and a fan to rapidly circulate hot air around the food at speeds up to 375°F (190°C). This intense heat quickly dehydrates the surface of the food, creating that coveted crispy texture, while the circulating air ensures even cooking. This method drastically reduces the amount of oil needed, typically just a tablespoon or two, depending on the recipe. Furthermore, because the heat is concentrated, air fryers cook food faster than conventional ovens, saving you both time and energy. The beauty of an air fryer truly lies in its versatility – it’s not just for chicken wings and french fries! You can air fry vegetables, seafood, desserts, and even entire meals with remarkable success. It’s a fantastic tool for anyone looking to embrace healthier cooking habits without sacrificing flavor or texture. It’s become a kitchen staple for good reason – it simplifies cooking while producing incredibly delicious results. The reduction in oil usage alone makes it an environmentally conscious choice, and the faster cooking times are a welcome bonus. healthy cooking is now easier than ever with an air fryer. air fryer technology is constantly evolving, offering innovative features and even greater convenience. reducing oil consumption is achievable with this appliance. faster cooking times make it a great time-saver. It truly is a game-changer in the kitchen. healthy air fryer recipes are abundant, making experimentation easy.
Ingredients You’ll Need for This Delicious Dish
Let’s gather all the ingredients you’ll need to create this incredibly flavorful and satisfying Air Fryer Orange Chicken. Don’t be intimidated – it’s a surprisingly simple recipe with readily available components.
For the Chicken:
-
Chicken Thighs (Bone-In, Skin-On): Approximately 1.5 – 2 pounds. Bone-in, skin-on thighs provide the most flavor and render beautifully in the air fryer, creating crispy skin. You can also use boneless, skinless thighs, but you’ll likely need to adjust cooking time. chicken thighs
-
Cornstarch: 1/2 cup. This is crucial for creating a light and crispy coating around the chicken. cornstarch
-
Salt & Black Pepper: To taste. Seasoning is key to unlocking the full potential of the dish. salt and black pepper
-
Vegetable Oil: 2 tablespoons. A neutral-flavored oil like avocado or canola oil is ideal for searing the chicken. avocado oil or canola oil
For the Orange Sauce:
-
Orange Juice: 1 cup (freshly squeezed is highly recommended – it makes a huge difference!). orange juice
-
Orange Zest: 2 tablespoons – Don’t skip the zest! It provides a concentrated burst of orange flavor. orange zest
-
Soy Sauce: 1/4 cup (low-sodium is preferred). Adds depth and umami to the sauce. soy sauce
-
Honey: 2 tablespoons. Balances the acidity of the orange juice and creates a luscious glaze. honey
-
Rice Vinegar: 2 tablespoons. Adds a touch of tanginess and complexity to the sauce. rice vinegar
-
Garlic: 2 cloves, minced. Essential for building flavor. garlic
-
Ginger: 1 teaspoon, grated (fresh is best!). Adds a warm, spicy note. ginger
-
Sesame Oil: 1 teaspoon (for finishing – adds a fragrant touch). sesame oil
-
Sesame Seeds: 1 tablespoon (for garnish – optional, but adds visual appeal). sesame seeds
Step-by-Step Instructions: Cooking the Orange Chicken
Let’s get cooking! This air fryer orange chicken recipe is surprisingly simple and yields incredibly crispy, flavorful results. Here’s a detailed breakdown of the process:
Prep Work (5 minutes):
- Marinate the Chicken: In a medium bowl, combine the chicken pieces with 2 tablespoons of soy sauce – soy sauce – , 1 tablespoon of rice vinegar – rice vinegar, 1 teaspoon of ground ginger – ground ginger, 1/2 teaspoon of garlic powder, and a pinch of black pepper. Toss to coat evenly. This marination step is crucial for infusing the chicken with flavor and tenderizing it. Let it sit for at least 15 minutes, or up to 30 minutes, for maximum benefit. You can even do this while you prep the other ingredients.
Air Frying the Chicken (18-22 minutes):
- Preheat the Air Fryer: Preheat your air fryer to 400°F (200°C). Ensure you have adequate space for the chicken pieces to circulate properly – overcrowding can lead to less crispy results.
- Arrange the Chicken: Place the marinated chicken pieces in a single layer in the air fryer basket. Avoid stacking them on top of each other. You may need to cook in batches, especially if you have a smaller air fryer.
- Cook for 18-22 Minutes: Air fry for 18-22 minutes, flipping the chicken pieces halfway through (around the 10-11 minute mark) to ensure even cooking and crisping on all sides. Keep an eye on it – cooking times can vary slightly depending on your air fryer model. The internal temperature of the chicken should reach 165°F (74°C) for safe consumption. You can use a meat thermometer to confirm.
Making the Orange Sauce (5 minutes – happens concurrently with cooking):
- Prepare the Sauce: While the chicken is air frying, make the sauce. In a small saucepan, combine 1/2 cup of orange juice – orange juice – , 2 tablespoons of honey – honey, 1 tablespoon of cornstarch – cornstarch, 1 tablespoon of water, and a pinch of red pepper flakes (optional, for a touch of heat). Stir constantly over medium heat until the sauce thickens – usually about 3-5 minutes.
Combining Chicken and Sauce (2 minutes):
- Coat the Chicken: Once the chicken is cooked through and the sauce has thickened, immediately transfer the chicken pieces to the saucepan with the orange sauce. Toss to coat thoroughly. The residual heat from the chicken will continue to cook the chicken and meld the flavors together beautifully. You could also toss it in a large bowl.
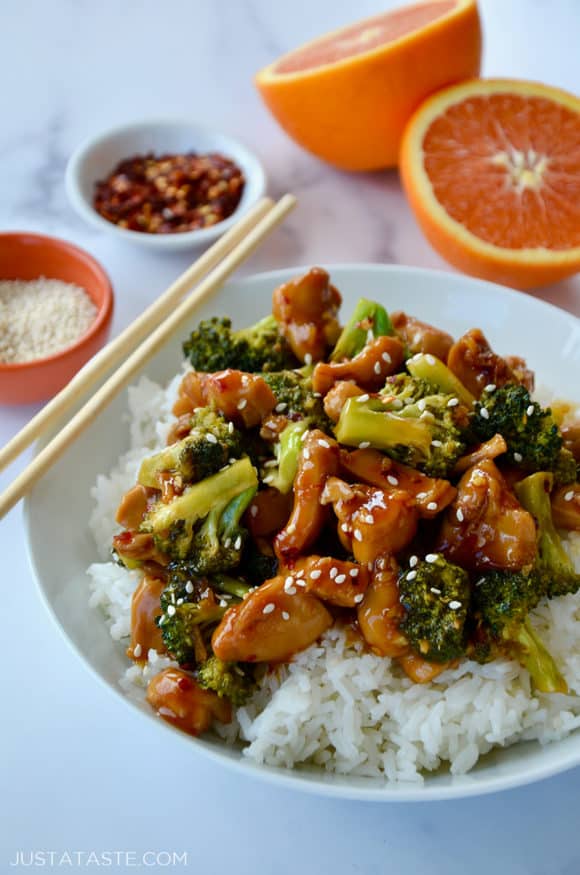
Serve Immediately: Serve the air fryer orange chicken immediately over rice – rice – or noodles. Garnish with chopped green onions or sesame seeds for extra flavor and visual appeal. Enjoy this incredibly easy and delicious air fryer orange chicken recipe! You can also add a little bit of zest from an orange – orange zest
Tips & Tricks for Perfectly Crispy Chicken
Achieving that ideal crispy texture for your air fryer orange chicken is all about a few key techniques. Don’t overcrowd the air fryer basket; working in batches is crucial. Overcrowding will steam the chicken, preventing it from getting that lovely, golden-brown crisp. Instead, aim for about 6-8 pieces of chicken at a time. Before you begin, pat the chicken pieces thoroughly dry with paper towels. Moisture is the enemy of crispiness! A dry surface allows the hot air to circulate properly and create that fantastic sear. Also, consider marinating the chicken in a little cornstarch – about 1 tablespoon per pound – before cooking. Cornstarch helps to absorb moisture and create a lighter, crispier coating. Don’t be tempted to open the air fryer basket frequently during cooking, as this releases hot air and can compromise the crisping process. Resist the urge to peek! For an extra boost of flavor and crispiness, you can sprinkle a small amount of toasted sesame seeds over the chicken during the last minute or two of cooking. These add a nutty flavor and beautiful visual appeal. Sesame seeds are a great addition. Another important detail is the temperature. While many air fryers recommend 400°F (200°C), starting at 375°F (190°C) and then increasing to 400°F (200°C) halfway through the cooking process can help prevent the outside from getting too dark before the inside is fully cooked. Monitor the internal temperature of the chicken with a meat thermometer – it should reach 165°F (74°C) for safety and maximum tenderness. Meat thermometer – having one ensures perfectly cooked chicken every time. Finally, a light spray of oil – just a quick spritz – during the last few minutes of cooking can further enhance the browning and crispness. Cooking spray is often overlooked but can make a big difference. Don’t forget to let the chicken rest for at least 5-10 minutes after cooking; this allows the juices to redistribute, resulting in a more tender and flavorful final product. Resting chicken is a key step that’s often skipped. Remember, patience is key – don’t rush the process, and you’ll be rewarded with incredibly crispy and delicious air fryer orange chicken. Air fryer chicken is a game-changer! Proper technique and a few simple tricks will transform your cooking, and allow you to make the most of your air fryer. Air fryer “}
Serving Suggestions & Side Dish Ideas
Once you’ve mastered the incredibly flavorful and satisfying crispy air fryer orange chicken, you’ll naturally want to complement it with the perfect side dishes. The bright, tangy-sweet flavor profile of this chicken pairs beautifully with a wide variety of options, ranging from light and refreshing to hearty and comforting. Let’s explore some fantastic ideas!
Light & Refreshing Options:
- Steamed Rice: A classic pairing, fluffy white rice (jasmine or basmati work particularly well) is a neutral canvas that allows the orange chicken to truly shine. Consider adding a little ginger and garlic to the rice while cooking for an extra layer of flavor flavor combination.
- Asian Slaw: A crisp, cool Asian slaw with a sesame vinaigrette provides a fantastic textural contrast and adds a refreshing element. Shredded cabbage, carrots, and a touch of cilantro or scallions are essential slaw recipe.
- Cucumber Salad: Thinly sliced cucumbers tossed in rice vinegar, sugar, and a pinch of salt create a light, hydrating, and delightfully tangy accompaniment cucumber recipe.
- Edamame: Steamed edamame sprinkled with sea salt offers a simple yet satisfying side, enhancing the dish’s vibrant colors edamame instructions.
Hearty & Comforting Options:
- Mashed Sweet Potatoes: The sweetness of mashed sweet potatoes balances the tangy orange chicken beautifully sweet potato mash recipe. Adding a little maple syrup and cinnamon elevates the experience even further.
- Roasted Asparagus: Roasting asparagus with a touch of olive oil, salt, and pepper brings out its natural sweetness. Adding a squeeze of lemon juice at the end brightens the flavors asparagus recipe.
- Quinoa: A protein-packed alternative to rice, quinoa adds a nutty flavor and a healthy dose of nutrients quinoa cooking instructions.
- Garlic Green Beans: Sautéed green beans with garlic and a splash of soy sauce offer a savory counterpoint to the sweetness of the chicken and sauce green bean recipe.
Creative Pairings:
- Wonton Wrappers: Crisp fried wonton wrappers can be used to create little cups filled with orange chicken for an interactive and fun dining experience wonton recipe.
- Naan Bread: Warm naan bread, brushed with garlic butter, is perfect for soaking up the delicious orange sauce naan recipe.
No matter your preference, experimenting with different side dishes is part of the fun! The key is to find combinations that complement the vibrant flavors of the orange chicken and elevate your overall dining experience. Consider adding toasted sesame seeds or chopped scallions for an extra visual and textural appeal topping suggestions.
Recipe Variations & Customization Options
Want to personalize your crispy air fryer orange chicken to perfectly suit your tastes? The beauty of this recipe is its adaptability. Here’s a breakdown of ways you can tweak it, from subtle changes to bolder additions:
Spice It Up: The level of heat in this recipe is easily adjustable. If you crave a fiery kick, increase the amount of red pepper flakes to 1/2 to 1 teaspoon, or even add a pinch of cayenne pepper for an extra boost. You could also incorporate a finely chopped jalapeño pepper – start with just a small amount (about 1/4 of a pepper) and add more to taste. For a smoky heat, try a dash of chipotle powder – a little goes a long way!
Sweetness Control: The orange glaze is the heart of this dish, and the sweetness can be adjusted based on preference. If you prefer a less sweet flavor, reduce the amount of honey to 2 tablespoons. For a tangier glaze, increase the orange juice to 1/2 cup, or substitute some of it with lime juice for a citrusy twist. You could also add a tiny amount of maple syrup for a richer, more complex sweetness.
Flavor Enhancements: Don’t be afraid to experiment with additional flavors. A tablespoon of garlic powder adds a savory depth. A pinch of ginger powder provides a warm, aromatic note. For an umami boost, consider a dash of soy sauce (low sodium is recommended) – start with 1 teaspoon and add more to taste. A little star anise (remove before serving) adds a delicate, licorice-like flavor that complements the orange beautifully. Don’t forget a generous sprinkle of sesame seeds for added texture and nutty flavor, especially toasted sesame seeds – just a quick toast in a dry pan adds so much depth! Adding a sprig of fresh thyme or rosemary to the pan while cooking can infuse the chicken with a fragrant herbal note. Finally, for a more sophisticated twist, consider adding a small amount of white wine – about 1/4 cup – during the cooking process for added acidity and complexity.
Vegetable Variations: While traditionally served with orange chicken, feel free to add other vegetables to the air fryer alongside the chicken. Broccoli florets, snap peas, or carrots all work wonderfully. Just be mindful of cooking times, adding denser vegetables later in the process. Remember to toss vegetables in a little cornstarch before adding them to the air fryer to help them crisp up. Adding in some sliced bell peppers – red, yellow, or orange – would really enhance the color and flavor profile as well.
Glaze Consistency: For a thicker glaze, simmer the sauce for an extra 2-3 minutes after combining the ingredients. If you prefer a thinner glaze, add a tablespoon of water at a time until you reach your desired consistency. Don’t be afraid to experiment – the best glaze is the one you like the most!”

 ,
,:max_bytes(150000):strip_icc()/Orange-Chicken--Broccoli-Skillet-step4-11999_preview_maxWidth_4000_maxHeight_4000_ppi_300_quality_100-78017584e80640c3a838870474e44154.jpg)