
Introduction: A Childhood Favorite Reimagined
I have incredibly vivid memories of my own childhood, and they often revolve around one simple, yet profoundly satisfying, meal: sweet and sour chicken. Growing up, a chicken nugget meal, coupled with a generous container of that tangy, sweet sauce from McDonald’s, was pure happiness. It wasn’t about gourmet dining; it was about a comforting, familiar flavor that brought a little bit of joy to a busy week. Fast forward a few years, and while my tastes have evolved – I certainly don’t crave a McDonald’s meal every night – the core craving for that sweet and sour flavor remains. I’ve spent a considerable amount of time, experimenting and refining, to create a recipe that captures that nostalgic essence, while also being adaptable and suitable for a family meal. This isn’t just any sweet and sour chicken; it’s a version built on simplicity, focused on delivering a truly delicious experience without the fuss. It’s a dish that celebrates flavor without compromising on ease, and it’s become a staple in our home – a reminder of those cherished childhood moments, reimagined for a modern palate. The key is to find that perfect balance between sweet and sour, ensuring each bite is bursting with deliciousness. I wanted to create something that my family genuinely loved, and I believe this recipe achieves exactly that – a testament to the enduring appeal of a classic comfort food. It’s a recipe designed to evoke happy memories, one delicious mouthful at a time. Furthermore, I’ve paid close attention to texture, striving for a crispy exterior and a tender, juicy interior. It’s a reflection of the values I hold when cooking for my family: wholesome, flavorful, and, above all, enjoyed together. And let’s be honest, being able to make it gluten-free and dairy-free is a huge bonus, making it accessible to everyone in the family – a win-win! comfort food truly is the best medicine. family recipe.
The Simple Secret to Delicious Sweet & Sour Chicken
Let’s be honest, a truly fantastic sweet and sour chicken isn’t about complicated techniques or exotic ingredients. It’s about a few key decisions that build layers of flavor and texture. The core secret lies in balancing sweet, sour, and savory, and ensuring the chicken itself is perfectly cooked – tender on the inside and beautifully browned on the outside. Many recipes overcomplicate this process, relying on heavy breading and deep frying, which can mask the true taste of the sauce and result in greasy chicken. This recipe deliberately avoids those pitfalls. Instead, we achieve that signature crispness through a simple flour coating and a careful browning process in a skillet. It’s a technique that’s surprisingly effective and remarkably easy to master.
Furthermore, the quality of the sauce is paramount. While store-bought sauces can be convenient, they often lack depth and complexity. This recipe focuses on building a sauce from scratch, starting with pineapple juice – the natural sweetness of the pineapple is fundamental to the flavor profile. Distilled white vinegar provides the necessary acidity to cut through the sweetness, while a touch of orange food coloring adds a vibrant hue and a subtle citrus note. The cornstarch slurry is a crucial thickening agent, creating a luscious, glossy sauce that clings perfectly to the chicken. It’s this careful consideration of the sauce, combined with a thoughtful approach to the chicken preparation, that unlocks the truly exceptional taste of sweet and sour chicken. It’s a reminder that sometimes, the simplest approaches yield the most rewarding results – especially when it comes to a family-favorite dish like this. Don’t underestimate the power of a well-executed sauce and a perfectly browned chicken; they truly are the foundations of this incredible flavor combination. The secret isn’t hidden in fancy ingredients; it’s in the mindful execution of a few core techniques. flavor development is key. Consider also exploring different vinegar types for a deeper understanding of how acidity impacts flavor.
Ingredients: What You’ll Need for This Easy Recipe
Let’s gather everything you’ll need to create this incredibly delicious and family-friendly Sweet & Sour Chicken. This recipe focuses on simplicity and fresh flavors, ensuring a vibrant and satisfying meal. You’ll find a curated list of ingredients below, all designed to elevate this classic dish to a new level of deliciousness. Don’t be intimidated; this is a straightforward recipe perfect for both beginner and experienced cooks alike. We’ve considered options for customization, including a fantastic gluten-free adaptation, so you can tailor the recipe to your family’s specific dietary needs and preferences. Sourcing high-quality ingredients is key to achieving that authentic Sweet & Sour taste – so let’s make it count! Fresh Chicken is the star of the show, and we’ll use it in generous portions for maximum flavor. Pineapple Chunks provide a burst of tropical sweetness, complementing the tangy sauce beautifully. Cornstarch is crucial for thickening our sauce, and we’ll use just the right amount to achieve that perfect consistency. Rice Vinegar contributes to the signature sour element, balanced with the sweetness. Sugar rounds out the flavor profile, adding a gentle sweetness. And of course, we need a dash of Orange Food Coloring to give the sauce its vibrant, appetizing color. For the gluten-free version, Gluten-Free Flour Mix is essential, ensuring everyone can enjoy this delicious meal. Finally, a little Ginger and Garlic Powder adds depth and aromatic complexity.
Here’s a detailed list of ingredients:
- 3-4 Medium Boneless Skinless Chicken Breasts, diced (approximately 1.5 – 2 lbs)
- 1 1/2 cup All-Purpose Flour
- 1 tsp Garlic Powder
- 1/4 tsp Ginger
- 4 tbsp Olive Oil
- 1 8 ounce can Pineapple Chunks, drained (juice reserved)
- 1/4 cup Cornstarch
- 1 3/4 cups Water, divided
- 3/4 cup Sugar
- 1/2 cup Distilled White Vinegar
- 2 drops Orange Food Coloring
- 1/2 cup Diced Colorful Bell Peppers
- Prepared White Rice
Sweet & Sour Sauce: The Flavorful Foundation
The heart of this Sweet & Sour Chicken recipe lies in its vibrant and tangy sauce – a flavor profile that instantly transports you to countless Chinese takeout experiences. But don’t be intimidated; crafting this sauce is remarkably simple, relying on a few key ingredients to create a depth of flavor that’s far superior to anything you’d find in a jar. It’s not just about sweetness; the balance of sugar, vinegar, and a touch of orange zest creates a complex taste that’s both refreshing and satisfying. The inclusion of pineapple juice, strained from the chunks we use, adds a subtle tropical note that elevates the sauce, and the addition of a couple of drops of orange food coloring, although technically unnecessary for flavor, provides a beautiful hue that makes this dish visually appealing – a truly impressive presentation! The cornstarch is crucial here, acting as a thickening agent, ensuring the sauce coats every piece of chicken perfectly, creating that luscious, glossy finish that defines a truly great Sweet & Sour Chicken. This isn’t a hurried addition; it’s a carefully constructed flavor experience. The ratio of sugar to vinegar is vital; a slight adjustment can dramatically alter the taste – a little more sugar will intensify the sweetness, while a bit more vinegar will boost the tang. Many recipes call for ketchup, but we intentionally avoid it here, opting for a cleaner flavor profile. The best Sweet & Sour Sauces are made from scratch and they are the result of years of refined taste. The key is to build layers of flavor, starting with the base of sugar and vinegar, then incorporating the pineapple juice and, finally, thickening the sauce with cornstarch. The mixture must be brought to a boil and reduced to a rich and glossy consistency. This is the foundation of the entire dish, and when done right, it will have everyone begging for more. You could explore variations with soy sauce for extra umami, or a pinch of red pepper flakes for a little heat, but the classic version, as outlined here, is a fantastic starting point. flavor balance is really critical. sweet and sour sauce recipe
Chicken Preparation: Achieving a Crispy Coating
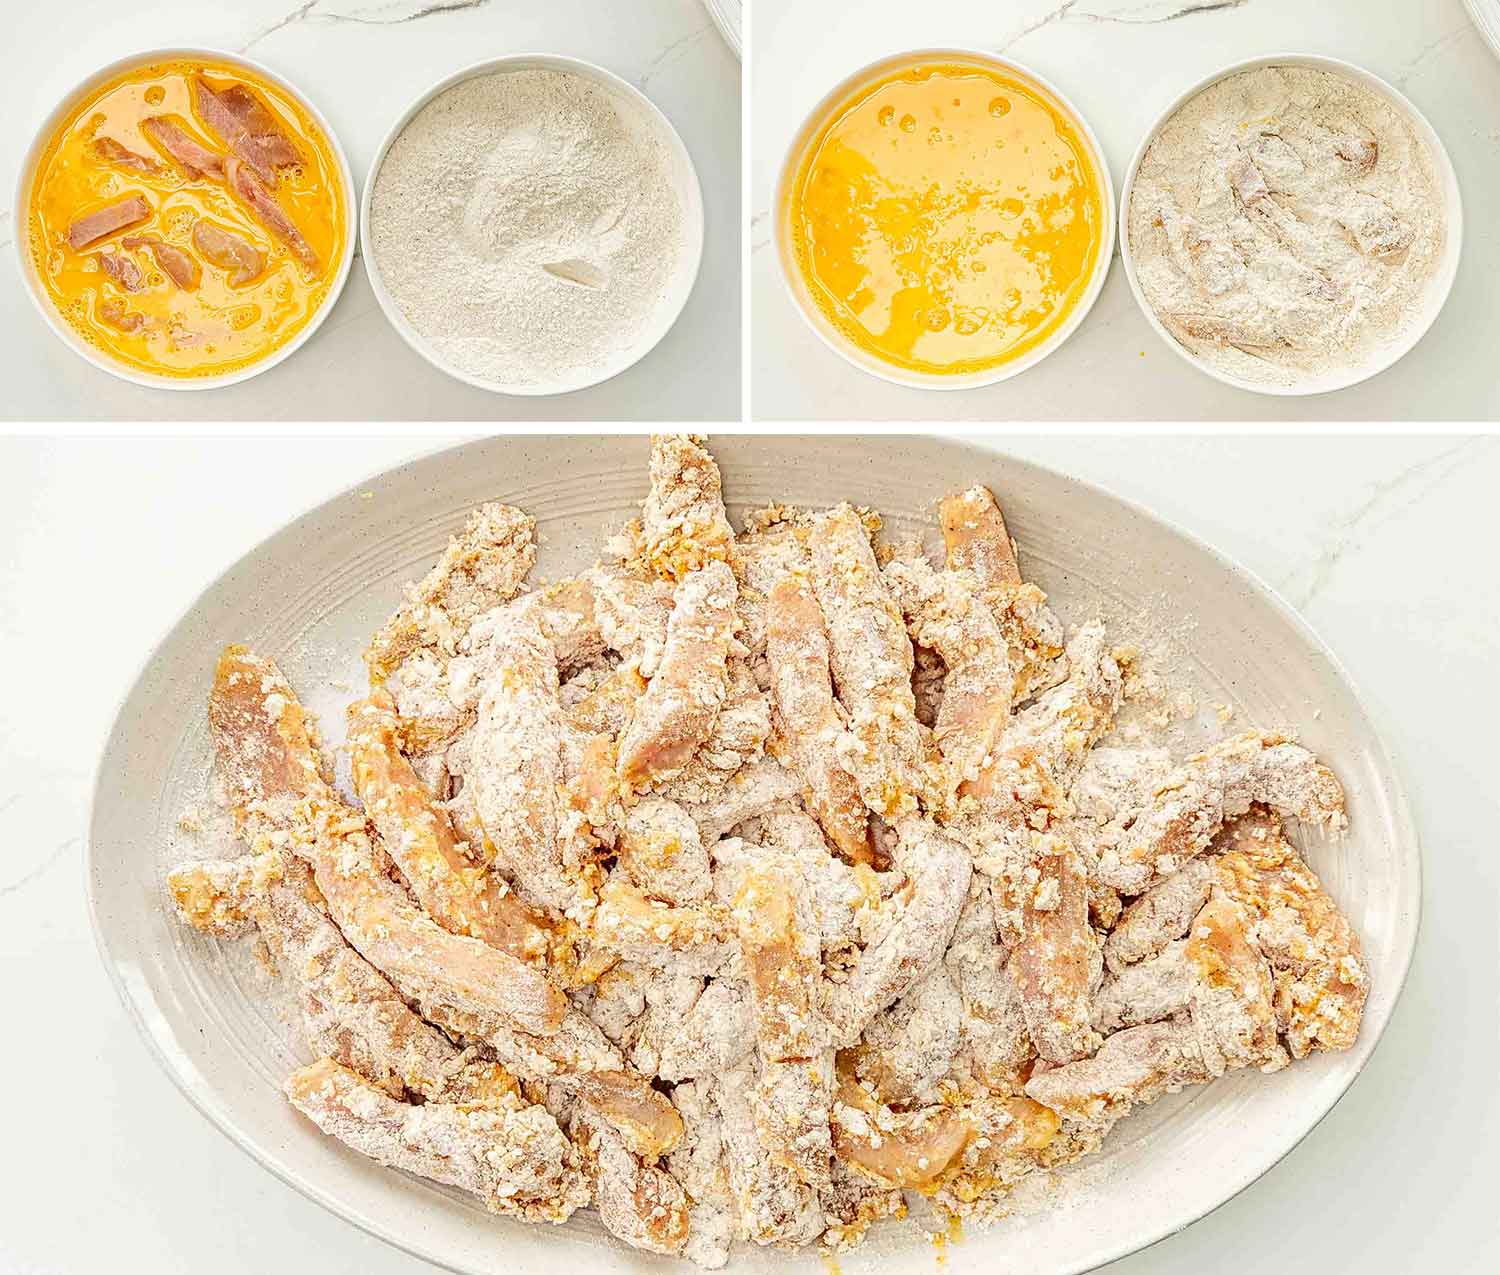
Let’s be honest, achieving that perfect, shatteringly crisp coating on chicken is often the trickiest part of any sweet and sour recipe. The goal isn’t just to brown the chicken; it’s to create a textured surface that grabs onto the tangy, sweet sauce and holds it beautifully. This recipe avoids excessive breading and deep frying, opting instead for a simple flour-based coating that delivers fantastic results. Flour is key here – a good quality all-purpose flour is essential for absorbing moisture and creating that desirable crispness.
To properly prepare the chicken for a crispy coating, it’s crucial to ensure it’s evenly coated and that excess flour is removed. The first step in this process is to place the diced chicken into a gallon ziploc bag and thoroughly toss it with flour, ginger powder, and garlic powder. This ensures every piece of chicken is evenly coated, minimizing any dry spots that could prevent crisping. After tossing, it’s important to gently shake out any excess flour. You don’t want a thick, heavy coating, as this will steam the chicken instead of creating a crispy exterior. A light, even dusting is what we’re after. The key to a truly crispy finish lies in the subsequent browning process – ensuring every piece is properly coated before it hits the hot skillet. Olive oil is used to coat the skillet. The proper temperature of the skillet is also important, it must be hot enough to brown the chicken quickly, but not so hot that it burns it immediately. Finally, don’t overcrowd the skillet; cooking in batches ensures even browning and prevents the temperature from dropping too much, which can result in steamed, rather than browned, chicken. A well-prepared, lightly floured chicken, coupled with a hot skillet and careful attention, will guarantee a consistently crispy and delicious sweet and sour chicken experience.
Browning the Chicken: Key to a Tender & Flavorful Meal
Browning the chicken is absolutely critical to achieving the truly exceptional texture and depth of flavor that makes this Sweet & Sour Chicken recipe so beloved. It’s far more than just searing the outside; it’s about developing a beautiful Maillard reaction—that complex, savory browning that happens when sugars and proteins are heated together. Think of it like this: the initial tossing of the chicken with the gluten-free flour, garlic powder, and ginger is just the first step in building that flavor base. The flour itself doesn’t solely provide texture; it absorbs those delicious browned bits from the pan, amplifying the savory notes. Flavor development
Now, let’s talk about the technique. Don’t overcrowd the skillet! Adding too much chicken at once lowers the temperature of the pan, leading to steaming rather than browning. Work in batches, ensuring that each piece of chicken has enough space to properly sear. A good quality, heavy-bottomed skillet – one that retains heat well – is your best friend here. Cast iron is fantastic for this, but any sturdy stainless steel will do. You want to use olive oil – a good quality extra virgin olive oil adds a subtle richness that complements the sweet and sour sauce. Don’t be tempted to stir constantly; resist the urge! Let the chicken develop a golden-brown crust before flipping. This initial sear locks in the juices, preventing the chicken from drying out. Understanding sear
Furthermore, a slight build-up of color on the chicken is desirable. A little bit of char is exactly what you’re looking for. It’s the sugars in the marinade caramelizing and contributing another layer of flavor. Don’t push it too far, though; you don’t want the chicken to burn. The goal is a beautiful, evenly browned exterior with a juicy, tender interior. This is where your careful attention to detail pays off. Achieving this perfect browning is the key to unlocking the full potential of this recipe, elevating it from a simple Sweet & Sour Chicken to a truly memorable culinary experience. Remember, a properly browned chicken is more than just visually appealing – it’s a foundation of intensely flavorful goodness. Chicken searing tips
Don’t skip the flip! Turning the chicken over allows for even browning on both sides, ensuring that every bite is bursting with that incredible flavor. It’s also crucial for preventing the chicken from sticking to the pan – a common problem when cooking chicken. Achieving optimal sear!
Gluten-Free Adaptation: Making it Suitable for Everyone
Switching to a gluten-free adaptation of this beloved sweet and sour chicken is surprisingly simple and ensures everyone at the table can enjoy a delicious meal. The original recipe relies on all-purpose flour for coating the chicken, which contains gluten. However, readily available gluten-free flour blends can perfectly replicate the texture and crispy coating without compromising flavor. You can find a fantastic selection of gluten-free flour mixes online at retailers like Amazon or Walmart. These blends typically contain a combination of rice flour, tapioca starch, and potato starch – ingredients that naturally don’t contain gluten. Using a gluten-free flour blend will maintain the same light and airy texture that you achieve with traditional flour, and provides an equally satisfying crunch when the chicken is browned. It’s important to note that the cornstarch used in the sauce is naturally gluten-free, so it’s not a concern. Just be sure to check the labels of any additional ingredients you might use for extra flavor – particularly if you’re preparing this meal for someone with a severe gluten intolerance. For those with celiac disease or highly sensitive individuals, double-checking ingredient labels for cross-contamination is always advised. The key to a successful gluten-free sweet and sour chicken lies in using a high-quality gluten-free flour blend, ensuring thorough coating of the chicken pieces, and maintaining a hot skillet for a truly crispy finish. With a little care, you’ll find that swapping out the all-purpose flour doesn’t impact the deliciousness of this family favorite. Consider adding a pinch of xanthan gum to your gluten-free flour blend – a common ingredient used to mimic the binding properties of gluten – for an even better result. Xanthan Gum is often found in baking supplies. This makes the coating even stickier and helps it adhere better to the chicken, ensuring a maximum level of crispiness. Finally, don’t forget to clean your work surface and utensils thoroughly after working with the gluten-free flour to prevent any potential cross-contamination. Making this recipe gluten-free is a simple way to expand the enjoyment of this classic dish to all members of your family!
Instructions: Step-by-Step Guide to Perfection
Let’s get cooking! This Sweet & Sour Chicken recipe is designed to be straightforward and deliver incredible flavor. Follow these simple steps, and you’ll be enjoying a family favorite in no time.
1. Preparing the Sauce: Begin by combining 1 1/2 cups of water in a medium saucepan. Add 3/4 cup of sugar, 1/2 cup of distilled white vinegar, and 2 drops of orange food coloring – just enough to give the sauce a subtle, beautiful hue. Bring the mixture to a boil over medium heat, then reduce the heat to low and let it simmer for about 5 minutes, stirring occasionally. Now, for the thickening magic! In a small bowl, whisk together 1/4 cup of cornstarch with 1/4 cup of cold water until completely smooth – this prevents lumps. Slowly pour the cornstarch slurry into the simmering sauce, whisking constantly. Continue to cook for another 2-3 minutes, or until the sauce has thickened to your desired consistency. It should coat the back of a spoon.
2. Coating the Chicken: While the sauce is simmering, prepare your chicken. Cut 3-4 medium boneless, skinless chicken breasts into approximately 1-inch cubes. Place the chicken cubes into a gallon-sized Ziploc bag. Add 1 tablespoon of ground ginger and 1 teaspoon of garlic powder to the bag. Seal the bag and shake vigorously until the chicken is thoroughly coated. This ensures every piece gets a burst of flavor. If you prefer, you can toss the flour, ginger, and garlic in a bowl and then add the chicken.
3. Browning the Chicken: Heat 4 tablespoons of olive oil in a large skillet over medium-high heat. Add the coated chicken cubes in batches – don’t overcrowd the pan, as this will lower the temperature and prevent proper browning. Cook for 6-8 minutes per batch, turning frequently to ensure all sides are evenly browned. It’s crucial to get a good sear on the chicken to develop maximum flavor. Remove the browned chicken from the skillet and place it in a 13×9 inch baking dish.
4. Baking for Flavor: Once all the chicken is browned, drizzle 1/2 cup of the prepared sweet and sour sauce evenly over the chicken in the baking dish. Cover the dish tightly with aluminum foil. Bake in a preheated oven at 400°F (200°C) for 20-25 minutes, or until the chicken is cooked through and the internal temperature reaches 165°F (74°C). The foil keeps the chicken moist and helps the sauce caramelize, adding even more deliciousness.
5. Finishing Touches: While the chicken is baking, prepare your rice according to package directions – fluffy white rice is the perfect accompaniment to this sweet and sour meal. Once the chicken is cooked, remove the foil and check the rice. To serve, arrange cooked rice on plates, top with the browned chicken pieces, and generously drizzle with the remaining hot sweet and sour sauce. For an extra pop of color and freshness, add diced bell peppers (about 1/2 cup) to the plates before serving. You can also garnish with chopped green onions for added flavor and visual appeal. Enjoy this incredibly flavorful and easy Sweet & Sour Chicken – a recipe your whole family will adore!
Serving Suggestions: Complete Your Family Meal
To truly elevate this easy sweet and sour chicken recipe into a complete and satisfying family meal, consider layering the flavors and textures beautifully. Start with a generous portion of fluffy, prepared white rice – a classic accompaniment that soaks up the delicious sweet and sour sauce. Don’t just serve it alongside; create a vibrant rice base by incorporating a little sesame oil and soy sauce for an extra layer of savory depth. Sesame Oil is a fantastic addition.
Beyond the rice, build a colorful and flavorful plate. The diced bell peppers – a mix of red, yellow, and green – add not just visual appeal but also a refreshing crunch. The pineapple chunks, either fresh or canned (drained, of course!), provide a burst of tropical sweetness that complements the sauce perfectly. Pineapple Chunks are a tropical delight.
For an added element of indulgence, consider a sprinkle of toasted sesame seeds on top for added texture and nutty flavor. Toasted Sesame Seeds are a fantastic finishing touch. A small dollop of plain yogurt or sour cream can also add a cooling tang, balancing the sweetness wonderfully. Plain Yogurt is a simple addition that works wonders.
To ensure everyone gets a little bit of everything, portion the chicken, rice, and pineapple strategically on each plate. A side of steamed broccoli or green beans could also be a welcome addition, providing a boost of vitamins and a contrasting color to the plate. Don’t be afraid to let the kids customize their plates – a little variety goes a long way! This sweet and sour chicken recipe is a fantastic base for creating a truly memorable and enjoyable family meal. It’s a recipe that’s sure to become a new favorite, passed down through generations. Finally, a wedge of lime adds a zingy element that brightens up the entire dish! Lime is the perfect finishing flourish.
 ,
,