
Understanding the Air Fryer Technique
The air fryer has revolutionized home cooking, offering a remarkably efficient way to achieve crispy, browned results without the need for a deep fryer’s excessive oil. Unlike traditional ovens, which rely on convection currents to distribute heat, the air fryer utilizes a heating element positioned close to the food. This proximity creates a superheated environment, rapidly dehydrating the surface of the food – the very process that yields the coveted crispy skin and textured exterior.
It’s crucial to understand that the air fryer operates on a principle of rapid heat exchange. The intense heat quickly evaporates moisture from the surface of the chicken, resulting in browning and crisping. This is why it’s so important to dry the chicken thoroughly before applying the rub. A damp surface will steam, hindering the crisping effect.
Furthermore, air fryers aren’t like conventional ovens in terms of heat distribution. While ovens typically circulate heat evenly, air fryers concentrate the heat directly on the food. This isn’t necessarily a disadvantage; it’s precisely what creates the intense browning. However, it does mean you need to pay closer attention to the rotation of your food during cooking – typically, flipping the chicken halfway through – to ensure even browning on all sides. Without this careful monitoring and rotation, one side of the chicken might become excessively dark while the other remains paler.
Finally, the enclosed nature of the air fryer contributes to this effect. The sealed chamber traps the superheated air, amplifying the drying and browning process. This is why it’s important to avoid overcrowding the basket; sufficient space between pieces of food allows for optimal air circulation and, consequently, a more even and truly crispy result. heat circulation is key to understanding how the air fryer works. cooking techniques also play a role in achieving perfect results. Understanding these nuances – the proximity of the heat, the concentrated airflow, and the importance of rotation – is fundamental to successfully utilizing an air fryer, especially for dishes like rotisserie chicken, where achieving that desirable crispy skin is paramount. crispy skin is a critical goal, and the air fryer helps you to achieve it without the added calories and fat of deep frying. rotisserie chicken is a great demonstration of this technique.
Ingredients and Equipment Needed
To create a truly exceptional air fryer rotisserie chicken, you’ll need a few key ingredients and, crucially, the right equipment to ensure optimal results. Let’s break down everything you’ll require:
Ingredients:
-
Whole Chicken: The star of the show! A 3-4 pound chicken is ideal for most standard 5-quart air fryers. Larger chickens may need a larger air fryer, or you’ll need to cut them down. Aim for a chicken with good bone-to-meat ratio for maximum flavor. Chicken sourcing is key – look for a bird with vibrant color and plumpness. Consider organic or free-range options for better flavor and ethical sourcing. Rotisserie Chicken Recipes offer diverse flavor profiles to experiment with, but for this basic technique, we’ll focus on a simple, classic preparation.
-
Olive Oil: Approximately 2 tablespoons. High-quality olive oil (extra virgin is recommended) will significantly contribute to the crispy skin. Olive Oil Benefits extend beyond just cooking; it’s packed with antioxidants.
-
Salt and Black Pepper: Generous amounts. Seasoning is essential for flavor. Use coarse kosher salt for best results. Salt Alternatives if you’re watching your sodium intake, though salt is critical for flavor in this recipe.
-
Optional Seasonings: This is where you can personalize your chicken. Consider adding:
- Paprika (sweet or smoked) – Approximately 1-2 teaspoons. Paprika Varieties offer a spectrum of colors and flavors.
- Garlic Powder – 1 teaspoon.
- Onion Powder – 1 teaspoon.
- Dried Herbs (thyme, rosemary, sage) – 1-2 teaspoons total. Herbs and Spices are key to building complex flavors.
-
Lemon (Optional): Half a lemon, sliced, can be placed in the cavity of the chicken for added zest and aroma. Lemon Juice Recipes can add acidity and brightness.
Equipment:
-
Air Fryer: A 5-7 quart air fryer is recommended. Ensure it has a rotisserie basket or rack – this is vital for proper cooking and achieving crispy skin. Air Fryer Reviews highlight the importance of basket size and functionality.
-
Meat Thermometer: An instant-read meat thermometer is absolutely essential for ensuring the chicken is cooked to a safe internal temperature. Thermometer Types vary in accuracy and ease of use.
-
Tongs: For handling the chicken.
-
Cutting Board: A sturdy cutting board for preparing the chicken.
-
Sharp Knife: For carving the chicken. Knife Skills are useful for presentation and efficient carving.
-
Spray Bottle: For spritzing with oil. Oil Sprayer offers consistent, even coating.
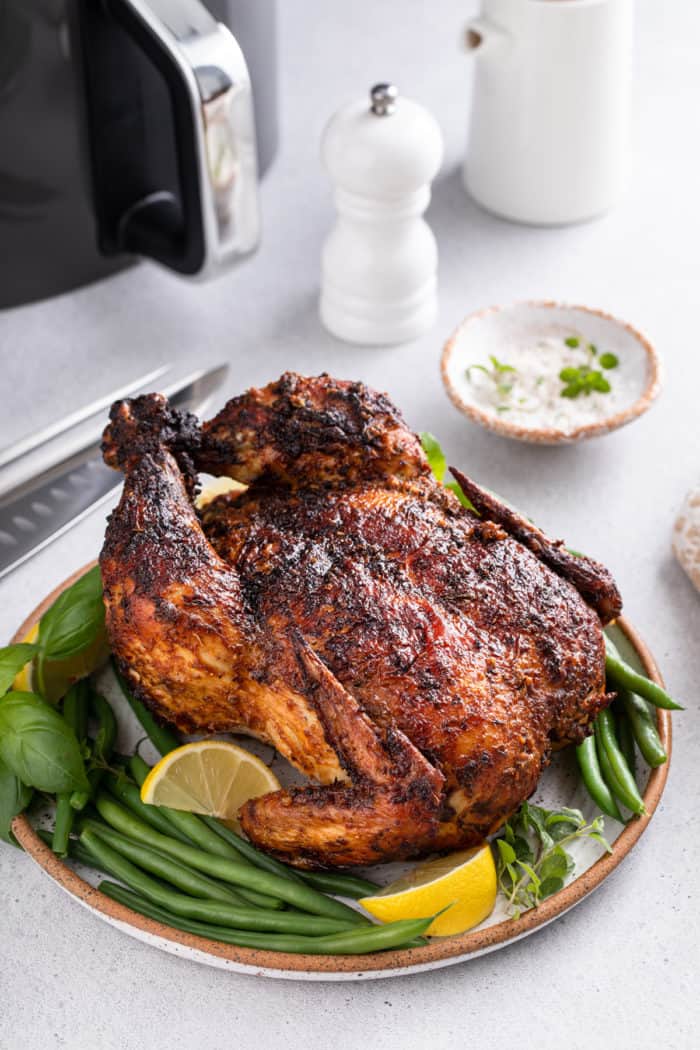
Preparing the Chicken for Crispy Skin
Achieving that signature rotisserie-style crispy skin on your air fryer chicken is key to a truly satisfying meal. It’s not just about slapping on some seasoning; it’s a multi-step process focused on maximizing surface area and creating the right conditions for dehydration – the secret to incredibly crisp skin. Here’s a breakdown of how to prepare your chicken for that coveted texture:
1. Dry Brining (Highly Recommended): The most impactful step, and one often overlooked, is dry brining. This involves liberally seasoning the chicken with salt – about 1 teaspoon per pound of chicken – and any desired spices (like black pepper, garlic powder, onion powder, paprika, or herbs) at least 4 hours, and ideally 24 hours, before cooking. The salt draws moisture out of the chicken, which then dissolves the salt and is reabsorbed back into the meat, resulting in a more seasoned and incredibly juicy bird. The long time frame allows the salt to penetrate deeply, creating a flavorful foundation. Place the chicken on a wire rack set over a baking sheet to allow for even drying. This also allows air to circulate around the chicken, further aiding the drying process. You can even add a little sugar to the dry brine for an extra level of caramelization during cooking – perhaps 1/2 teaspoon per pound. Consider using a coarse kosher salt for optimal brine absorption.
2. Patting Dry – The Crucial Step: Once the dry brining period is complete, thoroughly pat the chicken dry with paper towels. This is a critical step. Excess moisture is the enemy of crispy skin. Don’t just lightly dab at it; really press down and remove as much surface water as possible. Repeat this process a few times with fresh paper towels. The drier the skin, the better it will crisp up in the air fryer.
3. Separating the Skin (Advanced Technique – Improves Crispness): For a truly exceptional result, consider carefully separating the skin from the meat. This dramatically increases the surface area exposed to the hot air of the air fryer. To do this, use the handle of a wooden spoon or a butter knife to gently lift the skin away from the breast meat. Work your way around the entire chicken, loosening the skin as much as possible without tearing it. This doesn’t have to be perfect – a little bit of skin remaining is fine – but the more exposed surface area, the crispier the skin will be. Alternatively, you can use a sharp knife to make small cuts between the skin and meat, again increasing surface area. It’s a bit more delicate work, so proceed with caution.
4. Final Drying: After separating the skin (or even if you didn’t), give the chicken one last thorough drying with paper towels. Again, focusing on the skin. You want it to be as dry as possible before placing it in the air fryer.
5. Seasoning Right Before Cooking: Just before placing the chicken in the air fryer, you can give it a final sprinkle of your favorite spices. This isn’t essential, but it adds a final layer of flavor and ensures even distribution. Consider using a spice blend specifically designed for rotisserie chicken, or create your own using ingredients like smoked paprika, garlic powder, onion powder, black pepper, and herbs like thyme or rosemary.
Important Note: The air fryer environment is significantly drier than a conventional oven. This accelerated drying process is what makes achieving crispy skin possible. Don’t overcrowd the air fryer basket and ensure good air circulation for optimal results. A properly prepared chicken, with its dry skin and maximized surface area, is the key to unlocking the incredible, juicy-inside, crispy-outside experience you’re after. Don’t forget the paper towels! Learn more about dry brining Air Fryer Temperature Guide
Air Frying Instructions for Optimal Results
To achieve that coveted rotisserie-style crispy skin and juicy interior with your air fryer, precise timing and technique are key. Let’s break down the air frying process for maximum results.
Initial Air Frying (30 Minutes): Place the chicken, breast side down, directly into the preheated air fryer basket. Close the basket and set the temperature to 375°F (190°C) and the time for 30 minutes. This initial stage is crucial for establishing a solid foundation of heat and starting the browning process. The high heat encourages even cooking and begins to render the fat, contributing significantly to the crispy skin you’re aiming for. During this phase, monitor the chicken; you’ll start to notice some color development on the underside – this is exactly what you want.
Flip and Continue Air Frying (30 Minutes): After the initial 30 minutes, carefully flip the chicken over using a spatula. It’s important to do this gently to avoid tearing the skin. Return the chicken, skin-side up, to the basket. Maintain the temperature at 375°F (190°C) and continue air frying for an additional 30 minutes. This second stage is where the skin truly transforms – it will darken significantly, creating that signature rotisserie-like appearance. Maintaining consistent heat throughout this period is essential. Some air fryers may require occasional shaking of the basket to ensure even cooking; consult your air fryer’s manual for specific recommendations.
Final 15-Minute Blast (Optional, for Extra Crispness): For those who crave an exceptionally crisp skin, consider adding a final 15-minute blast at 400°F (200°C). This is ideal if you’re particularly focused on achieving maximum crispness. However, keep a close eye on the chicken – it can quickly go from perfectly crisp to burnt if you’re not vigilant. If you opt for this boost, monitor the skin frequently, and reduce the time if needed.
Tips for Air Fryer Success:
- Basket Loading: Don’t overcrowd the air fryer basket. Ensure there’s ample space around the chicken for optimal air circulation. This is key for even cooking and crisping. If needed, cook the chicken in batches.
- Spray with Oil: Lightly spray the chicken with cooking oil (vegetable, canola, or avocado oil) before air frying. This helps the skin brown beautifully and prevents it from sticking to the basket. Repeat spraying during the final 15 minutes for extra sheen and crispness.
- Don’t Open the Door Excessively: Each time you open the air fryer’s door, the temperature drops, which can negatively impact the cooking process. Only open the door when necessary (e.g., to check for doneness).
- Using a Thermometer: The most reliable way to confirm doneness is to use an instant-read meat thermometer. Insert the thermometer into the thickest part of the thigh – it should register 165°F (74°C).
By following these instructions and paying attention to the details, you’ll consistently achieve a restaurant-quality rotisserie chicken, perfectly cooked and boasting that irresistible crispy skin, all thanks to the power of your air fryer. Don’t forget to research different air fryer models online for tailored tips and recommendations.
Checking for Doneness and Resting
Ensuring your air fryer rotisserie chicken is cooked thoroughly is paramount for both safety and optimal flavor. Simply removing it from the basket doesn’t guarantee it’s reached the safe internal temperature of 165°F (74°C), which eliminates any potential bacteria. A crucial step often overlooked is verifying doneness using a reliable instant-read meat thermometer. Insert the thermometer into the thickest part of the thigh meat, avoiding any bone – bone heat can artificially inflate the temperature reading. A reading of 165°F (74°C) is the gold standard, confirming that the entire chicken, including the dark meat, is cooked through. Don’t rush this process; it’s far better to cook for a few extra minutes than to risk consuming undercooked poultry. Temperature monitoring is a key component of safe food handling.
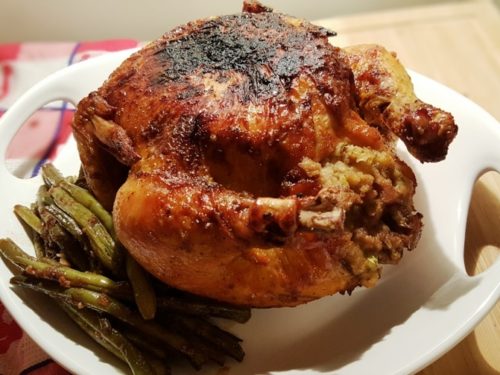
Once you’ve confirmed doneness, allow the chicken to rest for at least 5 to 10 minutes – longer resting periods (up to 15-20 minutes) can actually improve the juiciness of the meat. During this resting period, several important things happen. Firstly, the muscle fibers continue to relax, allowing the juices to redistribute throughout the meat. These juices, which have been forced towards the center during the cooking process, naturally flow back towards the surface, resulting in a noticeably more tender and flavorful chicken. Secondly, the heat continues to gently cook the chicken, further refining its texture and enhancing the overall flavor profile. Think of it as a final phase of cooking, finishing what the air fryer has begun. Resting meat is a practice championed by chefs worldwide for a reason – it’s transformative for the final product. During this period, you can also carve the chicken, making it easier to serve. Carving chicken is often a great way to leverage the rest period.
Furthermore, resting allows the surface of the chicken to cool slightly, which will also make it easier to handle without burning your hands. This is particularly important if you plan to slice the chicken or serve it immediately after carving. Best practices for serving meat include ensuring adequate resting time. Finally, remember that resting isn’t just about the chicken itself; it’s also about your patience. Taking the extra few minutes to rest your rotisserie chicken will yield a far superior result – a moist, flavorful, and incredibly tender piece of poultry that’s truly worth the wait. It’s a final step that elevates the entire experience from a simply cooked chicken to a truly impressive dish. Don’t skip it! Rotisserie chicken serving suggestions are a great way to enjoy the rest period.
Serving Suggestions and Variations
The beauty of air-fried rotisserie chicken lies not just in the perfectly crisp skin and juicy meat, but also in its incredible versatility. Once you’ve achieved that exceptional golden-brown finish, you’re presented with a multitude of delicious ways to enjoy your creation. This isn’t just a meal; it’s a canvas for culinary creativity.
Immediate Enjoyment: The most straightforward approach is, of course, to simply slice and serve. For a classic rotisserie experience, carve the chicken into traditional pieces – legs, thighs, and breasts – and arrange them attractively on a platter. Serve with your favorite sides like roasted vegetables – root vegetables – such as carrots, parsnips, and potatoes, or a vibrant salad green salad with a light vinaigrette. A drizzle of flavorful herb oil adds a sophisticated touch. For a quick and easy meal, consider serving the chicken over a bed of fluffy rice or quinoa grain.
Transforming the Chicken: But the air fryer’s true potential shines when you start transforming the chicken itself. Shredded rotisserie chicken is a superstar in numerous dishes. It’s incredibly convenient for adding protein to tacos or burritos, elevating them to a whole new level. You can also incorporate it into salads for a protein-packed addition. A classic chicken noodle soup is quickly made with shredded rotisserie chicken, making it a comforting and satisfying meal. Experiment with adding it to casseroles – a creamy chicken and mushroom casserole is a particular favorite. It’s also fantastic in wraps or sandwiches, offering a convenient and delicious option for lunch or dinner. For a touch of international flavor, consider using the shredded chicken in a chicken stir-fry with your favorite vegetables and sauce. Even a simple chicken and avocado salad is instantly elevated by the rotisserie chicken’s flavor and texture.
Flavor Boosts: Don’t underestimate the power of adding extra flavor. A squeeze of fresh lemon juice brightens up the chicken. Herbs are your friend – consider using chopped fresh parsley, cilantro, or thyme herb to enhance the taste. A sprinkle of smoked paprika adds a delightful smoky flavor. Experiment with different spices – cumin, chili powder, or even a pinch of cinnamon can add surprising depth and complexity. You can easily create a flavorful dip using Greek yogurt, herbs, and spices to serve with the chicken. Adding a small amount of bone broth while shredding can add incredible richness and flavor to the chicken and is a great way to use up the flavorful bones after air frying.
Ultimately, the possibilities are endless. The key is to embrace the versatility of your air-fried rotisserie chicken and let your culinary creativity guide you. Enjoy exploring all the ways you can transform this exceptional dish!
 ,
, ,
, ,
, ,
, ,
, ,
, ,
, ,
,